

In the world of cybersecurity, staying ahead of threats requires not only sharp skills but also powerful, efficient workflows. This guide will walk you through setting up a sophisticated environment that combines the principles of Detection-as-Code with AI-driven analysis to automate and enhance your threat-hunting capabilities within Google Security Operations (SecOps).
We'll cover two main parts: first, setting up a "Detection-as-Code" pipeline using GitHub to manage your security rules, and second, integrating AI and the Model Context Protocol (MCP) to supercharge your analysis and response.
This guide extends the notable work of David French on Detection-as-Code and Brian Ray's post on AI-driven security with MCP to provide a prescriptive workflow.
Part 1: Setting Up Your Detection-as-Code Pipeline
This pipeline allows you to manage your detection rules in a version-controlled, automated, and collaborative way.
Prerequisites
Before you begin, make sure you have the following installed and configured:
- Visual Studio Code (VS Code)
- Python
- uv (a fast Python package installer)
- gcloud CLI
- A GitHub account
- A Google Cloud Project
Step 1: Fork and Clone the Detection Rules Repository
- Fork the Repository: Start by creating your own copy of the official Google Cloud detection rules repository. Navigate to https://github.com/chronicle/detection-rules and click the "Fork" button. This will create a copy of the repository under your own GitHub account.
Note: there is a .gitignore file under tools/content_manager, which you should bring to the root of your repo.
- Clone to Your Local Machine: Open VS Code and clone the repository you just forked. You can do this by opening the Command Palette (Ctrl+Shift+P or Cmd+Shift+P), typing Git: Clone, and pasting the URL of your forked repository.
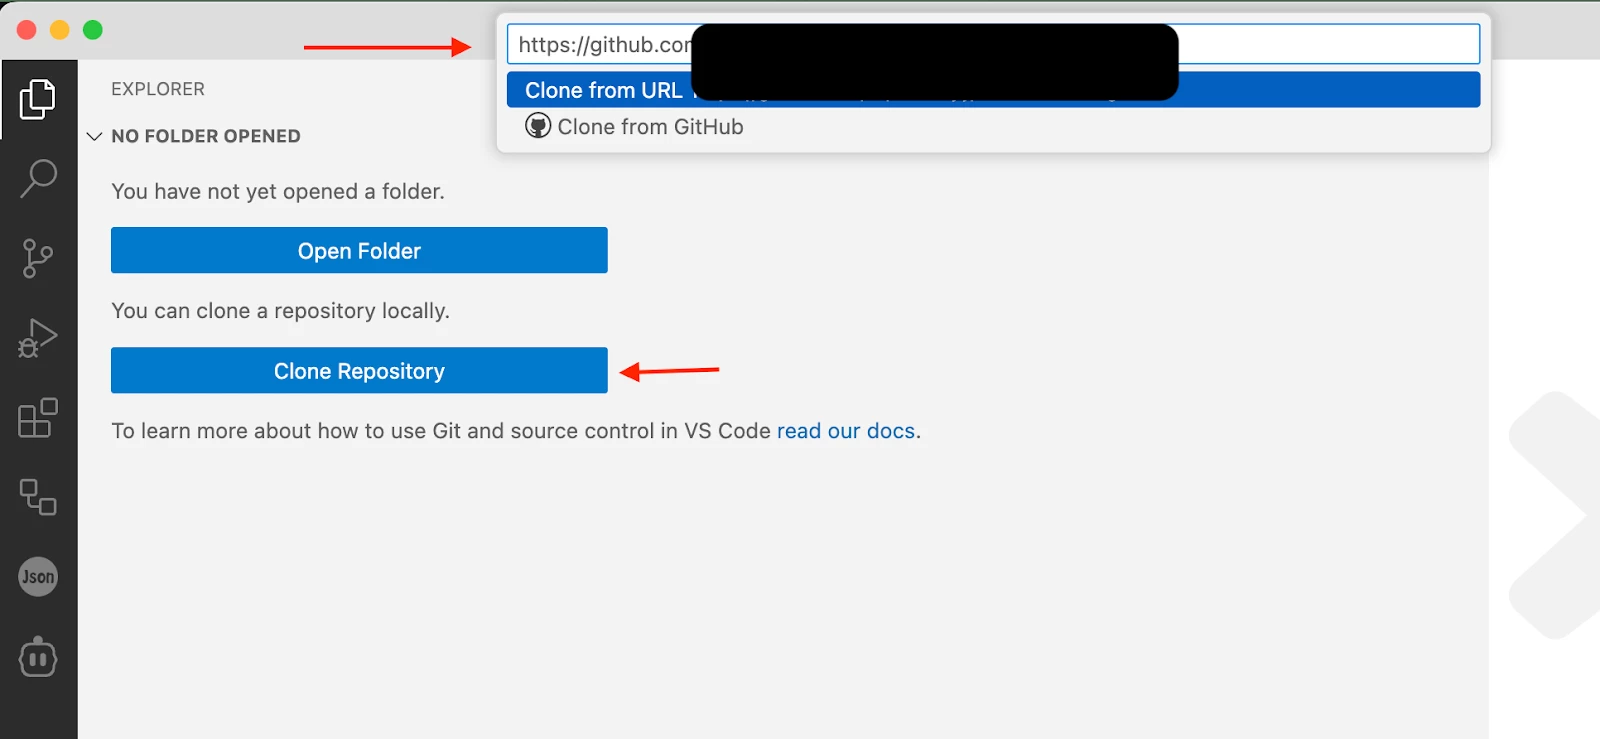
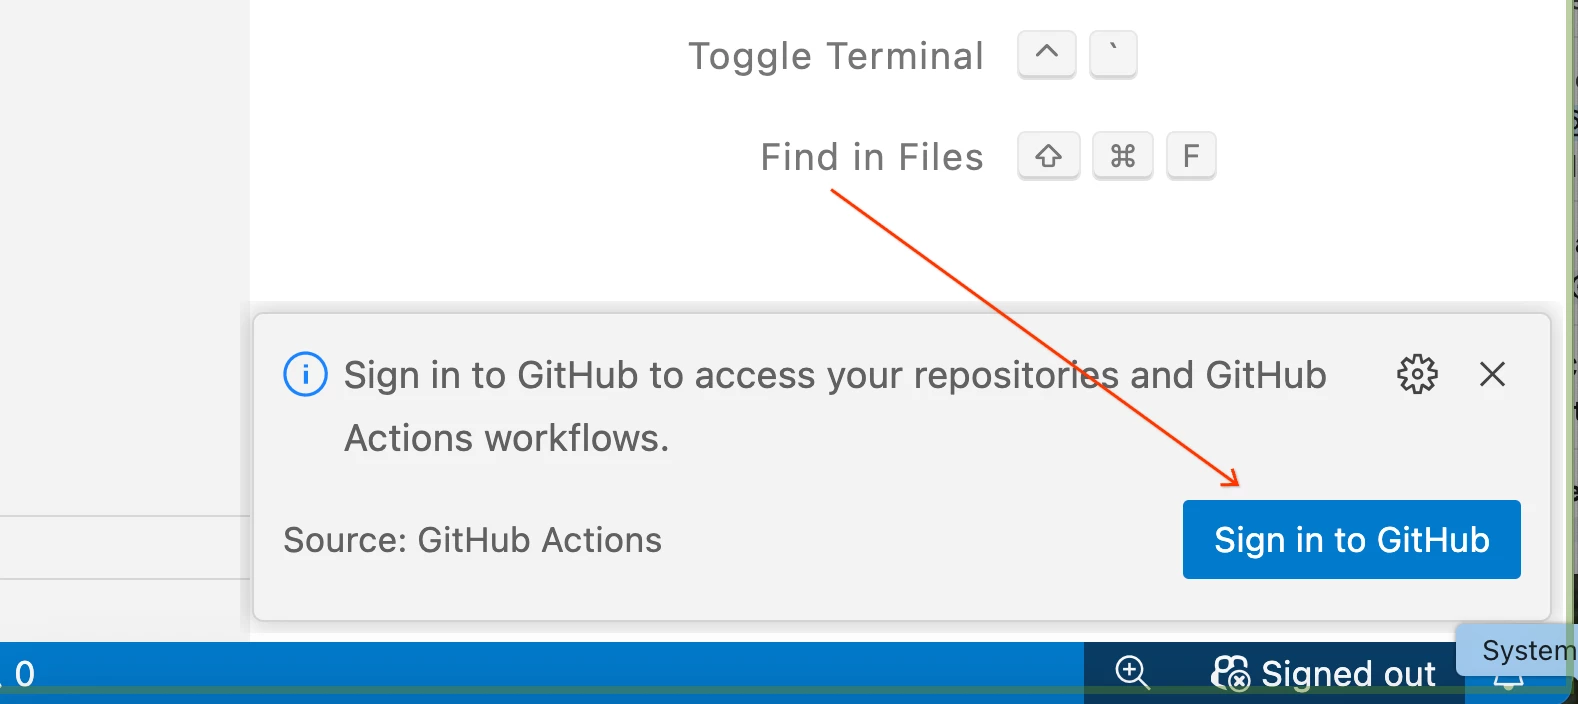
- Sign in to GitHub from VS Code: Once cloned, VS Code may prompt you to sign in to your GitHub account. This will integrate your local environment with your remote repository, allowing you to sync changes.
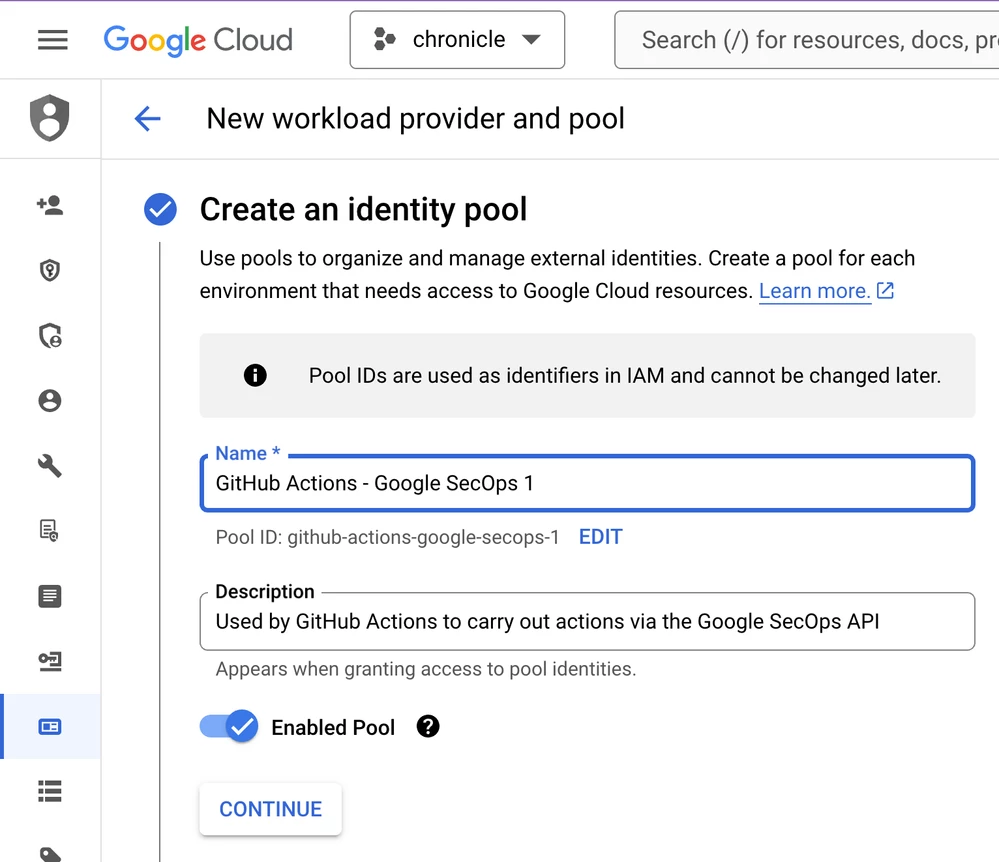
Step 2: Configure Workload Identity Federation in GCP
To allow GitHub Actions to securely interact with your Google Cloud project without using service account keys, you'll set up Workload Identity Federation.
- Create an Identity Pool: In the Google Cloud Console, search for "Workload Identity Federation" and create a new identity pool. Give it a descriptive name like GitHub Actions - Google SecOps.
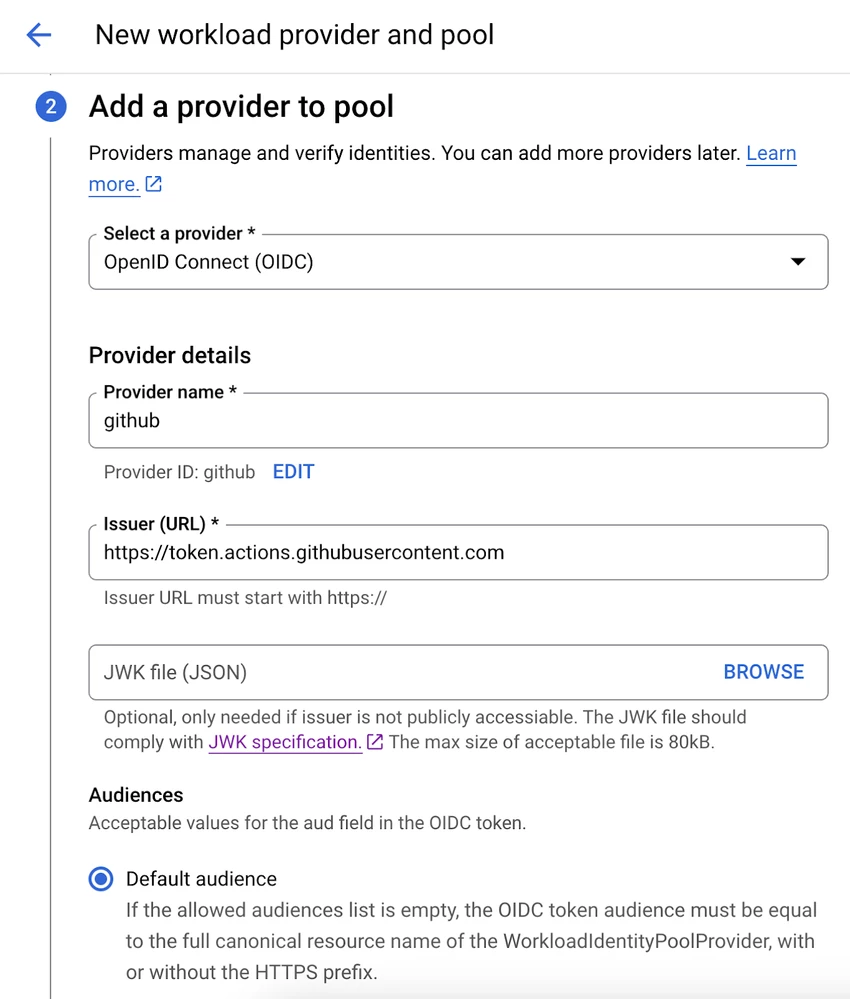
- Add a Provider: Configure a new OpenID Connect (OIDC) provider for the pool.
- Issuer (URL): Set this to https://token.actions.githubusercontent.com.
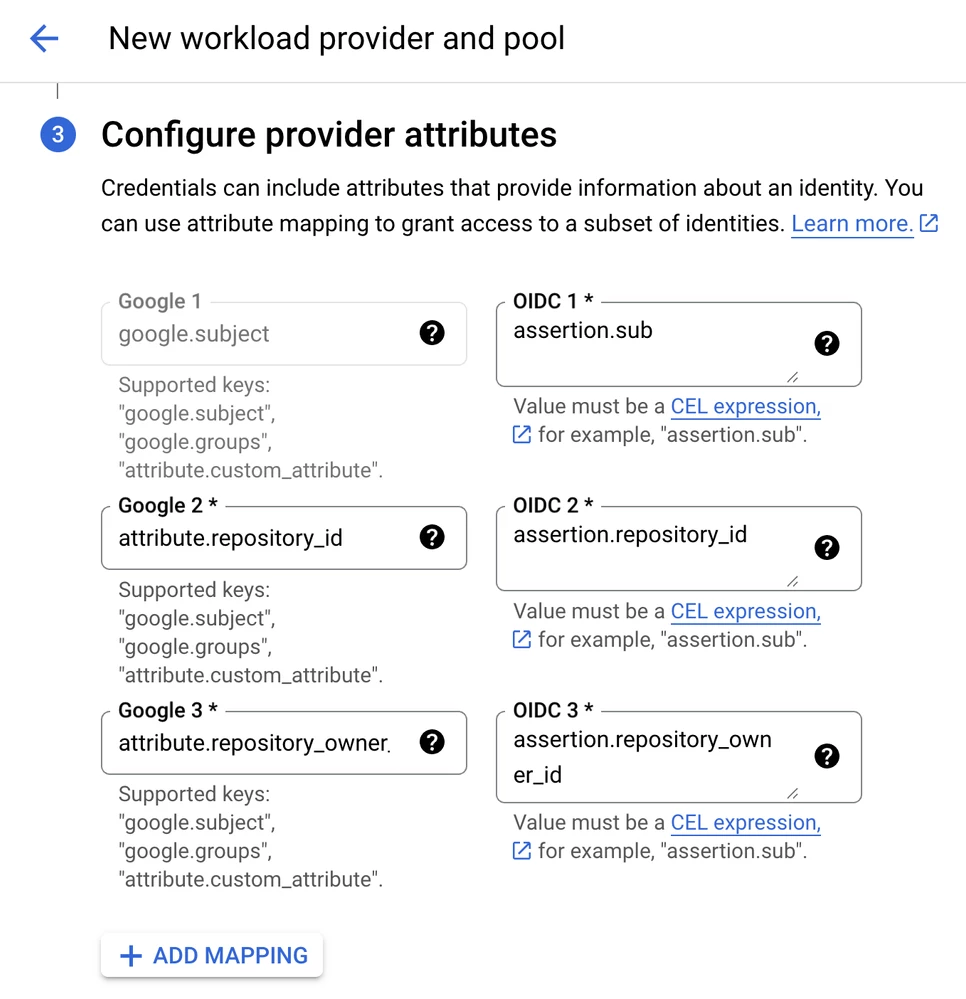
- Attribute Mapping: Map the following attributes to grant access to specific identities:
- google.subject | assertion.sub
- attribute.repository_owner | assertion.repository_owner_id
- attribute.repository_id | assertion.repository_id
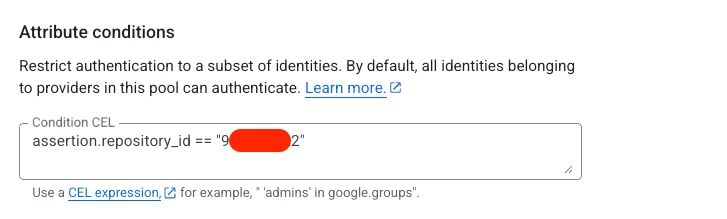
- Set Attribute Conditions: To restrict which repositories can authenticate, add a condition. You'll need your repository's ID, which you can find by viewing your GitHub repo's page source and searching for octolytics-dimension-repository_id.
Add the condition: assertion.repository_id == "[YOUR-REPO-ID]".
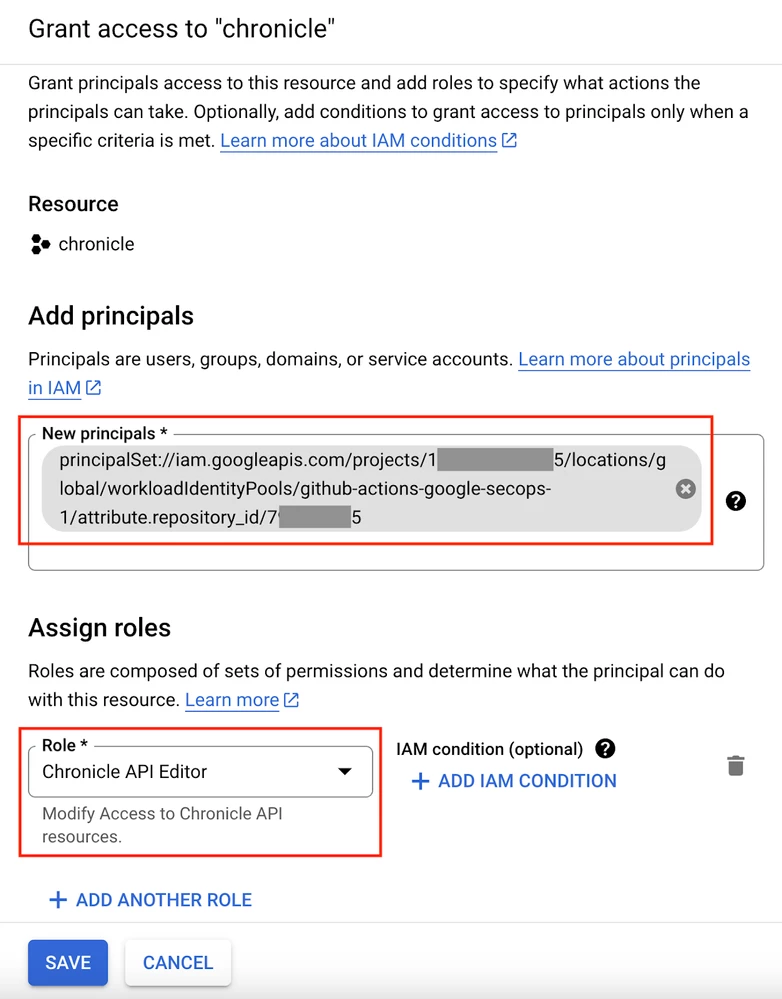
- Grant IAM Permissions: In the IAM & Admin section of the Google Cloud Console, grant the Chronicle API Editor role to the principal set you just created. The principal will follow this format (replace the bracketed values with your own): principalSet://iam.googleapis.com/projects/[GCP-PROJECT-NUMBER]/locations/global/workloadIdentityPools/[POOL-ID]/attribute.repository_id/[REPO-ID]
Step 3: Configure GitHub Actions
- Enable Workflows: In your forked repository on GitHub, go to the "Actions" tab and enable the workflows.

- To provide a ready-to-use automation template, this guide uses a companion repository containing pre-configured GitHub Actions.
You will need to copy these sample workflows into your forked repository.
- Navigate to the workflows folder in the companion repository here: https://github.com/acidack/blog/
- Download the three .yml files (Update Remote Content.yml, Pull Latest Content.yml, Run Tests.yml).
- In your forked repository, upload these files into the .github/workflows/ directory.
Note: Before running any third-party workflows, it is always best practice to review the contents of the YAML files (.yml) to understand the permissions they require and the actions they will perform in your environment. The above are samples of Github Actions you can modify to suit your requirements e.g. updating the workflows to ensure it refers to the respective path for tools/content_manager
- Set Environment Variables and Secrets: To allow the GitHub Actions to connect to your Google SecOps instance, you need to configure environment secrets and variables. Navigate to your repository's Settings > Secrets and variables > Actions.
- Create a new environment called .env.
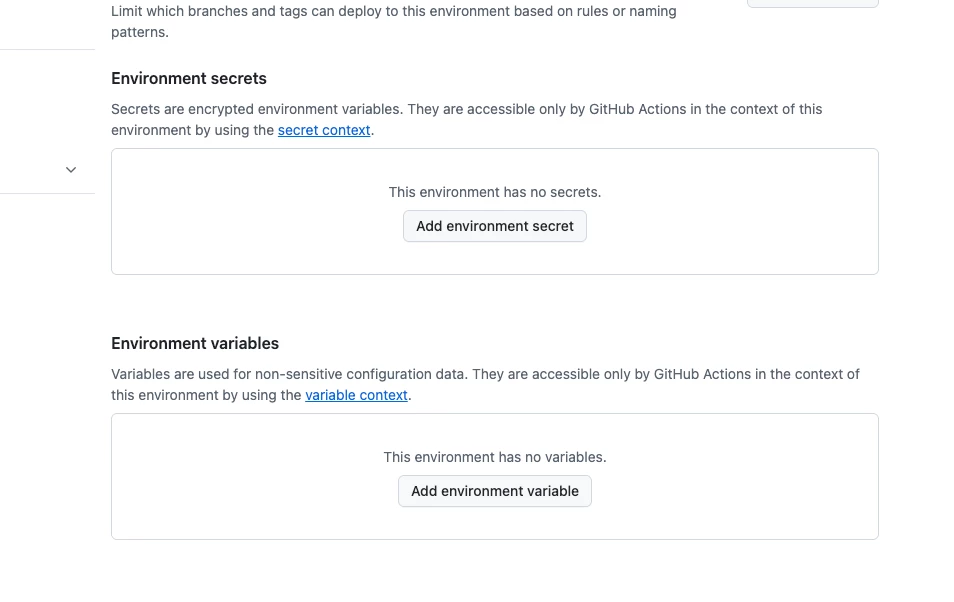
- Add the following Environment Variables:
| Name | Value |
| AUTHORIZATION_SCOPES | {"GOOGLE_SECOPS_API":["https://www.googleapis.com/auth/cloud-platform"]} |
| GOOGLE_CLOUD_PROJECT_ID | <GCP Project ID> e.g. myproject-373104 |
| GOOGLE_SECOPS_API_BASE_URL | https://<regionid>-chronicle.googleapis.com/v1alpha e.g.: https://us-chronicle.googleapis.com/v1alpha The following are the supported region IDs: asia-southeast1, australia-southeast1, europe, eu, europe-west2, europe-west3, europe-west6, govcloud-US, me-west1, and us. |
| GOOGLE_SECOPS_API_UPLOAD_BASE_URL | https://<regionid>-chronicle.googleapis.com/upload/v1alpha e.g.: https://us-chronicle.googleapis.com/upload/v1alpha The following are the supported region IDs: asia-southeast1, australia-southeast1, europe, eu, europe-west2, europe-west3, europe-west6, govcloud-us, me-west1, and us. |
| GOOGLE_SECOPS_INSTANCE | projects/<GCP Project ID>/locations/<regionID>/instances/<secops-customer-id> e.g.: projects/myproject-373104/locations/us/instances/bc12345-8692-4184-a40d-6c12ff58a350 The following are the supported region IDs:
|
| LOGGING_LEVEL | INFO |
- Add the following Secret:
| GOOGLE_CLOUD_WORKLOAD_IDENTITY_PROVIDER | projects/<GCP Project number>/locations/global/workloadIdentityPools/<PoolID>/providers/<ProviderID>
e.g. projects/123456789012/locations/global/workloadIdentityPools/mypoolid/providers/myproviderid Note:
|
Step 4: Test the Pipeline
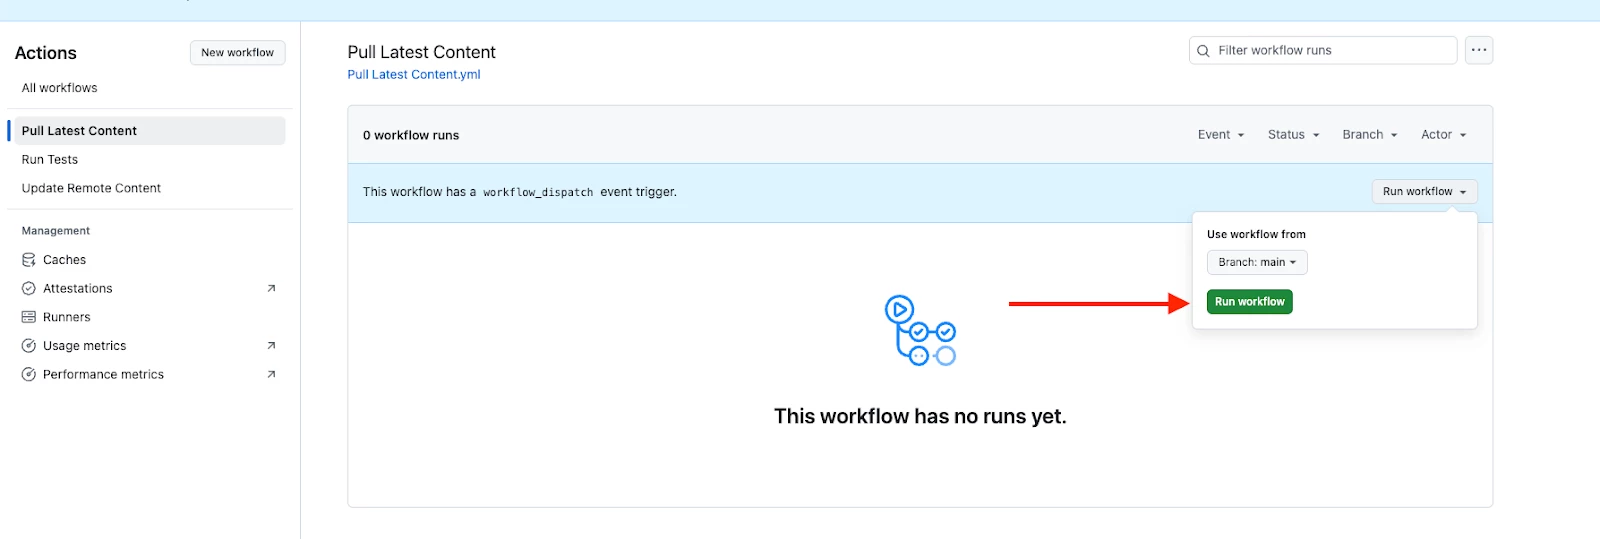
- Pull Existing Rules: In the "Actions" tab of your GitHub repo, find the "Pull Latest Content" workflow and run it. This will connect to your Google SecOps instance and pull all your existing detection rules into the repository.
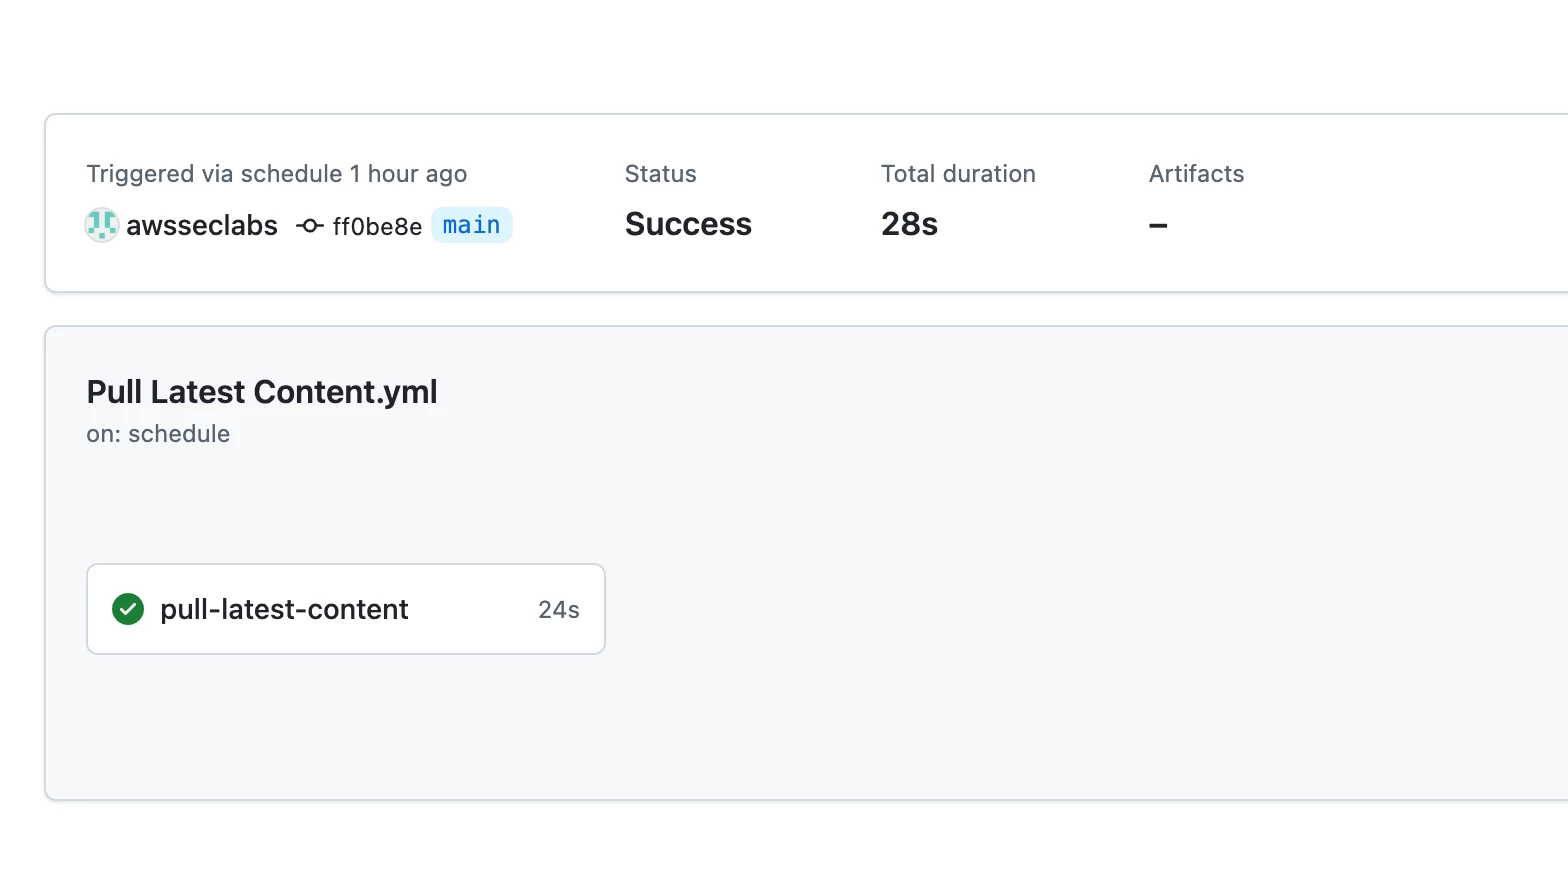
- If successful, you should see the rules within the detection-as-code -> rules folder. Also, your “pull-latest-content” action should have completed successfully.
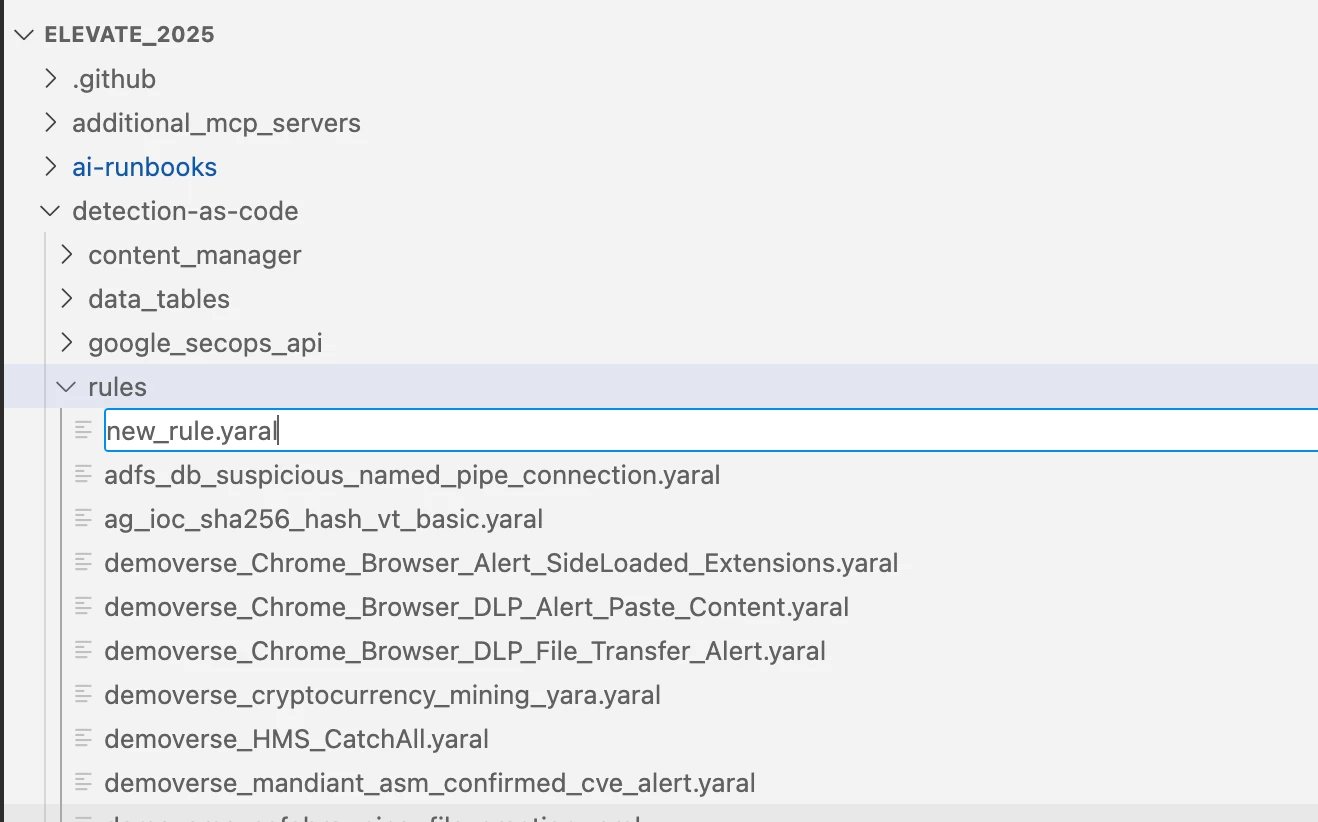
- Create a New Rule:
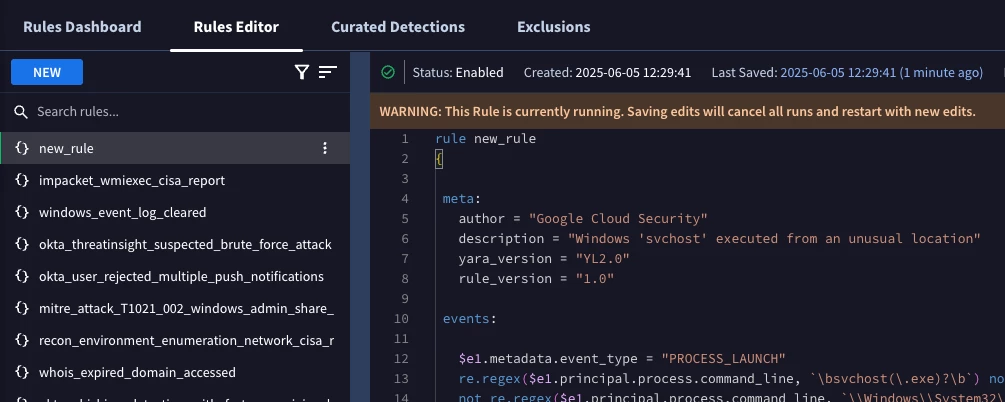
- In VS Code, create a new Yara-L rule file (e.g., new_rule.yaral) inside the rules folder.
- Add a corresponding entry for your new rule in the rule_config.yaml file.
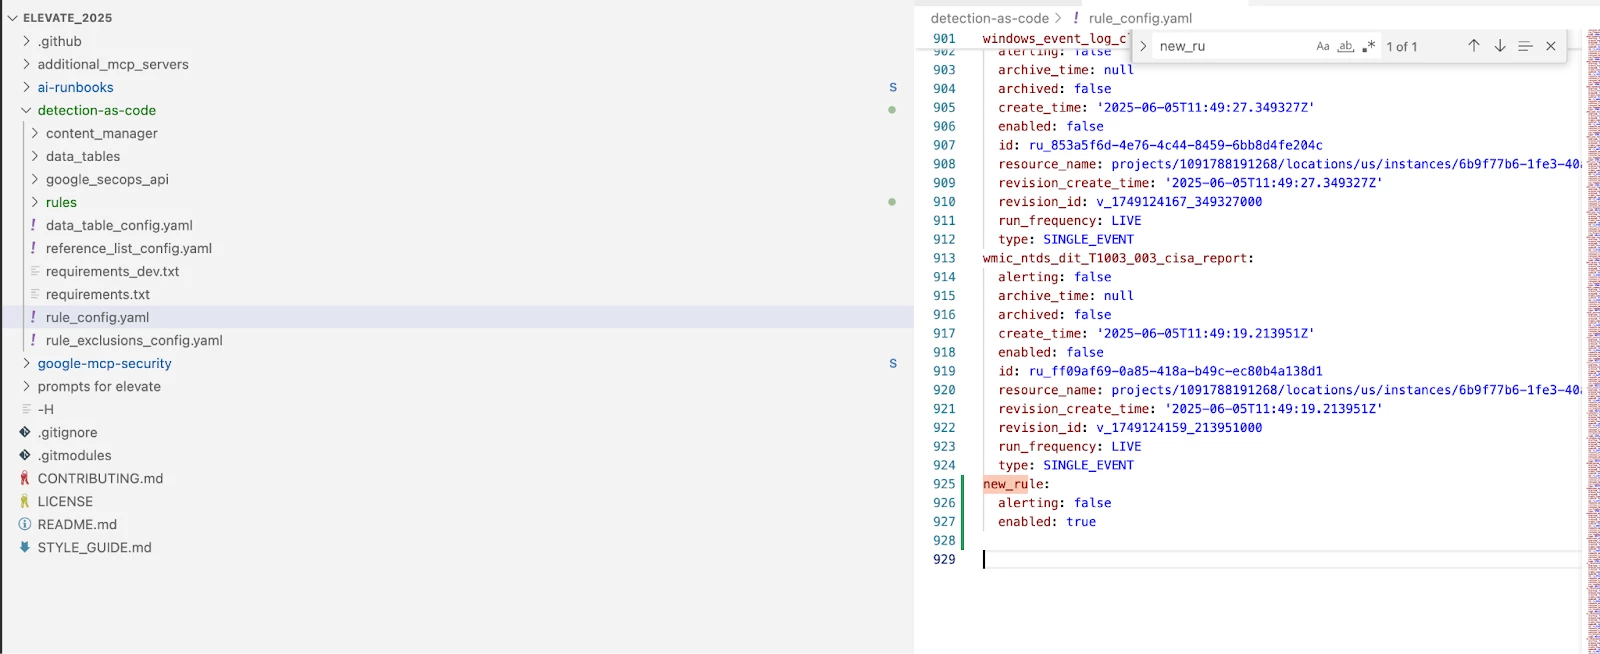
Example:
new_rule:
  alerting: false
enabled: true- Commit and Sync:
- Use the Source Control panel in VS Code to commit your changes with a descriptive message like "feat: add new detection rule".
- Click "Sync Changes" to push the commit to your GitHub repository.
This will trigger the "Update Remote Content" GitHub Action, which will automatically test and upload your new rule to your Google SecOps instance. You can then verify that the new rule appears in the Rules Editor.
Part 2: Integrating AI for Enhanced Threat Hunting
Now that you have an automated detection pipeline, let's bring in AI to help with analysis, threat intelligence, and even rule creation. We will use the Model Context Protocol (MCP) to connect a large language model (LLM) to your security tools.
Prerequisites
- Complete all steps in Part 1.
- The mcp-security repository, which you can find here: https://github.com/Google/mcp-security.
- The ai-runbooks repository, found at: https://github.com/dandye/ai-runbooks/.
Step 1: Set Up the MCP Environment in VS Code
- Clone https://github.com/Google/mcp-security to your local machine.
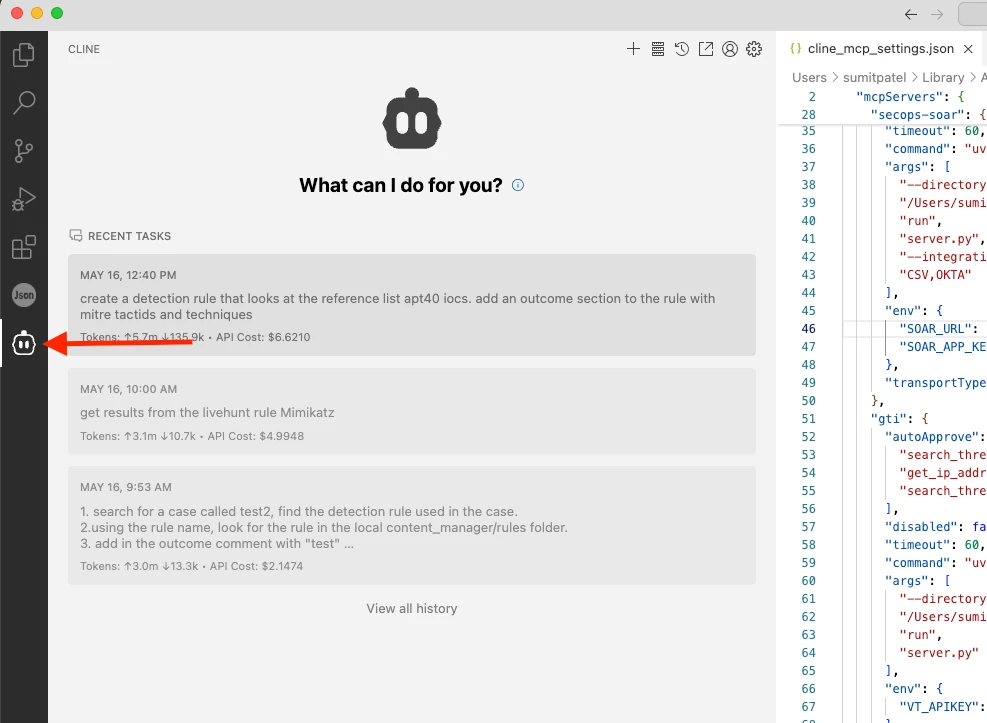
- Install the CLINE Extension: In VS Code, install the cline.bot extension from the marketplace. This provides the interface for interacting with the AI.
- In the CLINE extension, navigate to the Marketplace > Installed and select "Configure MCP Servers".
- This will open the cline_mcp_settings.json file. Here, you will define the paths to the different MCP servers located in the mcp-security repository you cloned (e.g., for SecOps, GTI, SCC).
- Update the args to point to the correct directory on your local machine. For example: "/path/to/your/mcp-security/server/secops/secops_mcp"
Step 2: Connect to a Gemini Model
You have two main options for providing the AI model that CLINE will use:
- Option 1: Use Vertex AI in GCP:
- In the CLINE settings, set the API Provider to GCP Vertex AI.
- Fill in your Google Cloud Project ID and region.
- Authenticate by running gcloud auth application-default login in your terminal.
- Option 2: Use a Google AI Studio API Key:
- Go to https://aistudio.google.com and generate a new API key.
- In the CLINE settings, set the API Provider to Google Gemini and paste your API key.
Step 3: Supercharge Your Workflow with AI
With everything configured, you can now use natural language to perform complex security tasks. Try prompts like:
- "Tell me more about the threat actor APT43, including their common TTPs and any IOCs seen in the last 30 days."
- "Analyze CVE-2025-0108. Based on the indicators, are we impacted?"
Step 4: Lets bring MCP Servers and Detection-As-Code together
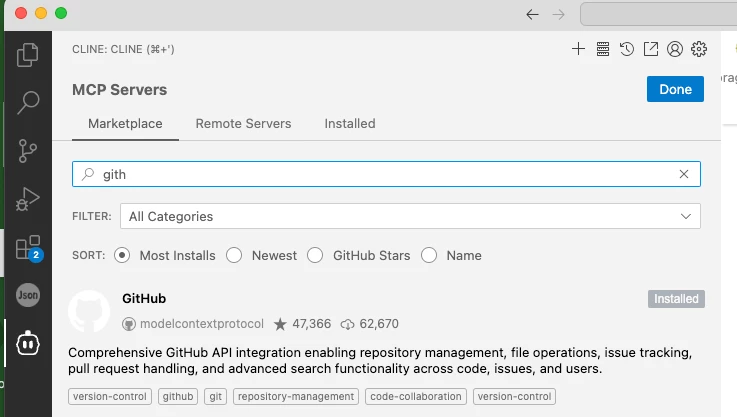
- Install MCP Server Github integration in your Visual Studio Code.
- Set it up, it will require a Personal Access Token to be generated from your Github account. To find your Personal Access Token:
- Under your GitHub user profile (not the repository profile), click the “Settings” link.
- Scroll down and click the “Developer Settings” link.
- Click the GitHub “Personal access tokens” link.
- Click the “Generate new token” link and provide your password again if required.
- Provide a name for the GitHub personal access token in the “Note” field.
- Set the access token’s expiration timeout to something appropriate.
- Click “Generate token”
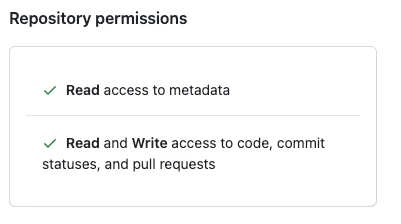
- Give the following permissions for read/write access
- Commit statuses
- Contents
- Pull Requests
- With everything configured, you can now use natural language to perform complex security tasks. Try prompts like:
- Search for recent SOAR cases in Google SecOps that are closed with the root cause, "normal behavior". Use the analyst's comments from the case to do the following:
- Understand which rule(s) generated the alerts that are in the closed SOAR case.
- Using the rule name(s) that generated the alerts, look for the rule in the local rules directory.
- Create a new branch and merge request in the GitHub project "<your-user-name>/<your-repo-name>" that contains the proposed changes to the detection logic for the rule(s) associated with the case.
Wrapping Up
We have now connected using Visual Studio Code and GitHub to your tools via MCP, you can now query your Google SecOps instance for data, analyze vulnerabilities, and even draft new detection rules for you to review and deploy through your Detection-as-Code pipeline.
By combining these workflows, you create a powerful, semi-automated system where you can manage detections as code and leverage AI to accelerate your threat intelligence and hunting efforts.