

The world has changed a lot since we started to speak about the options for data residency, operational transparency and privacy controls in Google Cloud. We’re in an era defined by data and digital transformation, where the concept of digital sovereignty has taken center stage, especially in Europe. Organizations are increasingly seeking AI solutions that not only drive innovation, but also respect and enforce regional regulations like GDPR, data security, privacy and sovereignty.
As a continuation of our recent blog on how to deploy serverless AI with Google Gemma 3 on Cloud Run, today’s blog guides our customers through how to implement this AI service using Assured Workloads in the Sovereign Controls by Partners environment.
Google Cloud enables GDPR compliance, while allowing our customers to run generative AI services with sensitive data like personal, health or intellectual property data with the highest level of trust. In some cases customers want to have additional control on how their data is managed, and Sovereign Controls by Partners brings them the tools to do so. Keep reading to learn more, including the optimal configurations that enforce security, data protection, and GDPR compliance.
Understanding Digital Sovereignty in the European Context
Digital sovereignty, in the European context, is about ensuring that organizations have control over their data and digital processes. This includes:
- Data Residency: Ensuring data is stored and processed within a specific geographic boundary.
- Compliance with Regulations: Adhering to laws which mandates strict data protection and privacy measures.
- Protection against extra-territorial laws: Through detailed frameworks to be followed by providers for critical digital infrastructure and services.
Sovereign Controls by Partners: A Foundation for Sovereign AI
In this blog post we will deploy in Europe using the Google Cloud's Sovereign Controls by SIA service. It provides a robust environment to address these needs. Developed in partnership with SIA and Minsait, it offers a comprehensive set of controls:
- Data Residency: The data remains in Spain.
- External Key Management including Key Access Justification: The customer maintains control over the encryption keys, with detailed justification for any access.
- European Support: Access to support teams based in Europe.
- Access Approval: The customer has granular control and must approve any access to their data.
- Access Transparency: Detailed logs provide full visibility into access to the customer’s environment.
These controls provide a strong foundation for deploying AI solutions that meet the stringent requirements of digital sovereignty and GDPR.
Deploying a Sovereign AI Solution
Let's walk through deploying a Gemma model in a Sovereign Controls by SIA environment. We will use a Cloud Run deployment, drawing inspiration from this guide here and using Ollama, as a proof of concept.
Step 1: Setting up the Sovereign Environment
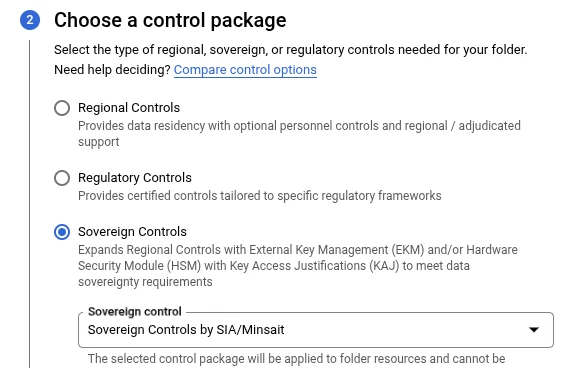
1. Deploy a Sovereign Controls by SIA folder: This establishes the overarching boundary for your sovereign environment. The main documentation to create a Sovereign Control’s folder can be found in this link.
The process is fairly easy to follow and it requires creating an Assured Workloads folder, selecting, in this case, The Sovereign Controls by SIA/Minsait control package.
When a Sovereign Controls by Partners folder is created, it automatically creates a KMS project that will be the link between Google Cloud and the External Key Manager, deployed and managed by the Partner and hosted outside the Cloud, providing not only control but also possession of the key manager outside Google Cloud.
We will be creating the keys in step-2.
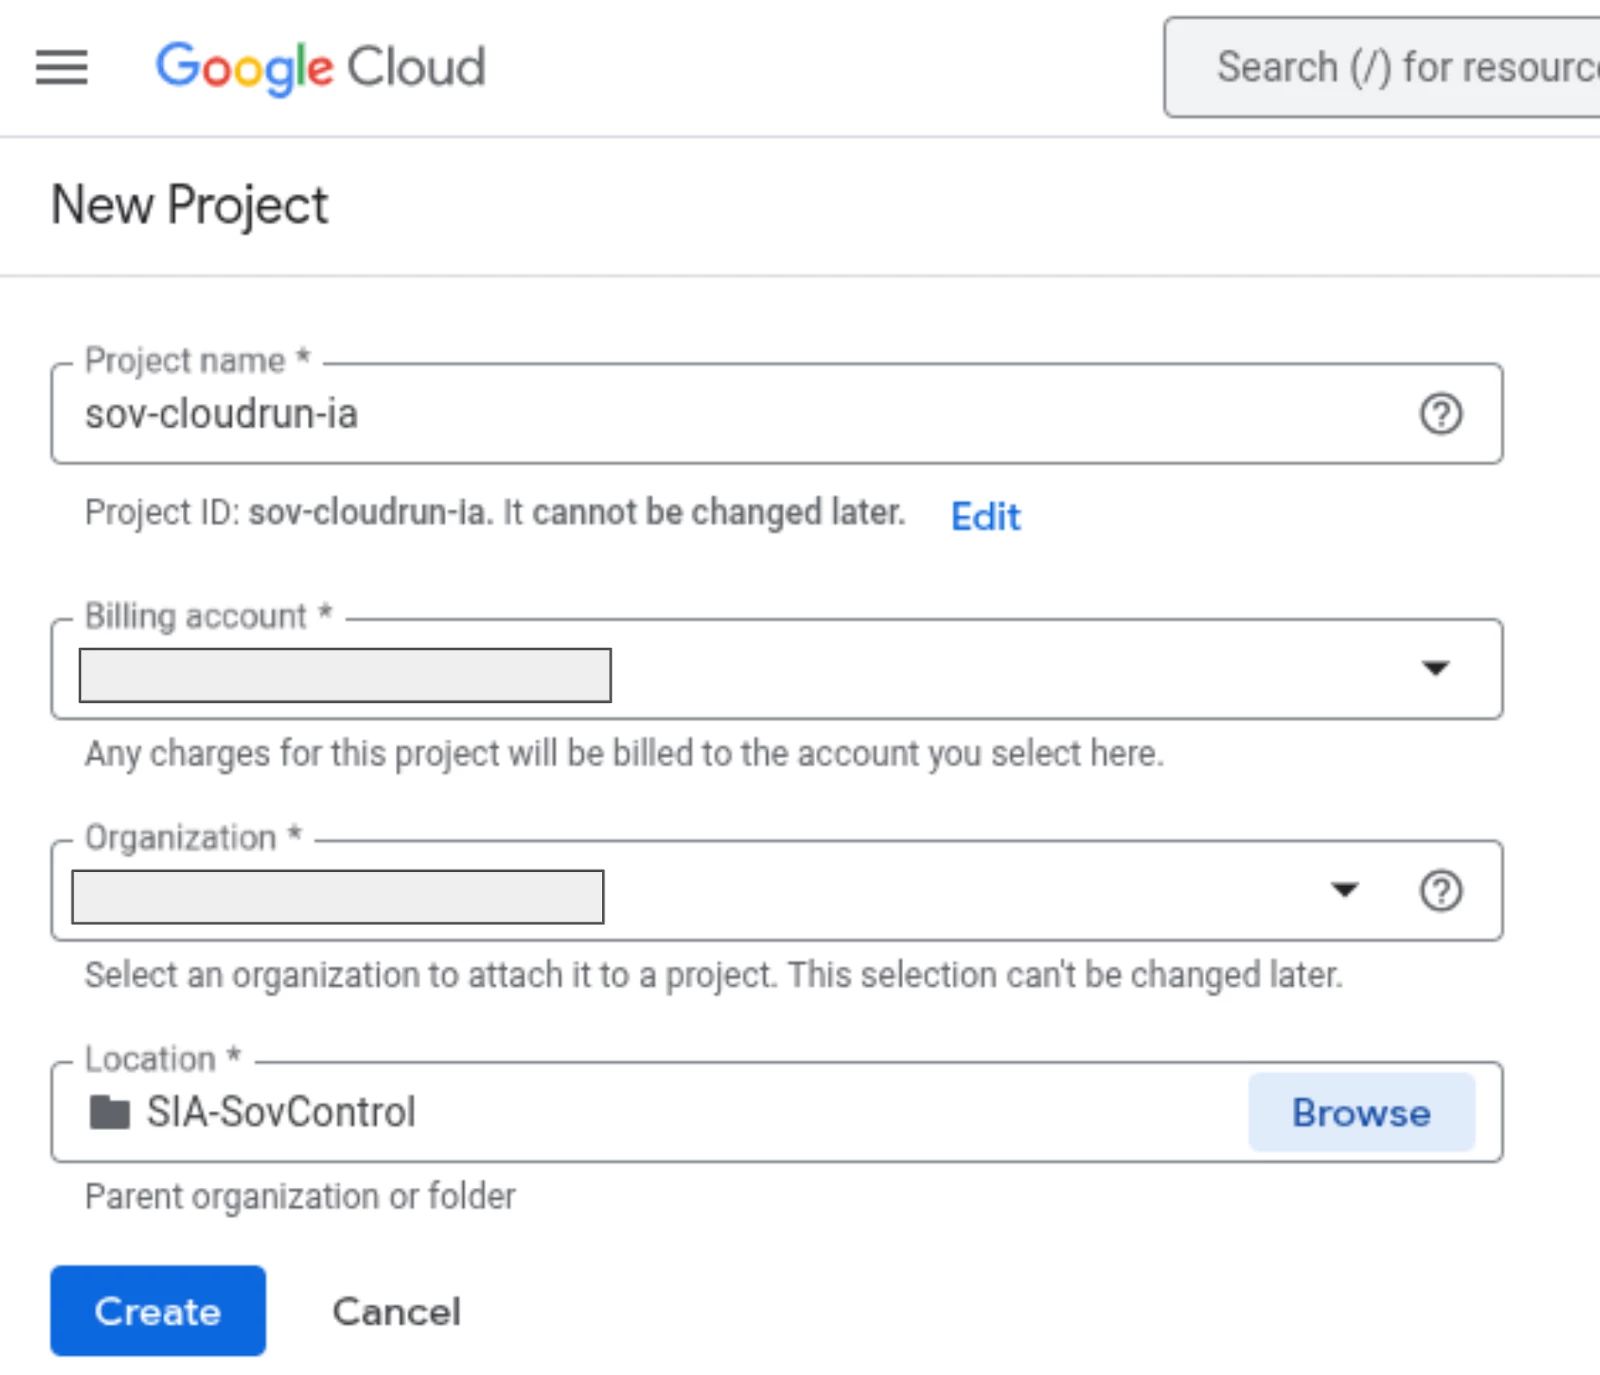
2. Create a Project within the Folder: For our example, we'll create a project named "sov-cloudrun-ia". By placing that project in the previously created folder, it will automatically receive all sovereignty controls provided by Sovereign Controls by SIA/Minsait.
Step 2: Generating Keys for the services.
Security is paramount. We'll generate the necessary keys to secure our services deployment.
This process includes:
- Generating external encryption keys with minimal necessary permissions.
- Storing keys securely, outside Google Cloud, in the Partner environment, using Cloud External Key Manager Service (EKM).
- Leveraging Key Access Justification to log and control key usage.
The user will create the external keys using the Key Management Service in the project that will automatically launch the creation of the keys in the Partner’s external systems.
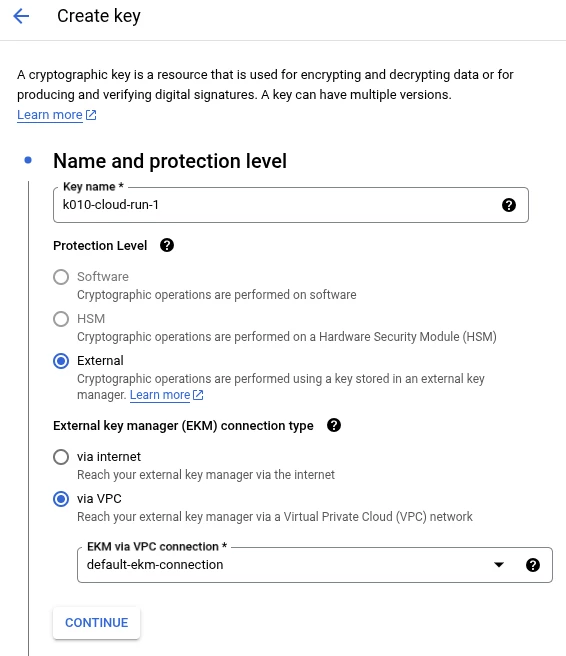
For this deployment we will be using several services and we will be able to create different external keys, one per service so we can increase the confidentiality of our data.
We will be using the following services that will use a different key:
- Artifact Registry that will receive the key k009–artifact-registry-1.
- Cloud Run will use the k010-cloud-run-1.
Step 3: Build the docker image and deploy it in Artifact Registry
We will need to enable Artifact Registry and create a repository to store our docker images.
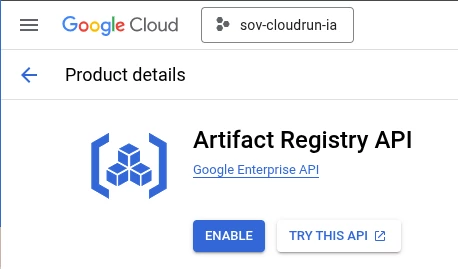
Once the API is enabled, it is possible to create a repository.
Creating an Artifact Registry is fully documented in the Artifact Registry’s documentation but the relevant inputs for this initiative are listed in the screenshot below:
- Location should be Regional and the region in Spain should be selected.
- The Cloud KMS external key needs to be selected and it must be one of the keys that we have previously created.
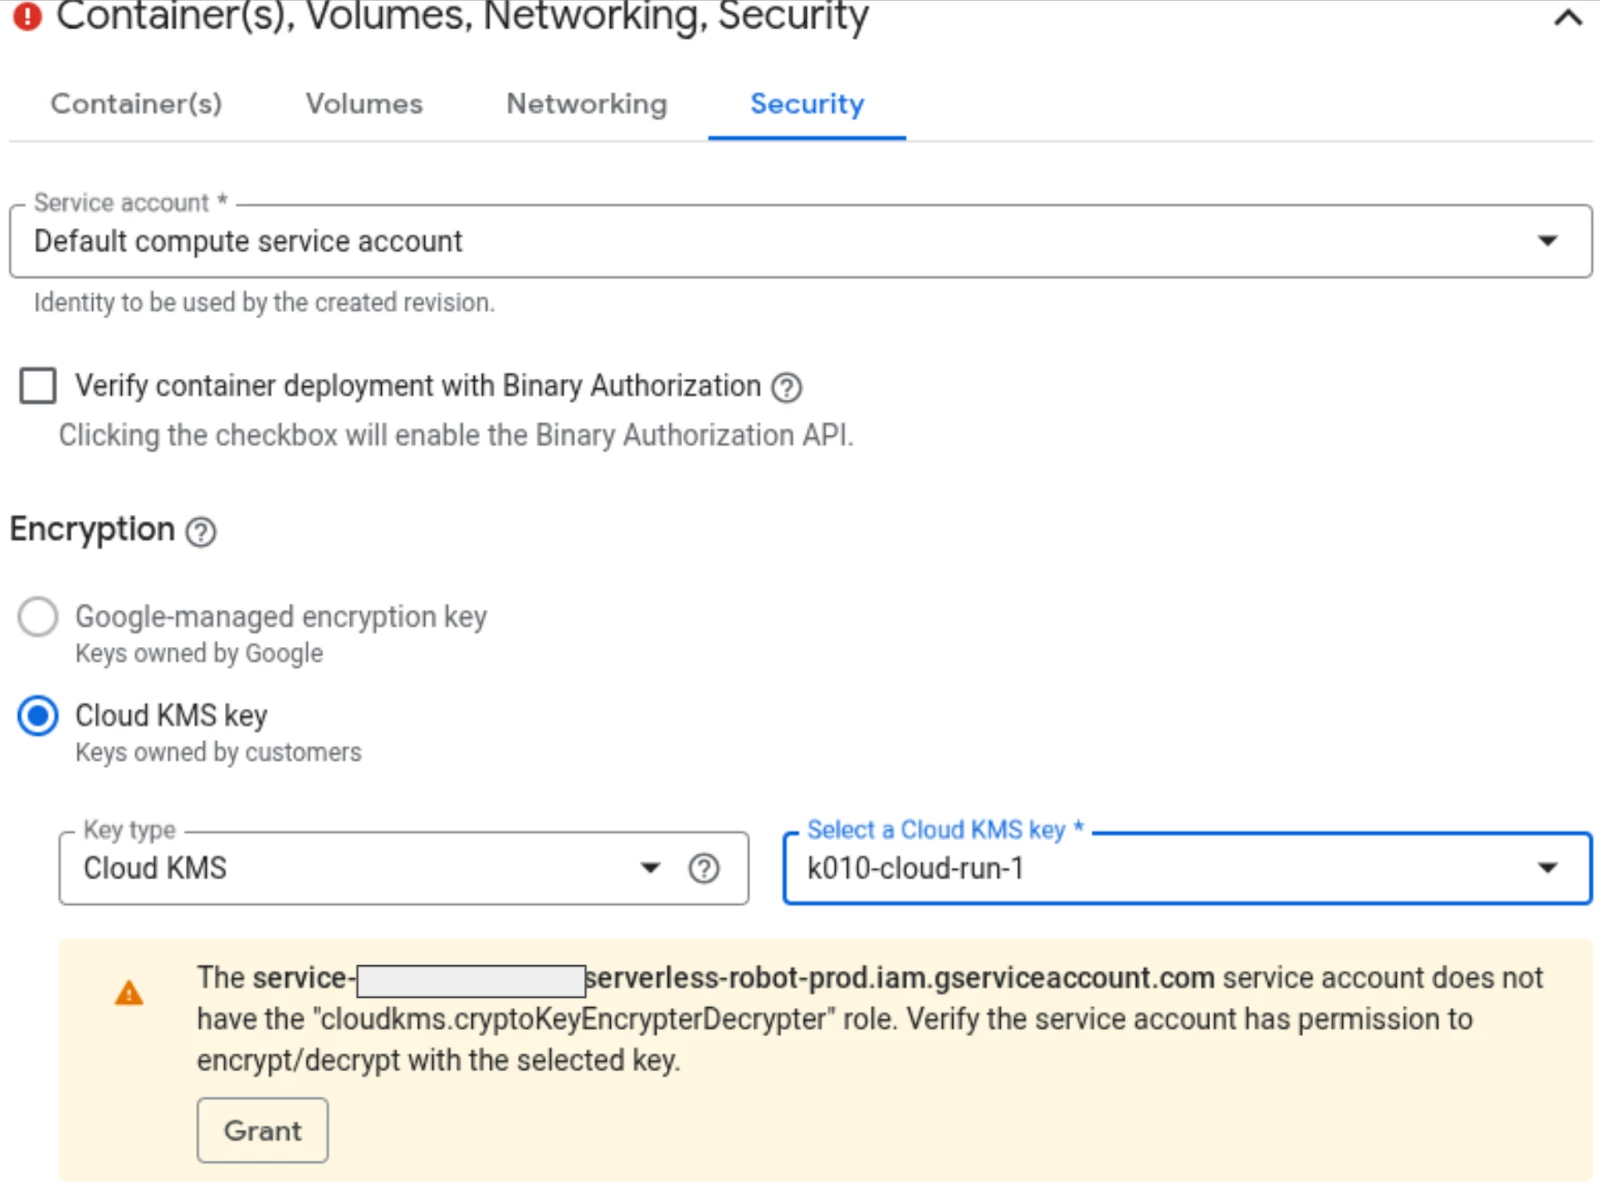
- When a key is created, before it is used, access rights must be granted to the key.
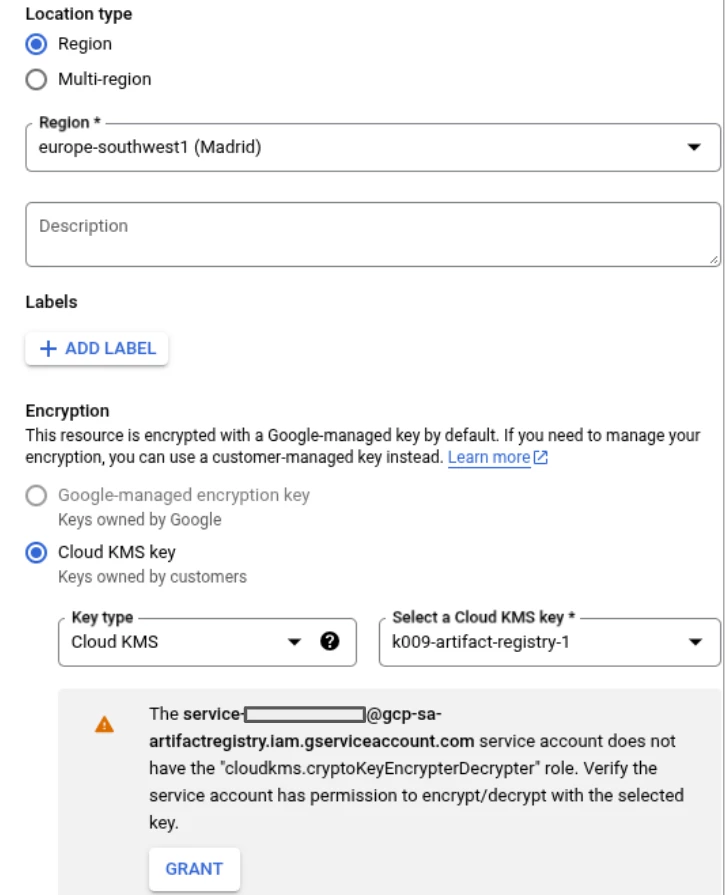
You can see in the previous screenshot that access must be granted to the Artifact Registry service account to access the key.
Step 4: Creating the docker image
In the Cloud Shell, we create a folder called sov-ia.
In that folder, we will create a Dockerfile with the following content:
Note: The version of Ollama was 0.6.0 when this article was written.
FROM ollama/ollama:0.6.0
# Listen on all interfaces, port 8080
ENV OLLAMA_HOST 0.0.0.0:8080
# Store model weight files in /models
ENV OLLAMA_MODELS /models
# Reduce logging verbosity
ENV OLLAMA_DEBUG false
# Never unload model weights from the GPU
ENV OLLAMA_KEEP_ALIVE -1
# Store the model weights in the container image
ENV MODEL gemma3:1b
RUN ollama serve & sleep 5 && ollama pull $MODEL
# Start Ollama
ENTRYPOINT ["ollama", "serve"]
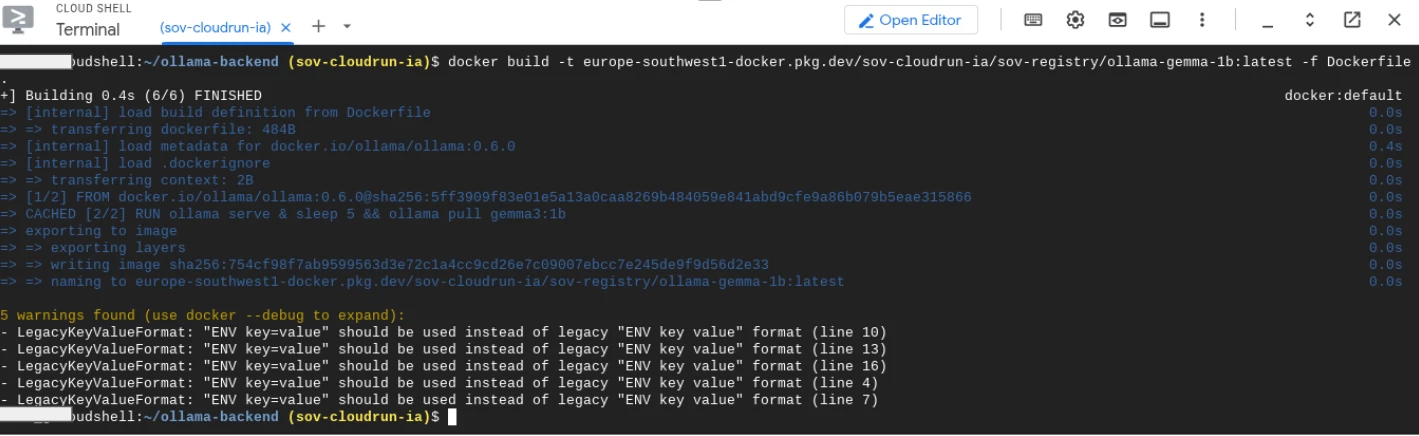
With the Dockerfile created, we need to build the image, we enter in the repository folder and build the image with the following command being:
docker build -t \\
europe-southwest1-docker.pkg.dev/sov-cloudrun-ia/sov-registry/ollama-gemma-1b:latest \\
-f Dockerfile .
It will start building the image with the image.
If everything goes well, once the image is built, it needs to be uploaded (pushed) to the repository.
It can be done as follows:
docker push  \\
europe-southwest1-docker.pkg.dev/sov-cloudrun-ia/sov-registry/ollama-gemma-1b:latest
When we execute that command, the image is uploaded to the repository: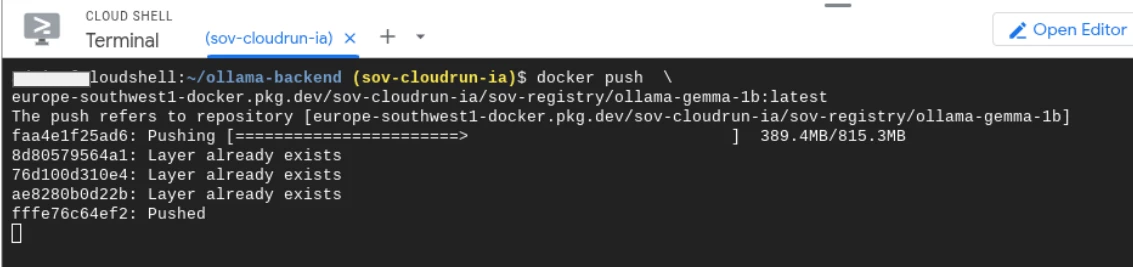
The image is now ready to be used from the Google Cloud Artifact Registry.
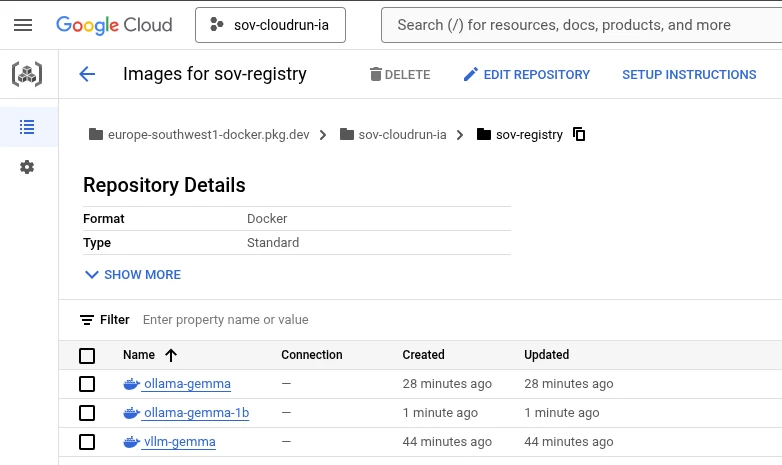
The image can be seen stored in the repository and you can see, you can host several images in the same repository.
Step 4: Deploying Gemma on Cloud Run
Now we need to deploy Cloud Run, using the image that we prepared some minutes ago.
We'll deploy the Gemma 3 model to Cloud Run, ensuring that the deployment adheres to our sovereignty and security requirements.
This will involve:
- Containerizing the application.
- Configuring Cloud Run to use the generated keys.
- Setting appropriate resource limits and network settings.
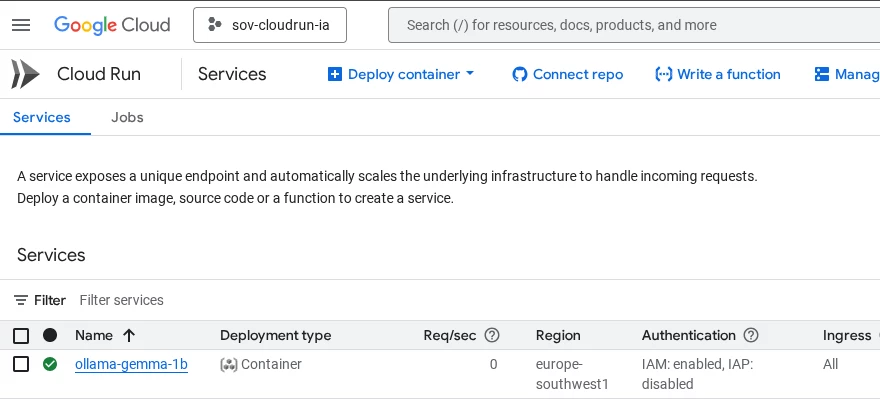
When a Cloud-Run instance is deployed, we need to specify the image URL (the image that we uploaded to Artifact Registry), the region where the instance will be running at and several other parameters.
In order to deploy this service you will have to select the Container Image URL, define a name for the service (or leave the default one) and select the region.
Please know that if you are using Sovereign Controls, you will only have the region where Sovereign Controls is being used, Spain in this example.
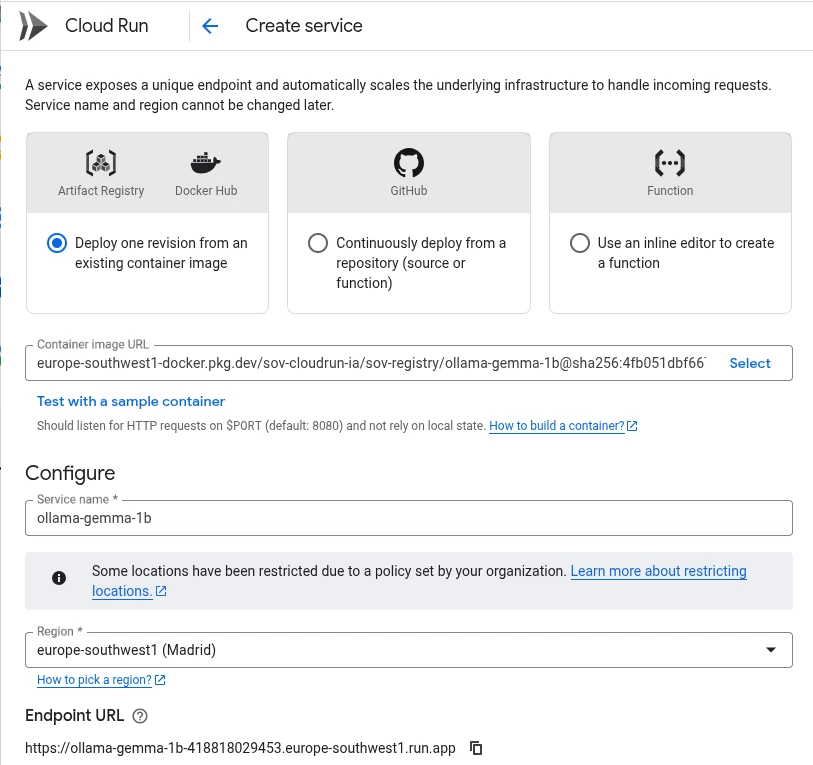
Cloud Run shows the URL that Google Cloud will use to expose the Cloud Run instance.
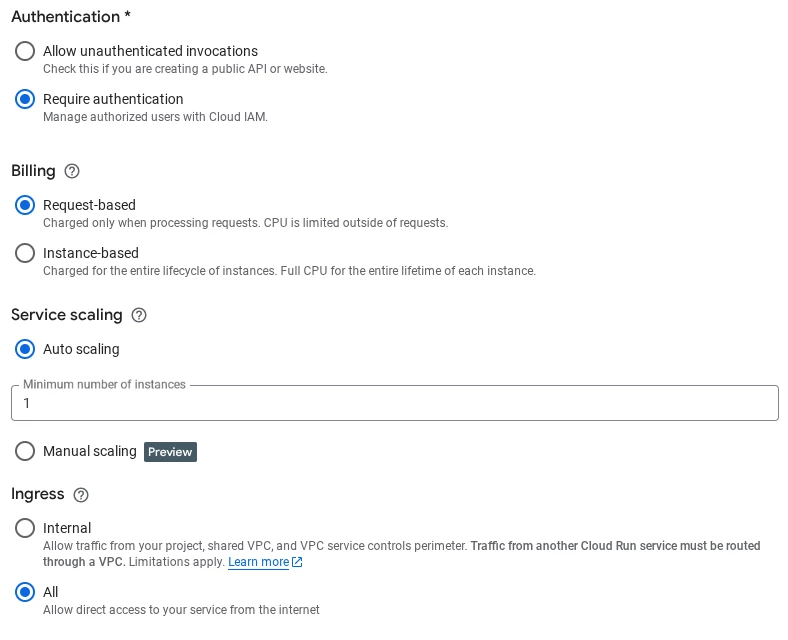
Below the previous configuration, you will have to select some other parameters like Authentication (Require authentication), Billing (Request-based), Service Scaling (we will define at least 1 instance here) and the Ingress (All for this project)
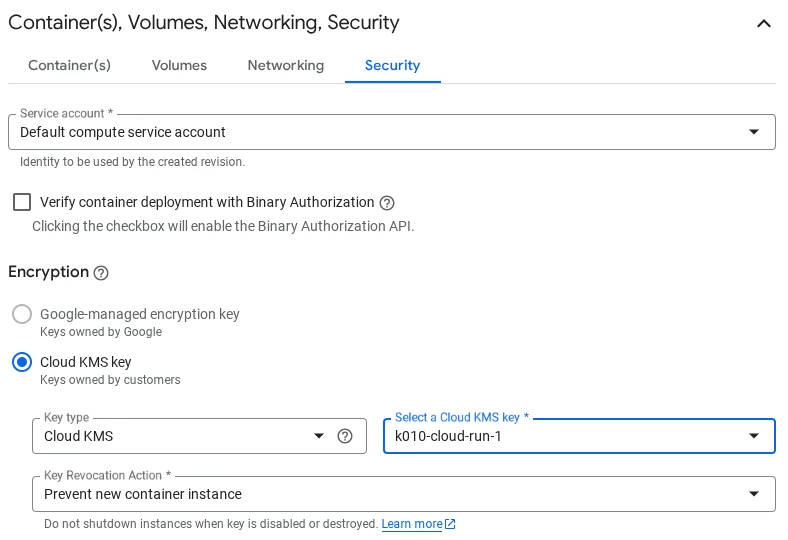
In the “Container(s), Volumes, Networking, Security” part, there is only one single configuration to be done that is related to Digital Sovereignty, you will have to select the right key.
Please remember that at the beginning of this blog post we created two different keys, one for the Artifact Registry service and another one for the Cloud-Run service (k010-cloud-run-1). This very last key is the one we will be using to configure Cloud-Run here.
The configuration of Cloud-Run is a basic Cloud Run configuration, so just ensure that we are using the tcp/port 8080 that our image uses so no special configuration is to be done here as the port 8000 is the Cloud Run default port for this.
There are three settings that the user can select on when key revocation:
- Prevent new container instance
- Shutdown as soon as possible
- Custom shutdown delay
The selection of one or the other option should be done based on the risk analysis outputs of each organization.
Once the Cloud Run environment is configured, it will take some minutes to be created.
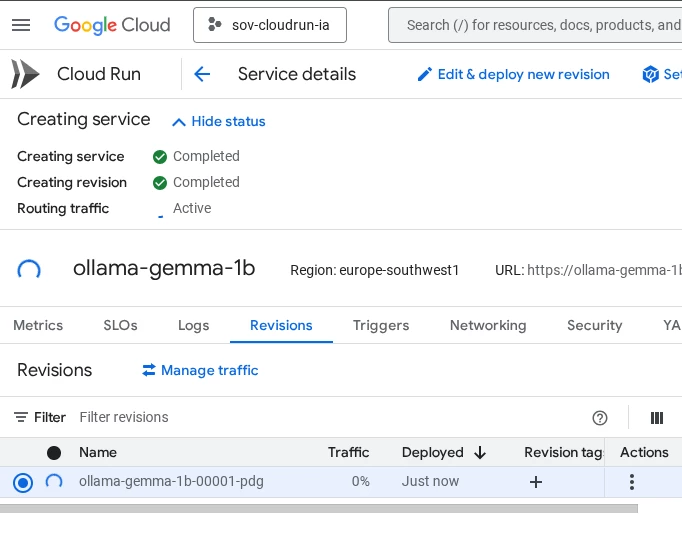
When the Cloud-run instance is deployed our tasks have finished and it’s time to test that everything is working properly.
The instructions that can be found in the blog post on Cloud-Run and Gemma 3 that we were referring on the beginning also guides you to test the Gemma model
There are other ways to test the service but we will do it following the instructions from the cloud shell to avoid having to develop a front-end just for this test.
Back to the cloud shell to start a proxy on localhost pointing to Cloud-Run with the following command:
gcloud run services proxy ollama-gemma-1b --port=9090
After selecting the region, the proxy will running:

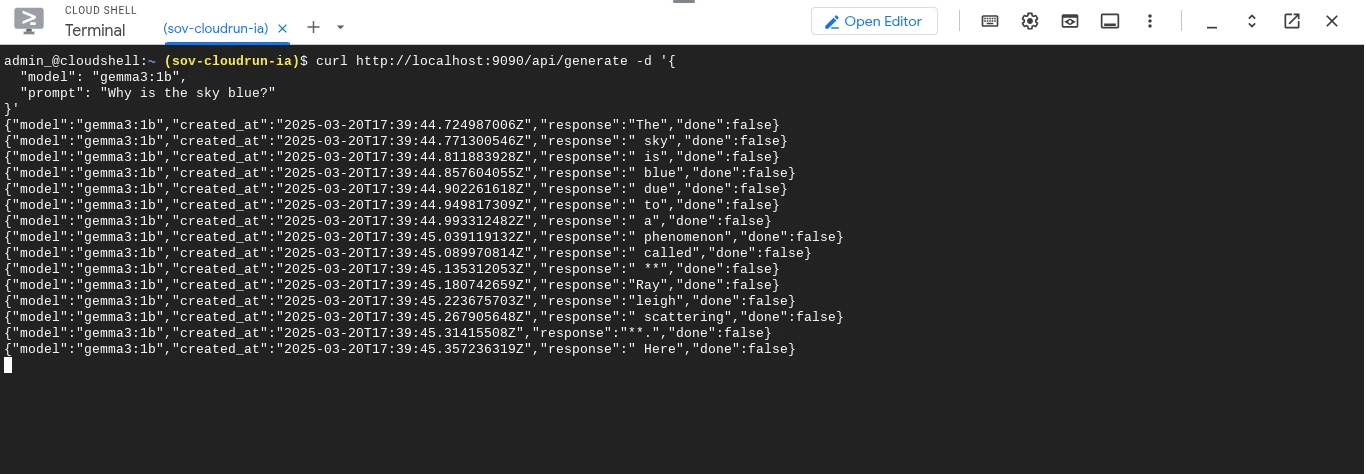
Then we will connect to the Cloud Run service using the following parameters:
curl http://localhost:9090/api/generate -d '{
  "model": "gemma3:1b",
  "prompt": "Why is the sky blue?"
}'

In a few seconds, Gemma 3 will return the answer to our question. The answer will be much longer but we have just captured the beginning.
Conclusion
By combining the power of Google Cloud's AI capabilities with Sovereign Controls by SIA, organizations can build innovative AI solutions while upholding the principles of digital sovereignty, data protection and compliance. This approach enables you to extract business value from sensitive information in a secure and compliant manner.
Ready to build a sovereign environment on Google Cloud? Here you’ll find a very detailed tutorial on how to deploy a Cloud Run to explore the functionalities of Gemma 3.