

In part 1 of this blog series, we explored how to create an "Impossible Travel" detection rule using YARA-L in Google SecOps SIEM, aiming to identify potentially compromised accounts based on suspicious login activity from geographically distant locations.
Now, in this second part, we'll take the next step and focus on building an associated SecOps SOAR Playbook to provide security analysts with an actionable alert.
The Impossible Travel playbook in SecOps SOAR
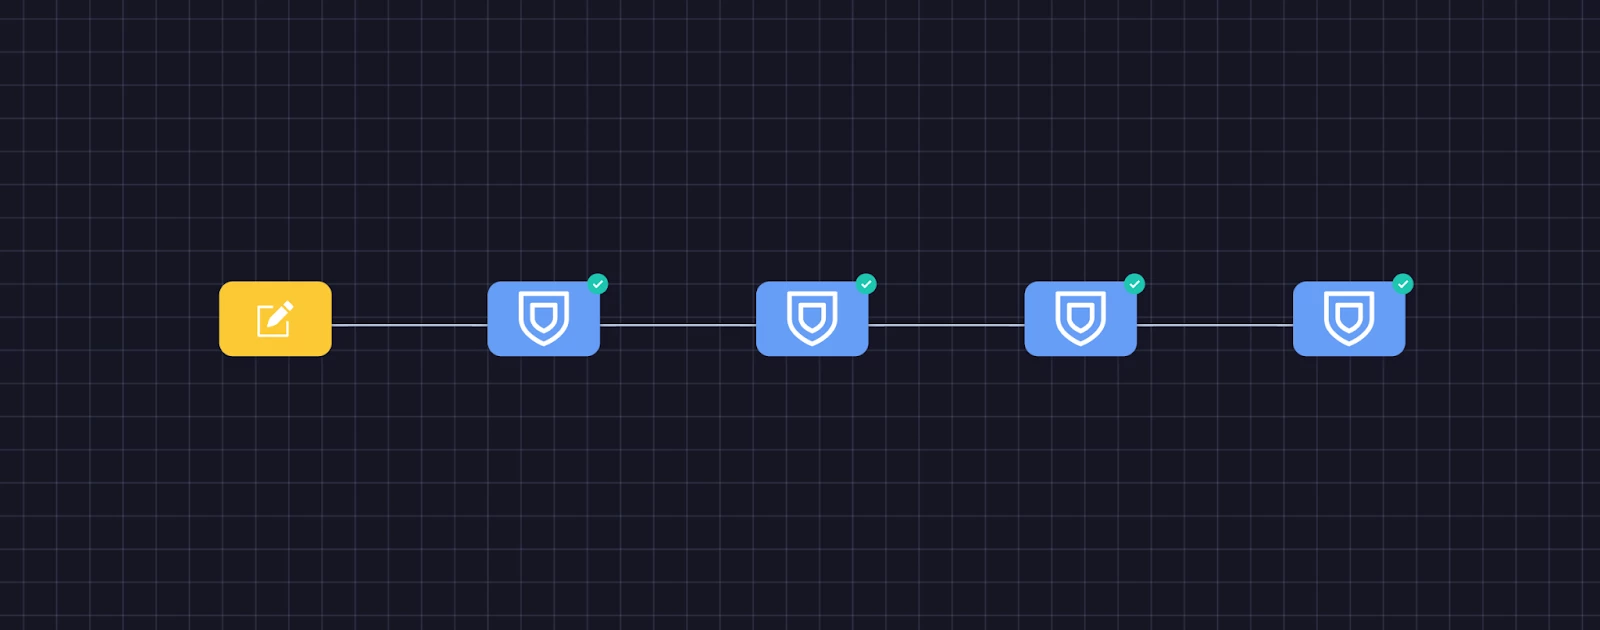
Impossible Travel Playbook Actions
To present an aAnalyst with a comprehensive summary of the Impossible Travel event, we'll design a SOAR playbook incorporating the following Actions:
- Custom Trigger
- Siemplify - Case Tag
- Siemplify - Update Case Description
- Google SecOps - Get Rule Details
- Google SecOps - Get Detection Details
 The Impossible Travel Playbook Actions
Note, the following prerequisites are required for this Playbook:
- The Google SecOps Marketplace integration is installed and configured
- Optionally, a Google Maps API key is required for the custom Google Maps HTML widget
Custom Trigger
Triggers are used within a Playbook to specify which Alerts the Playbook will run against. For the Impossible Travel use case, we want the Playbook to execute exclusively when the specific YARA-L alert is triggered. To achieve this, we'll use a Custom Trigger that matches the YARA-L Rule name associated with our Impossible Travel detection.
Trigger Type = Custom Trigger
Trigger Value = [Alert.Name] = SUSPICIOUS_AUTH_UNUSUAL_INTERVAL_TIME
Comparison Type = And
Siemplify - Case Tag
Adding Tags in SOAR via a Playbook enables you to easily Search or filter in Dashboards, and so the Case Tag action is used to mark this Case as “Impossible Travel.”. Once the Playbook is triggered, we'll enrich the Case with relevant tags to enhance organization and searchability within SOAR. The "Case Tag" action marks this particular case with the tag "Impossible Travel.".
Tag = Impossible Travel
This allows analysts to easily filter and identify cases related to this specific type of potential security incident.
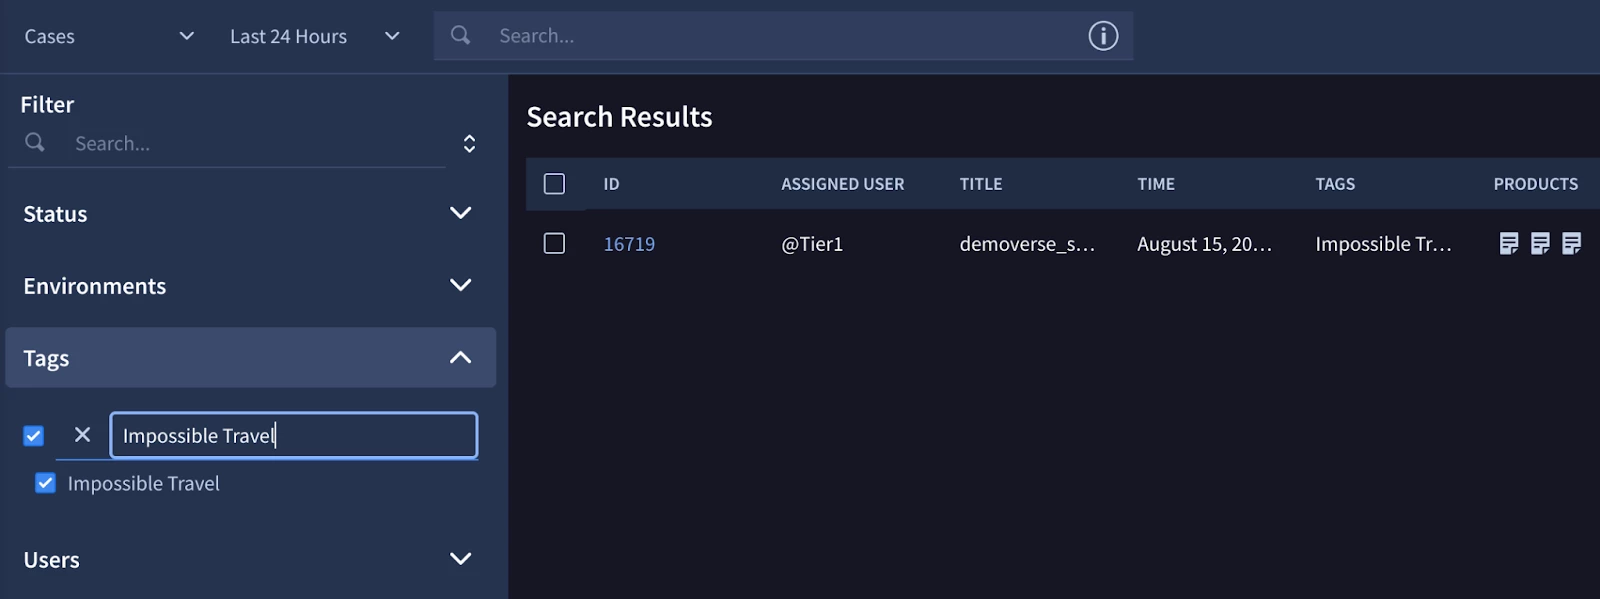
Example of using Tags to search SOAR Cases
Siemplify - Update Case Description
To provide analysts with a concise overview of the potential incident, we'll leverage the "Update Case Description" action. We designed the YARA-L rule to include several summary Outcome variables, which can now be seamlessly incorporated into the case description using Placeholder variables.
Description = User [Event.event_target_user_emailAddresses_1] logged in from multiple locations: [Event.event_principal_location_countryOrRegion], within [Event.detection_outcomes_duration_hours] hours. The two locations are estimated to be [Event.detection_outcomes_distance_kilometers] kilometers apart, which would require travelling [Event.detection_outcomes_kph] kilometers per hour.
This approach ensures that analysts have the most critical information readily available at a glance, enabling them to quickly assess the situation and prioritize their response efforts.

Google SecOps - Get Detection Details
Beyond the initial summary, analysts need the ability to dive deeper into the specifics of the detected events without having to switch back and forth between platforms. The "Get Detection Details" action from the Google SecOps integration addresses this need, pulling in all the relevant event information directly into SecOps SOAR.
To configure the Action the YARA-L Rule ID and Detection ID is provided as input parameters:
Rule ID = [Alert.rule_id]
Detection ID = [Event.id]
This action also includes a pre-defined Playbook View widget, providing a structured and organized way to present the details to the analyst, saving valuable time during investigations.
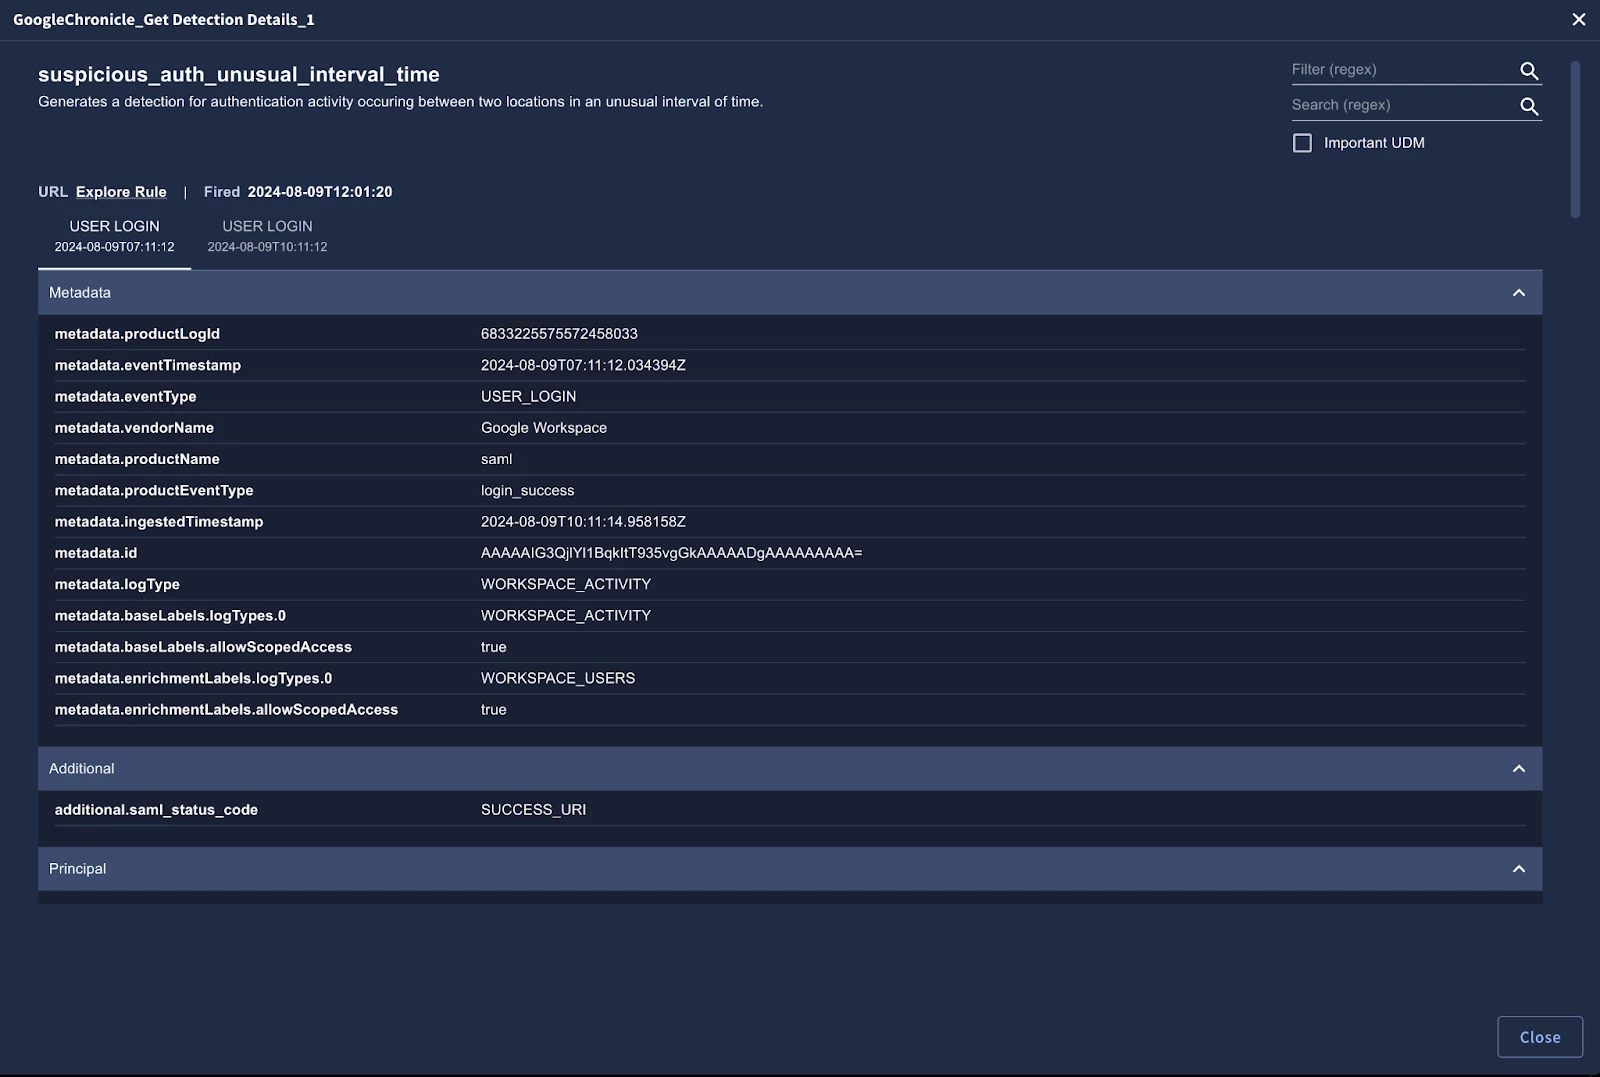
Using the predefined “Get Detection Details” HTML widget to perform event level analysis
Google SecOps- Get Rule Details
To provide analysts with a deeper understanding of the detection logic, we'll utilize the "Get Rule Details" action from the Google SecOps integration. This action retrieves and stores the specific version of the YARA-L rule that triggered the alert, making it readily available within the case.
The Action is configured with the ruleVersion field which includes the YARA-L rule ID and version ID:
Rule ID = [Event.detection_1_ruleVersion]
By having access to the rule details, analysts can gain insights into the specific conditions and criteria that led to the alert, helping them make more informed decisions during their investigations.
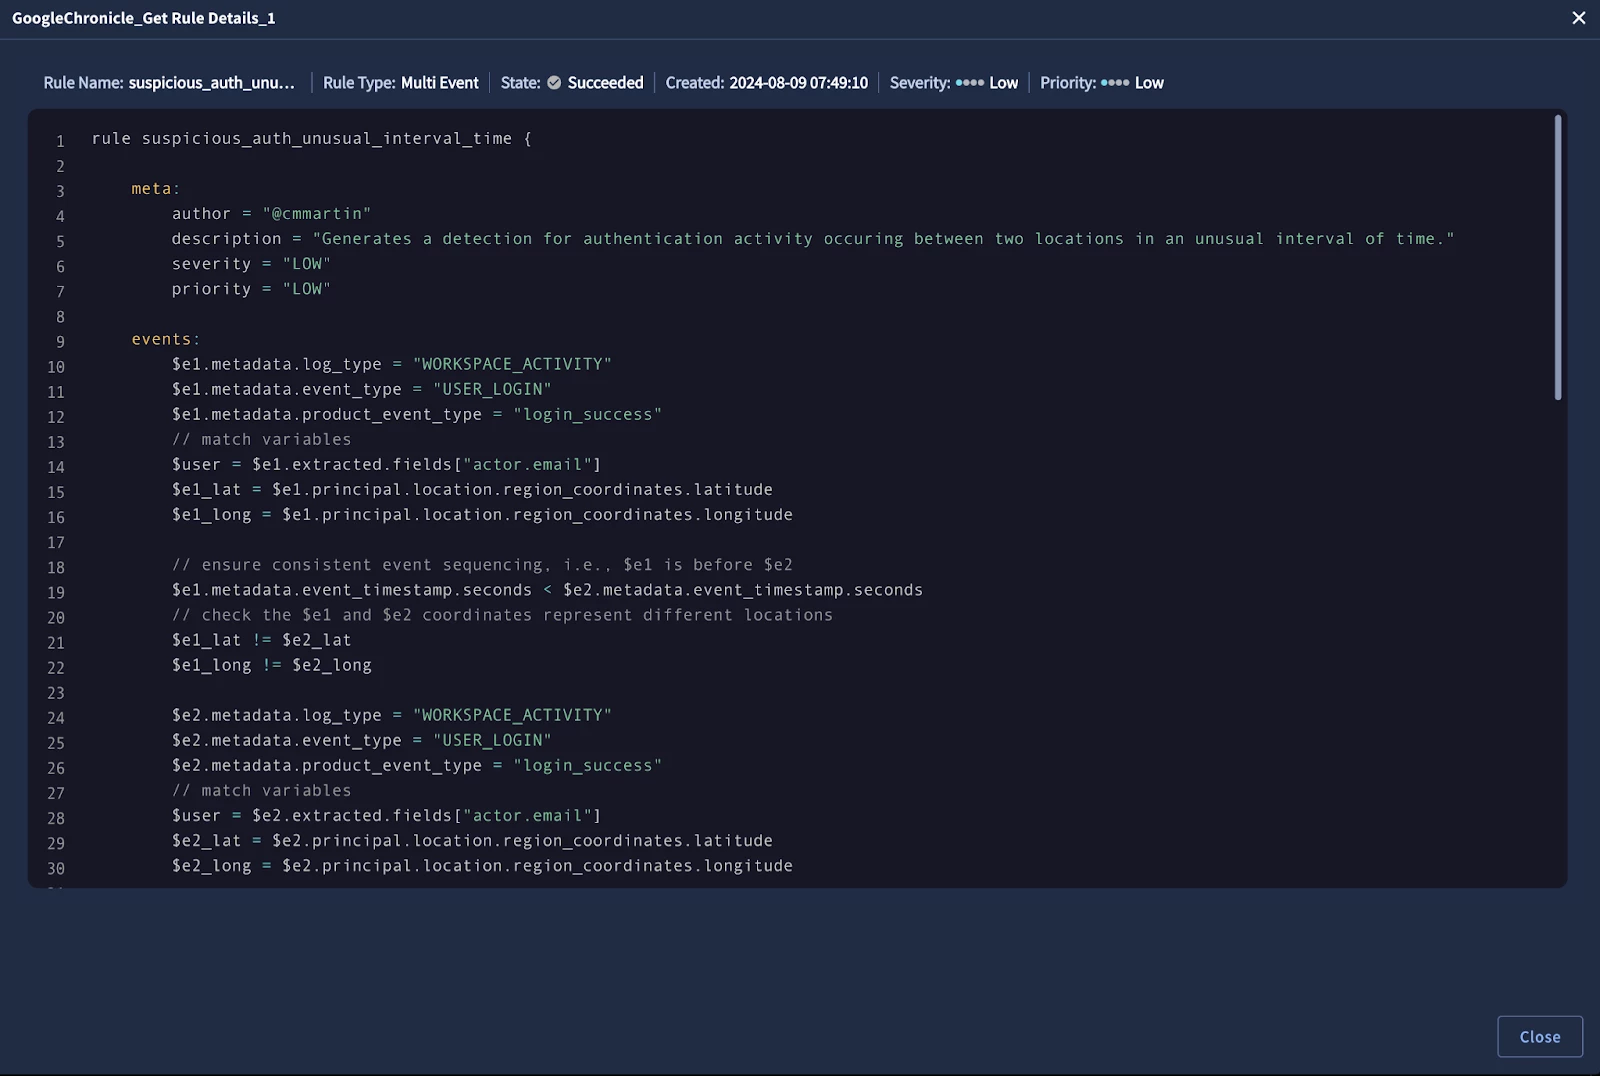 Viewing the YARA-L rule that generated the Impossible Travel Alert within SOAR with the pre-defined HTML widget
Note: If you don’t see any of the pre-defined integrations mentioned above , make sure your Google SecOps integration is up to date.
Impossible Travel Playbook View
Within a SecOps SOAR Playbook you can not only add a series of Actions but configure pre-defined Layouts (Views), specific to the SOAR user’s role, to view the Playbook’s results.
For this example Impossible Travel Playbook the following View is used:
- Entities Highlights
- Impossible Travel Summary (Custom HTML Widget)
- Impossible Travel Context
- Google Maps (Custom HTML Widget)
- Google SecOps - Get Detection Details
- Google SecOps - Get Rule Details
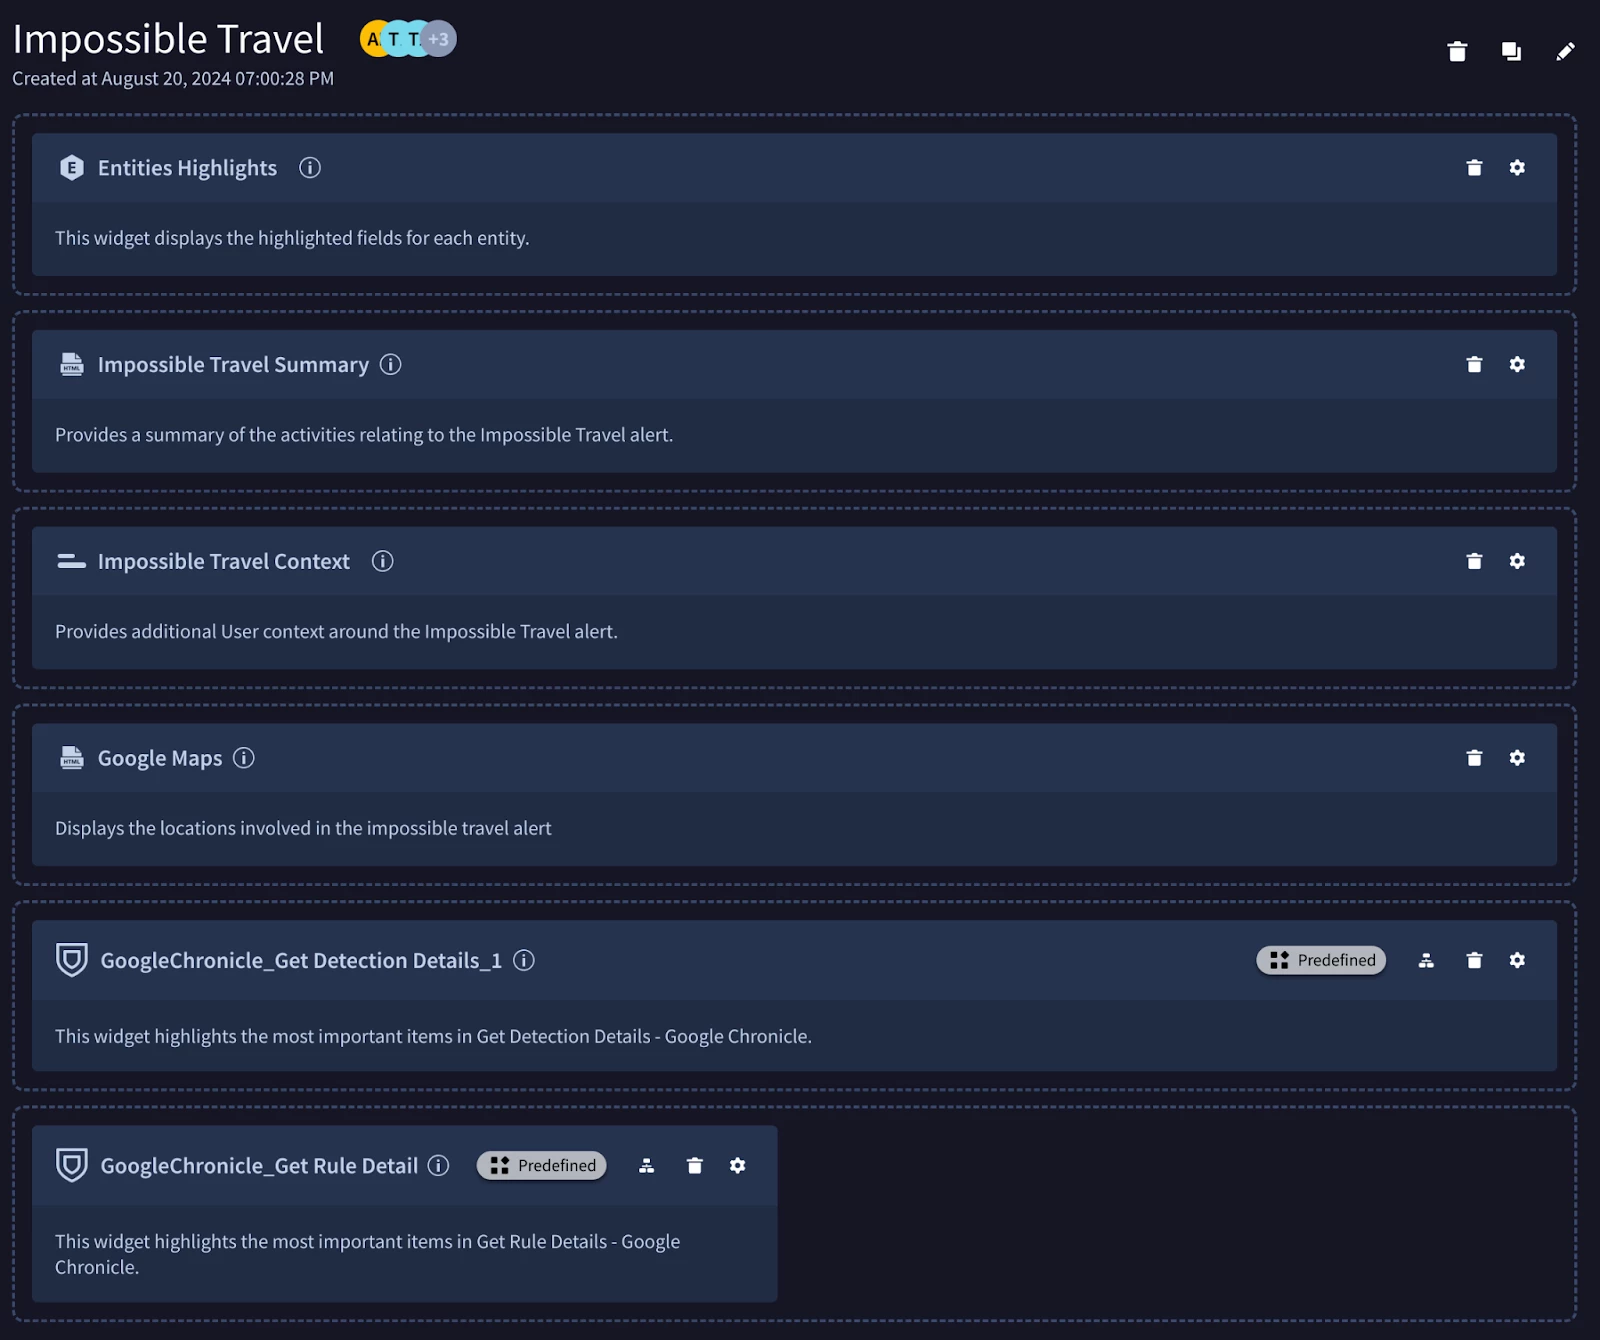 The Impossible Travel Playbook View
Entities Highlights
The first widget in our Playbook View is the "Entities Highlights" widget. This essential tool provides analysts with a quick summary of the key entities involved in the alert, drawing from the SOAR Ontology. By presenting this information upfront, analysts can rapidly grasp the "Who" and "What" of the situation, enabling them to make informed decisions and prioritize their next steps in the investigation.

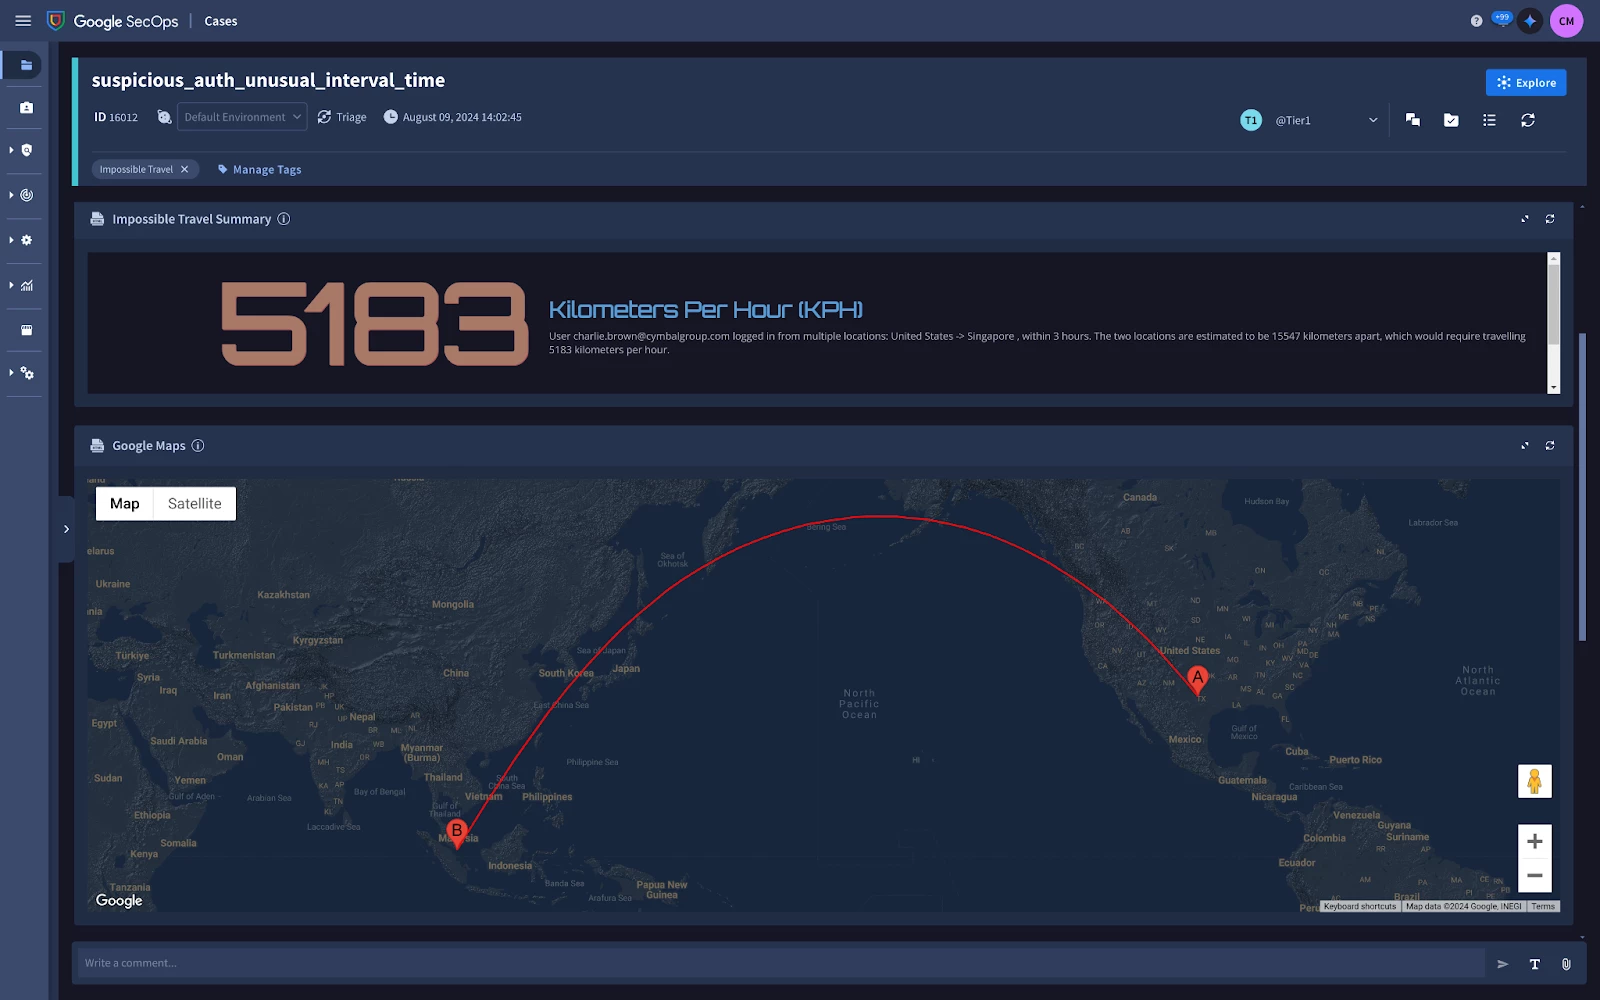
Impossible Travel Summary custom HTML Widget
Next in our Playbook View, we've incorporated a custom HTML widget to present a visually appealing and informative summary of the Impossible Travel event. This widget displays the YARA-L Outcome values for kilometers per hour (KPH), providing a quick snapshot of the travel speed anomaly. Additionally, it offers a concise overview of the associated events, similar to the information captured in the Case Description.

Instead of building the HTML from the ground up, we can save time and effort by utilizing the pre-built HTML widgets available in SOAR. For our purposes, the "Number template" provides a convenient foundation for our custom Impossible Travel Summary widget.
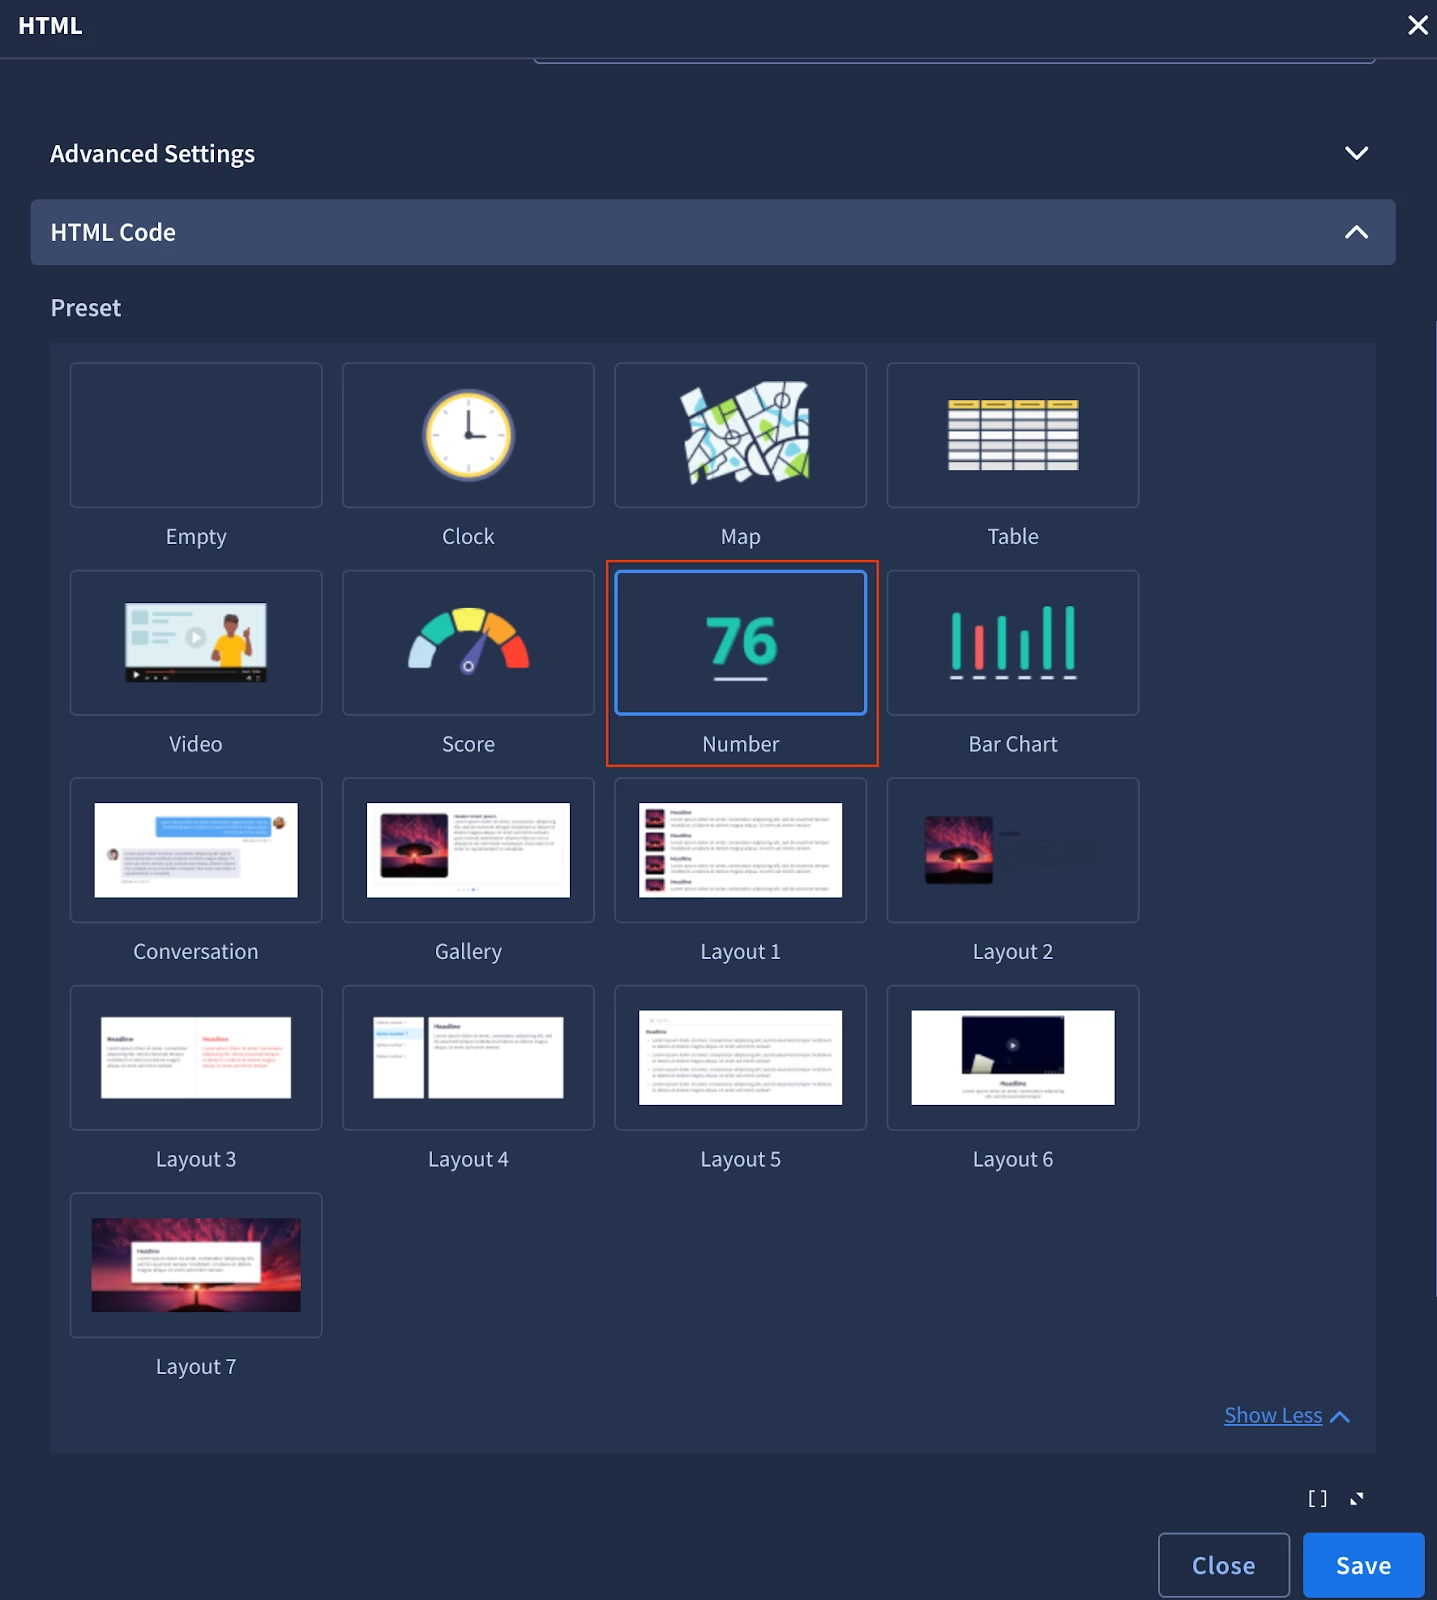
Predefined HTML templates in Playbook Views
The template provides three pre-built fields:
- Field 1: Numeric value (populated with the YARA-L Outcome value).
- Field 2: Headline (static text: "Kilometers Per Hour").
- Field 3: Description (requires JavaScript to split and clearly display the potential direction of Impossible Travel using Event.event_principal_location_countryOrRegion).
Placeholder Variables
If a SOAR Alert contains multiple Events, the Placeholder variables for the Fields within each Event will export each unique value, e.g., you have two Events in an Alert:
| Event | Event.event_principal_location_countryOrRegion | [Event.event_target_user_emailAddresses_1] |
| 1 | Singapore | charlie.brown@cymbal.com |
| 2 | Texas | charlie.brown@cymbal.com |
This will result in the Placeholder variables having values as follows:
| Event.event_principal_location_countryOrRegion | [Event.event_target_user_emailAddresses_1] |
| Singapore, Texas | charlie.brown@cymbal.com |
Since each Placeholder is an array of unique values, we'll split the array and store each value in its own country variable for use in the description. This will allow us to present the data in an easily understandable A -> B format, enhancing the reader's understanding of the travel patterns.
        <script>
            var country = "[Event.event_principal_location_countryOrRegion]";
            const [event1_country, event2_country] = country.split(",");

            $(document).ready(function () {
                var field1 = Math.round([Event.detection_outcomes_kph]);
                var field2 = "Kilometers Per Hour (KPH)";
                var field3 =
                    "User [Event.event_target_user_emailAddresses_1] logged in from multiple locations: " +
                    event1_country +
                    " -> " +
                    event2_country +
                    " , within [Event.detection_outcomes_duration_hours] hours.  The two locations are estimated to be [Event.detection_outcomes_distance_kilometers] kilometers apart, which would require travelling  [Event.detection_outcomes_kph] kilometers per hour. ";

                $("#field1").html(field1);
                $("#field2").html(field2);
                $("#field3").html(field3);
            });
        </script>
Note: This JavaScript can be further improved by incorporating error handling to gracefully handle unexpected scenarios.
Complete Widget HTML
<!DOCTYPE html>
<html>
    <link href="https://fonts.googleapis.com/css?family=Open+Sans:400,400i,700,700i" rel="stylesheet" />
    <link href="https://fonts.googleapis.com/css?family=Orbitron" rel="stylesheet" />
    <link href="https://www.siemplify.co/wp-content/themes/siemplify/assets/fonts/stylesheet.css?version=99601167404751" rel="stylesheet" />

    <style>
        .cardContainer {
            float: left;
            width: 100%;
            max-width: 100%;
            min-height: 240px;
            align-items: center;
        }
        .cntLeftSide {
            float: left;
            width: 30%;
            margin-right: 25px;
        }
        .cusWdgNumber {
            font-style: normal;
            font-weight: bold;
            font-size: 130px;
            line-height: 120.95%;
            align-items: center;
            text-align: right;
            width: 100%;
            color: #a87867;
            text-shadow: 1px 1px 0px #ab5656;
            font-family: "Orbitron";
        }
        .cusWdgNumberTitle {
            font-family: Open Sans;
            font-style: normal;
            font-weight: bold;
            font-size: 26px;
            line-height: 108.95%;
            display: flex;
            align-items: center;
            color: #569cd6;
            margin-top: 47px;
            margin-bottom: 10px;
            font-family: "Orbitron";
        }
        .cusWdgNumberText {
            font-family: Open Sans;
            font-style: normal;
            font-weight: normal;
            font-size: 12px;
            line-height: 135%;
            display: flex;
            align-items: center;
        }
        body {
            background-color: #161625;
            color: #abb2bf;
        }
    </style>
    <head> </head>
    <body>
        <div class="cardContainer">
            <div class="cntLeftSide">
                <div class="cusWdgNumber" id="field1"></div>
            </div>
            <div class="cntRightSide">
                <div class="cusWdgNumberTitle" id="field2"></div>
                <div class="cusWdgNumberText" id="field3"></div>
            </div>
        </div>
        <script src="https://code.jquery.com/jquery-3.5.1.min.js"></script>
        <script>
            var country = "[Event.event_principal_location_countryOrRegion]";
            const [event1_country, event2_country] = country.split(",");

            $(document).ready(function () {
                var field1 = Math.round([Event.detection_outcomes_kph]);
                var field2 = "Kilometers Per Hour (KPH)";
                var field3 =
                    "User [Event.event_target_user_emailAddresses_1] logged in from multiple locations: " +
                    event1_country +
                    " -> " +
                    event2_country +
                    " , within [Event.detection_outcomes_duration_hours] hours.  The two locations are estimated to be [Event.detection_outcomes_distance_kilometers] kilometers apart, which would require travelling  [Event.detection_outcomes_kph] kilometers per hour. ";

                $("#field1").html(field1);
                $("#field2").html(field2);
                $("#field3").html(field3);
            });
        </script>
    </body>
</html>
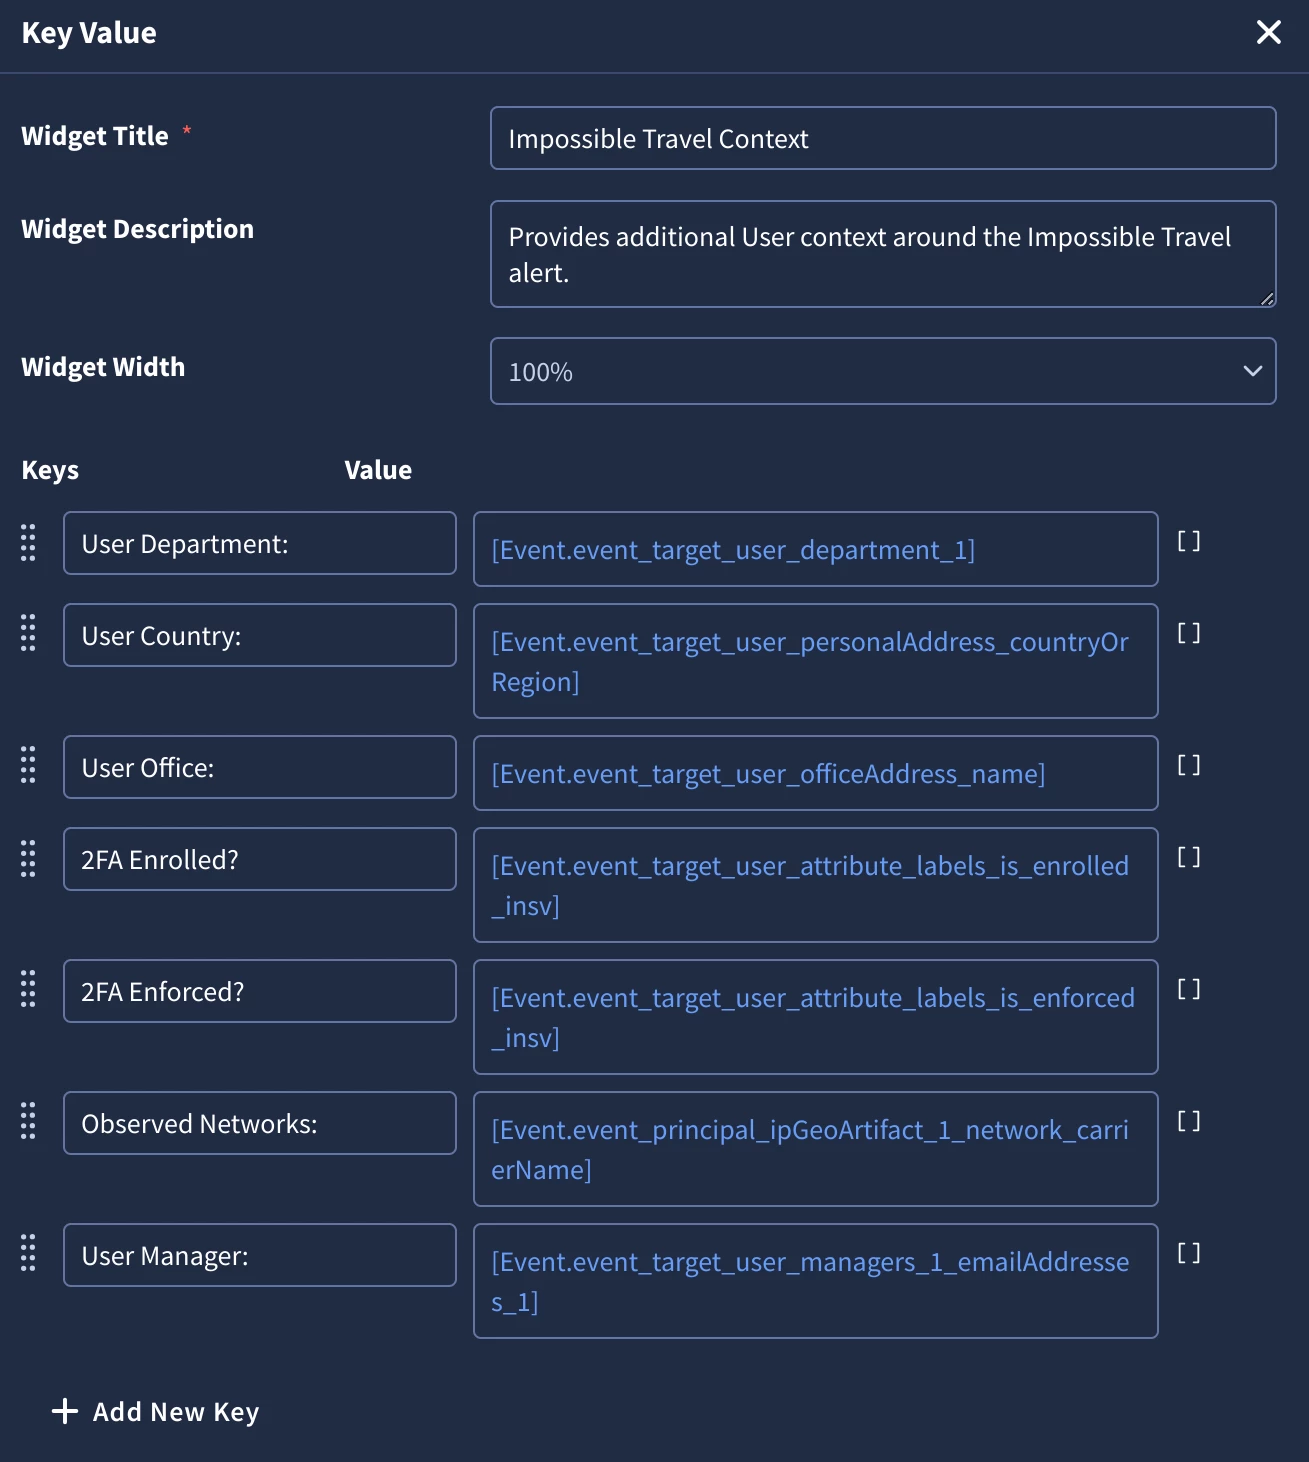
Impossible Travel Context
We use the Key Value widget to provide analysts key organizational context that helps provide additional insight into the likelihood and impact of the Impossible Travel alert:.
- What is the user’s normal location?
- Could someone else have used the account?
- Was there a VPN or anonymization tool used?
- Was the user traveling?
These are all pertinent questions, and questions that SecOps context enrichment of UDM event data can potentially answer.

The Key Value widget configuration is dependent on the log sources you used in your YARA-L Impossible Travel rule, and the available context enrichment sources that can run against them. Once you have verified which of these fields are populated, you can add them in as key value pair mappings into the Key Value widget.
What is the user’s normal location?
If you've configured SecOps SIEM to connect to your LDAP or HCM platform, you'll automatically receive enrichment on all UDM events, including the user's known working location.
entity.user.first_name = "Charlie"
entity.user.last_name = "Brown"
entity.user.personal_address.country_or_region = "US"
entity.user.department = "Sales"
entity.user.office_address.name = "Dallas, Texas"
UDM User enrichment from an IdP, LDAP, or HCM
In our Impossible Travel case, since user context enrichment is configured and populated in the source platform, we can quickly and confidently determine the user's primary working location.
If you don’t have this level of context enrichment in SecOps SIEM you can still achieve it through SOAR. Add a custom Action to your playbook to query your LDAP or HCM directly, leveraging one of the many available Marketplace integrations.
Could someone else have used the account?
If the user account lacks 2FA, the risk of compromise significantly increases, as attackers only need to obtain the user's password to gain access. In our case, we can see from the SecOps SIEM enrichment that 2FA is not enabled for this user, raising a flag.
entity.user.attribute.labels.key = "is_enrolled_in_2sv"
entity.user.attribute.labels.value = "false"
entity.user.attribute.labels.key = "is_enforced_in_2sv"
entity.user.attribute.labels.value = "true"
entity.user.attribute.creation_time.seconds = 1720646987
entity.user.attribute.creation_time.nanos = 0
entity.user.last_login_time.seconds = 1723993953
entity.user.last_login_time.nanos = 0
The configuration of the user account via User enrichment from an IdP
Newly created accounts or long-dormant accounts suddenly becoming active could suggest suspicious activity. If you have connected your IdP or LDAP to SecOps SIEM, you'll have access to user creation time and last login timestamps, which can help assess the account's history and identify any unusual patterns.
Was there a VPN or other anonymization tool in use?
To uncover potential VPN or anonymization tool usage, we can leverage SecOps SIEM's native GeoIP enrichment. This enrichment automatically adds network information to each UDM event, including GeoIP coordinates, ASN, ISP, and domain name.
Analysts can review this enrichment data, specifically the network carrier and domain name, to identify any known VPN providers or services associated with anonymization tools.
principal.ip_geo_artifact.location.country_or_region = "Singapore"
principal.ip_geo_artifact.location.region_coordinates.latitude = 1.352083
principal.ip_geo_artifact.location.region_coordinates.longitude = 103.819836
principal.ip_geo_artifact.network.asn = "3758"
principal.ip_geo_artifact.network.carrier_name = "singnet"
principal.ip_geo_artifact.network.dns_domain = "shimano.com.sg"
principal.ip_geo_artifact.network.organization_name = "far east soho pte ltd"
Native GeoIP and Carrier enrichment of all public IP addresses
Was the user traveling?
Determining whether a user was genuinely traveling at the time of the suspicious logins can be tricky based solely on event data. While HCM integration with SecOps SIEM can provide some clues, such as whether the user was on leave, it doesn't definitively confirm travel.
In such cases, direct verification with the user or their manager might be necessary. If your SecOps SIEM is integrated with HCM or LDAP, you might already have the manager's information available in UDM.
Tip: SecOps SOAR offers convenient ways to facilitate this verification process. You can use a manual Action or a Playbook Approval Link to reach out to the user or their manager, asking them to confirm or deny the unexpected login activity via Email or Chat. This human-in-the-loop approach can provide valuable context and help determine the legitimacy of the travel claim.
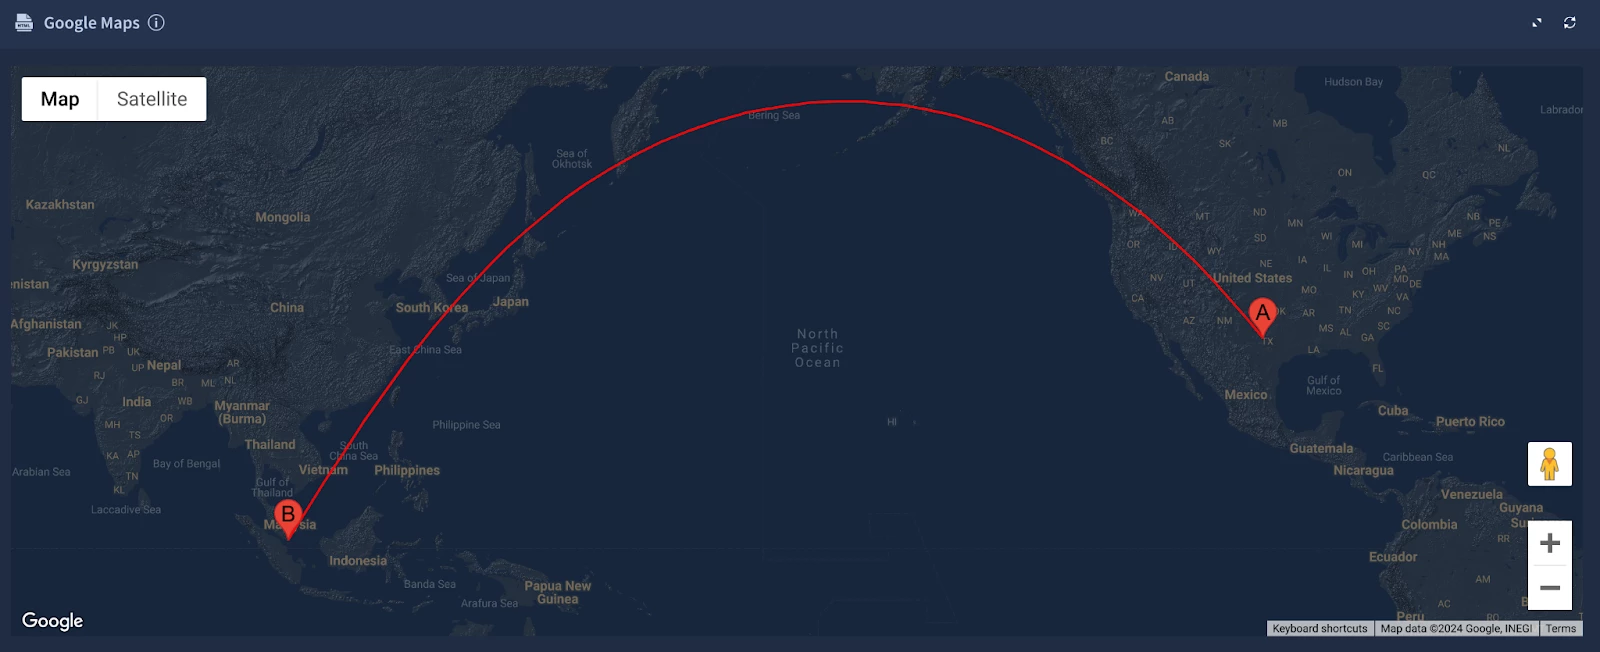
Google Maps custom HTML widget
To provide analysts with a visual representation of the Impossible Travel events, we'll incorporate a custom Google Maps widget into our Playbook View. While not essential for understanding the case, plotting the locations on a map allows for quick and intuitive visualization of the travel patterns.
We'll leverage a Polyline example from the Google Maps JavaScript API references to plot the travel routes. To ensure a cohesive look and feel within the SOAR platform, we'll apply a Night Mode CSS to style the map to match Google SecOps.
Note: Access to the Google Maps API via Google Cloud is required for this functionality. Please see here for further details.
Similarly, we'll extract longitude and latitude data from their respective Placeholder variables: Event.event_principal_location_regionLatitude and Event.event_principal_location_regionLongitude:
        <script>
            var regionLatitude = "[Event.event_principal_location_regionLatitude]";
            const [lat1, lat2] = regionLatitude.split(",");
            var regionLongitude = "[Event.event_principal_location_regionLongitude]";
            const [long1, long2] = regionLongitude.split(",");
The longitude and latitude coordinates are then added to the Google Maps object to create the “Flight Path”:
                const flightPlanCoordinates = [
                    { lat: Number(lat1), lng: Number(long1) },
                    { lat: Number(lat2), lng: Number(long2) },
                ];
                const flightPath = new google.maps.Polyline({
                    path: flightPlanCoordinates,
                    geodesic: true,
                    strokeColor: "#FF0000",
                    strokeOpacity: 1.0,
                    strokeWeight: 2,
                });
Which produces the resulting Google Maps interactive widget as follows:
Complete Widget HTML
<!DOCTYPE html>
<!--
 @license
 Copyright 2019 Google LLC. All Rights Reserved.
 SPDX-License-Identifier: Apache-2.0
-->
<html>
    <head>
        <title>Simple Polylines</title>
        <style>
            /*
        * Always set the map height explicitly to define the size of the div element
        * that contains the map.
        */
            #map {
                height: 100%;
            }

            /*
         * Optional: Makes the sample page fill the window.
         */
            html,
            body {
                height: 100%;
                margin: 0;
                padding: 0;
            }
        </style>
        <script>
            var regionLatitude = "[Event.event_principal_location_regionLatitude]";
            const [lat1, lat2] = regionLatitude.split(",");
            var regionLongitude = "[Event.event_principal_location_regionLongitude]";
            const [long1, long2] = regionLongitude.split(",");

            /**
             * @license
             * Copyright 2019 Google LLC. All Rights Reserved.
             * SPDX-License-Identifier: Apache-2.0
             */
            function initMap() {
                const map = new google.maps.Map(document.getElementById("map"), {
                    zoom: 3,
                    styles: [
                        { elementType: "geometry", stylers: [{ color: "#242f3e" }] },
                        { elementType: "labels.text.stroke", stylers: [{ color: "#242f3e" }] },
                        { elementType: "labels.text.fill", stylers: [{ color: "#746855" }] },
                        {
                            featureType: "administrative.locality",
                            elementType: "labels.text.fill",
                            stylers: [{ color: "#d59563" }],
                        },
                        {
                            featureType: "poi",
                            elementType: "labels.text.fill",
                            stylers: [{ color: "#d59563" }],
                        },
                        {
                            featureType: "poi.park",
                            elementType: "geometry",
                            stylers: [{ color: "#263c3f" }],
                        },
                        {
                            featureType: "poi.park",
                            elementType: "labels.text.fill",
                            stylers: [{ color: "#6b9a76" }],
                        },
                        {
                            featureType: "road",
                            elementType: "geometry",
                            stylers: [{ color: "#38414e" }],
                        },
                        {
                            featureType: "road",
                            elementType: "geometry.stroke",
                            stylers: [{ color: "#212a37" }],
                        },
                        {
                            featureType: "road",
                            elementType: "labels.text.fill",
                            stylers: [{ color: "#9ca5b3" }],
                        },
                        {
                            featureType: "road.highway",
                            elementType: "geometry",
                            stylers: [{ color: "#746855" }],
                        },
                        {
                            featureType: "road.highway",
                            elementType: "geometry.stroke",
                            stylers: [{ color: "#1f2835" }],
                        },
                        {
                            featureType: "road.highway",
                            elementType: "labels.text.fill",
                            stylers: [{ color: "#f3d19c" }],
                        },
                        {
                            featureType: "transit",
                            elementType: "geometry",
                            stylers: [{ color: "#2f3948" }],
                        },
                        {
                            featureType: "transit.station",
                            elementType: "labels.text.fill",
                            stylers: [{ color: "#d59563" }],
                        },
                        {
                            featureType: "water",
                            elementType: "geometry",
                            stylers: [{ color: "#17263c" }],
                        },
                        {
                            featureType: "water",
                            elementType: "labels.text.fill",
                            stylers: [{ color: "#515c6d" }],
                        },
                        {
                            featureType: "water",
                            elementType: "labels.text.stroke",
                            stylers: [{ color: "#17263c" }],
                        },
                    ],
                    center: { lat: 0, lng: 0 },
                    mapTypeId: "terrain",
                });
                const flightPlanCoordinates = [
                    { lat: Number(lat1), lng: Number(long1) },
                    { lat: Number(lat2), lng: Number(long2) },
                ];
                const flightPath = new google.maps.Polyline({
                    path: flightPlanCoordinates,
                    geodesic: true,
                    strokeColor: "#FF0000",
                    strokeOpacity: 1.0,
                    strokeWeight: 2,
                });

                new google.maps.Marker({
                    position: { lat: Number(lat1), lng: Number(long1) },
                    map,
                    label: {
                        text: "A",
                        fontFamily: "Helvetica",
                        color: "#000000",
                        fontSize: "20px",
                    },
                    title: "Event 1",
                });

                new google.maps.Marker({
                    position: { lat: Number(lat2), lng: Number(long2) },
                    map,
                    label: {
                        text: "B",
                        fontFamily: "Helvetica",
                        color: "#000000",
                        fontSize: "20px",
                    },
                    title: "Event 2",
                });

                var latlng = [
                    new google.maps.LatLng(Number(lat1), Number(long1)),
                    new google.maps.LatLng(Number(lat2), Number(long2)),
                    // ...
                ];
                var latlngbounds = new google.maps.LatLngBounds();
                for (var i = 0; i < latlng.length; i++) {
                    latlngbounds.extend(latlng[i]);
                }
                map.fitBounds(latlngbounds);

                flightPath.setMap(map);
            }

            window.initMap = initMap;
        </script>
    </head>
    <body>
        <div id="map"></div>
        <script src="https://maps.googleapis.com/maps/api/js?key=<YOUR_GOOGLE_MAPS_API_KEY>&callback=initMap&v=weekly" defer></script>
    </body>
</html>
Google SecOps - Get Detection Details
The "Get Detection Details" widget comes pre-defined, requiring no additional configuration beyond its inclusion in the Playbook itself.
Note: You can search multiple Values in the “Get Detection Details” widget using a regex OR statement within a group, e.g., “target\\.user\\.(off|dep|per)”
Google SecOps YARA-L Rule
To provide analysts with understanding of the detection logic, we display the underlying YARA-L rule directly within the case using the "Get Rule Details" pre-defined widget, requiring no additional configuration beyond its inclusion in the Playbook itself.
Summary & Next Steps
In this blog series, we explored how to detect and respond to "Impossible Travel" scenarios. We covered the creation of a custom YARA-L rule in SecOps SIEM, leveraging YL2 functions and native GeoIP enrichment to identify suspicious login patterns. We then demonstrated how to implement a custom SOAR Playbook and Playbook View to streamline the investigation and response process, providing analysts with actionable alerts and enriched context.
However, the elements covered in this blog are just a starting point. We encourage you to adapt and explore what you can do with Google SecOps specific to your environment, and please continue to share your questions and feedback with the community.


