This guide provides a practical demonstration on how to implement unified Data and Feature RBAC in Google SecOps SIEM and SOAR components using a SIEM Data RBAC Scope with a single Custom Label.
Before performing any setup configuration it is important to thoroughly consider your planning stage in advance of making any configuration changes, and specifically deciding the naming convention for your SIEM Data RBAC Scopes.
For the purpose of this guide, SIEM Data RBAC Scopes will be created to represent specific technology stacks, e.g., windows and linux, which can then be assigned to different teams.
Note, as you will see, Google SecOps SOAR Environments are case sensitive, whereas SIEM Scopes can only be lowercase.
Important: To reiterate, this approach will only work consistently if a Data RBAC Scope contains just one Custom Label. This is due to a limitation of the SOAR Connector, which can only read a single custom label value (...customLabels_1) for alert routing.
Summary of steps:
The process for implementing Data and Feature RBAC in Google SecOps involved the following steps:
- IDP or Directory: Create Groups (Optional)
- SIEM: Create Data RBAC Custom Labels
- SIEM: Create Data RBAC Scopes, using your Custom Labels
- GCP IAM: Create custom Roles (Optional)
- GCP IAM: Assign Groups with Conditions to IAM
- SOAR: Create SOAR Environments and/or Aliases
- SOAR: Evaluate Permission Groups (Optional)
- SOAR: Create Roles
- SOAR: Group Mapping
- SOAR: Connectors
- SIEM: Bind Rules to Scopes
Setup Guide
You will need the following access rights in order to perform this setup:
- Chronicle API Admin
- Chronicle SOAR Admin
- GCP IAM Administrator
You will need to have enabled your Google SecOps tenant IAM access.
Note, if you can’t see the Data Access tab in your Google SecOps SIEM Settings then contact Google Cloud Support, or your account team, in order to enable the feature.
IDP or Directory: Create Groups (Optional)
The first, optional, step is to create Groups that will be used for your Teams. If you have existing suitable IDP Groups you can use those.
At the time of writing, November 2025, SIEM does use the members of an assigned Google Cloud Identity group for Feature and Data RBAC, but SOAR does not.
However, this is planned to change at a future date where a native unified approach to Feature and Data RBAC will be implemented for SOAR components, and so creating, populating, and assigning groups is a recommended future proof approach.
Note, be aware that nested group membership can result in unexpected SIEM Data RBAC access.
SIEM: Create Data RBAC Custom Labels
In this stage we create the Team based Custom Labels that will be used to apply Data RBAC restrictions on SIEM data.
- SIEM Settings > Data Access > Custom Labels
- Click the “Create Custom Label” button
- Enter a YARA-L query for each Team label required, and click “Create Label”
For example, Team X could be configured as:
- Name: windows
- UDM Search:
metadata.log_type = "WINEVTLOG" or metadata.log_type =
“WINDOWS_SYSMON” - Name: linux
- YARA-L query:
metadata.log_type = "NIX_SYSTEM" or metadata.log_type = "AUDITD" As we will see later on, the Custom Labels approach is the only way to apply a consistent label to all Google SecOps SIEM data irrespective of ingestion method, i.e., this approach will work against Google Cloud or Workspace native ingestion, the Ingestion API (which includes the OTEL Collector), and Feed Management.
SIEM: Create Data RBAC Scopes, using your Custom Labels
In this stage we create a SIEM Data RBAC Scope that uses the previously created SIEM Data RBAC Custom Label.
- SIEM Settings > Data Access > Scopes
- Click “Create Scope”
- Scope Name: <enter a scope name>
- Description: <enter a description, e.g., Created by X on Y>
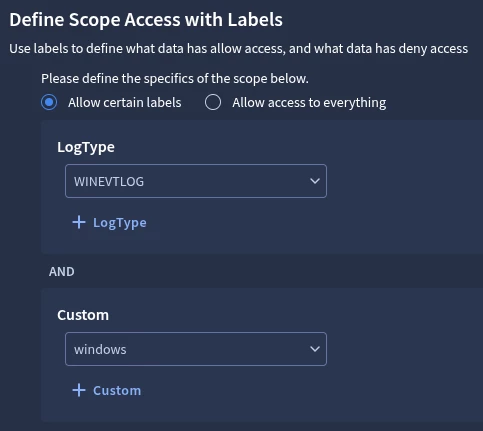
- Under “Define Scope Access with Labels” select “Custom” and select the Custom Label you create in the prior step
- Click “Create Scope”
For the purpose of this example setup, the following configuration is used:
- Scope: linux
- Allow Labels: linux
- Scope: windows
- Allow Labels: windows
Raw Log Search
If Team X will require the Raw Log Search feature in SIEM then you will need to explicitly include the LogType in your Scope. Why is this? Only the LogType definition will allow access to this feature as a security measure to prevent data leakage. As Custom Labels are only applied to UDM, allowing Raw Log Search could allow access to unparsed Raw Logs which were not part of the intended scope.
Note, Data RBAC labelling is not instant, and can take up to an hour to take effect.

GCP IAM: Create custom Roles (Optional)
In this stage we, optionally, create custom IAM Roles in GCP in order to allow Feature RBAC access to specific SIEM components:
- SecOps Gemini
- SecOps Agent AI
Note, if you do not require restricted users within a Team to have access to Gemini in Google SecOps SIEM you can skip this step.
- Open a Google Cloud console Cloud Shell
- Set the active GCP Project to that of your Google SecOps tenant:
- gcloud config set project cmmartin-dev
- For each Feature you want to grant to a restricted role in SecOps create the associated yaml file, as below, and run the following gcloud command:
- gcloud iam roles create {role_name} --project={GCP_PROJECT_ID} --file={filename.yaml}
- E.g., gcloud iam roles create chronicle_gemini --project=cmmartin-dev --file=chronicle_gemini.yaml
Google SecOps Gemini
description: 'Created on {DATE} by {USER}'
includedPermissions:
- chronicle.ais.createFeedback
- chronicle.ais.translateUdmQuery
- chronicle.ais.translateYlRule
- chronicle.conversations.create
- chronicle.conversations.delete
- chronicle.conversations.get
- chronicle.conversations.list
- chronicle.conversations.update
- chronicle.messages.create
- chronicle.messages.delete
- chronicle.messages.get
- chronicle.messages.list
- chronicle.messages.update
- chronicle.preferenceSets.update
name: projects/{GCP_PROJECT_ID}/roles/google_secops_gemini
stage: BETA
title: Google SecOps Gemini
Note, additional SIEM Feature RBAC roles may be required depending on your organization's specific needs.
GCP IAM: Assign Groups with Conditions to IAM
The next stage involves assigning your IDP groups to default and, optionally, custom GCP IAM roles, and applying a GCP IAM Condition to the default Chronicle API Restricted Data Access role.
- In the Google Cloud console navigate to GCP > IAM & Admin > IAM
- Click “Grant Access”
- Under “Add principals” enter the Group email address
- Under “Assign roles” click “Add Roles”, and add the following:
- Chronicle API Restricted Data Access Viewer
- Chronicle API Restricted Data Access
- Click “Save”
The next step is crucial in order to apply the SIEM Data RBAC Scope previously created to the configured Group:
- For the Group in question, under the “Chronicle API Restricted Data Access” click the Pencil (Edit Principal) icon
- For the “Chronicle API Restricted Data Access” IAM Role click “Add Condition”
- Title: <condition title, e.g. linux>
- Description: <enter a description, e.g., Added by X on Y>
- Under the “Condition builder” tab fill in the fields as follows:
- Condition type 1 = Name
- Operator = Ends with
- Value = /<scope name>
- Click “Save”
Note, it is crucial that the Value is case sensitive and entered correctly.
Note, if any of the Roles show as having either (Beta) in their name, use those.
SOAR: Create SOAR Environments
This stage involves creating SOAR environments that match the SIEM Data RBAC scopes. Alternatively, if you have existing SOAR Environments and want to re-use these you can use the SOAR Environment Alias feature.
Creating SOAR New Environments
This path is for creating a brand new Team environment:
- Settings > SOAR > Organization > Environments
- Click the “+” icon
- “Name” enter your Environment name
- This must exactly match the SIEM data RBAC Scope name. Since SIEM scopes must be lowercase, this Environment name must also be lowercase. The matching is case-sensitive.
- “Description”: <description of the Environment, e.g., Team X, created by Y on Z”
- “Contact Name”: <contact name for Team X>
- “Contact Emails”: <Team X email address>
- “Contact Phone”: <Team X contact phone number, note you can enter 0 if you have no valid number>
- “Aliases”: <optionally add additional Custom Scope that should be matched to this SOAR Environment>
- Click “Add”
Note, you can change the Image for an Environment click click the Pencil icon
Adding an Alias to an existing SOAR Environment
This path is for re-using an existing SOAR Environment, and this can support multiple Custom Labels being applied.
- Settings > SOAR > Organization > Environments
- Edit the Environment (double mouse click)
- Add the Data RBAC Custom Label to the Aliases field
- Note, you need to press the Enter key on your keyboard so that the entry is recognized as a Chip before clicking Save
- Click “Save”
Note, while not covered in this guide, you can also utilize SOAR Environment Groups for more fine grained access, which also support Aliases - https://cloud.google.com/chronicle/docs/soar/admin-tasks/environments/environment-groups
SOAR: Evaluate Permission Groups (Optional)
In this stage you can optionally create a new Permission group if a default Permission Groups do not suffice.
However, for the purpose of this example guide the default Managed User role will be used. A list of default SOAR Permission Groups can be found here.
SOAR: Create Roles
In this stage a custom SOAR Role is created that will be used to map Cases to that specific Team environment. This capability will also help for Playbook content where you can assign it to specific Roles only (this is not covered in this guide)
- Settings > SOAR Settings > Organization > Roles
- Click the “+” icon
- Role Name: <team X>
- Additional Roles: <select your Default Role, which is by default Tier1>
- Click Add
SOAR: Group Mapping
In this stage the IDP Group mapping is applied and linked to the Team X Environment, SOC Role, and a SOAR Permission Group.
- Settings > SOAR Settings > Advanced > Group Mapping
- Click the “+” icon
- Group: <enter the IDP email address of your group>
- Permissions Group: Managed User
- SOC Roles: Team X Role
- Environment: Team X Environment
- Group Members: <enter the email address of users within the group who require access>
- Click Add
Note, in this setup configuration no “Default Access Settings” are configured or required.
SOAR: Connectors
In this stage the default “Google Chronicle Connector” is updated to use the SIEM Data RBAC Scope Name to route the SIEM Detection Alerts to the appropriate SOAR Environment.
- Settings > SOAR Settings > Ingestion > Connectors
- Under “Google Chronicle” select the default “Google Chronicle - Chronicle Alerts Connector 1”
- Under “Advanced” in “Environment Field Name” enter “event_metadata_baseLabels_customLabels_1”
- Click “Save”
Note, this guide is premised on there only being a single custom label applied to each UDM event.
SIEM: Bind Rules to Scopes
In this stage SIEM Detection Rules are bound to the appropriate Scope.
If this configuration is not applied then restricted Team X users will not be able to see the YARA-L rules, nor will they be able to use the Composite Detection widget in a Case in SOAR.
- SIEM > Detection > Rules & Detections > Rules Editor
- In the left hand panel, select the YARA-L rule(s) in question
- In the top right hand corner click the drop down menu and select the associated Scope
- Click “Save”
Questions
What if I require Team X to have Raw Log Search capabilities?
At present if using a SIEM Data RBAC Custom Label this only grants access to UDM Search, and not Raw Log Search. If you require Team X to have access to Raw Log Search you will need to include the explicit Log Type in the SIEM Data RBAC Scope.

Can I configure SIEM or SOAR only access?
Yes. While not covered in this guide, further detail is available here, which can be adapted and built upon the content in this solution:
https://cloud.google.com/chronicle/docs/secops/adding_siem_or_soar_roles
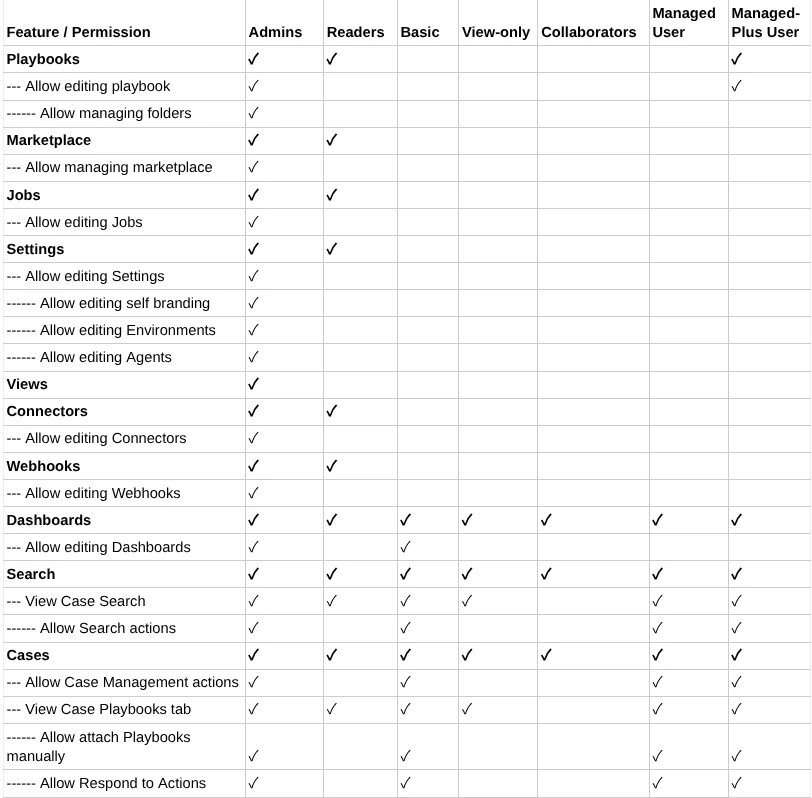
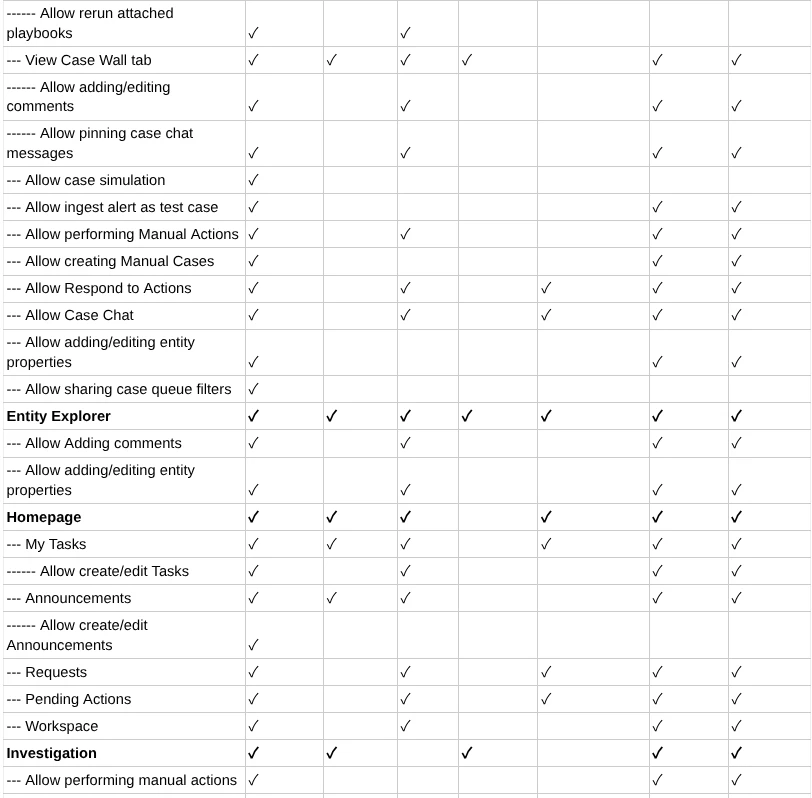
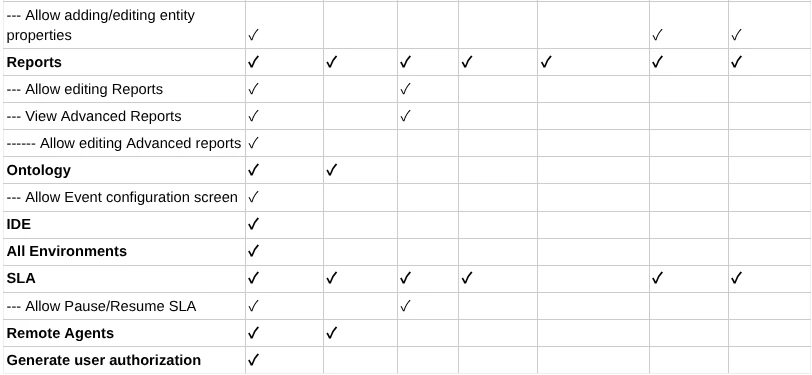
SOAR Permissions Group
The following table shows the default SOAR Permissions Group available. If these do not meet your requirements you can use these as a basis for creating a custom Permissions Group.