

Table of Contents
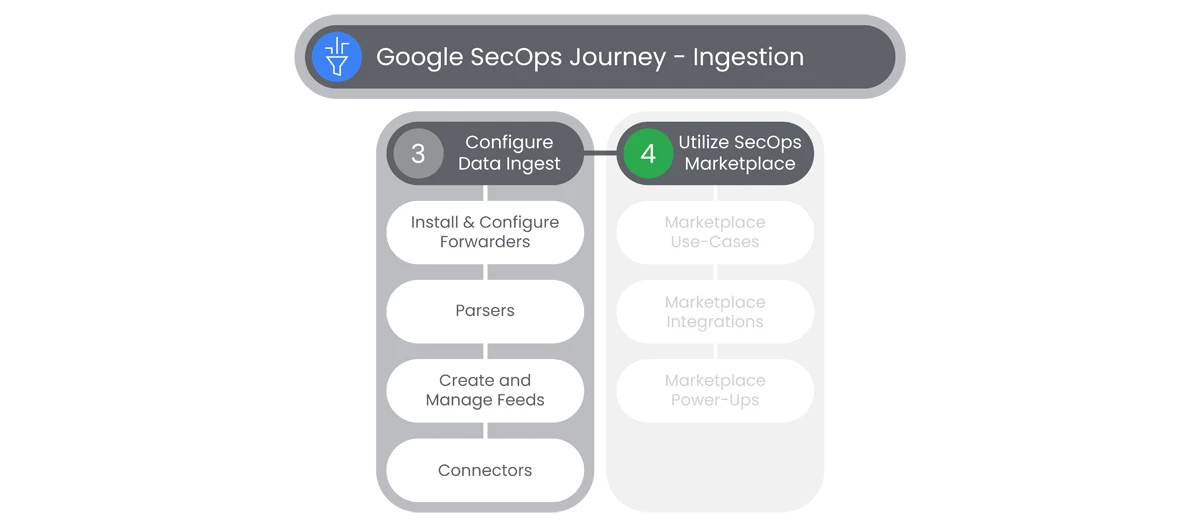
Data Ingest is the core of Google SecOps ingests raw log data, alerts, and other information. Ingested information is normalized and indexed for rapid search, then context enriched with data available from other ingested sources including threat intelligence feeds.
Configuring data ingest is the first step in preparing Google SecOps to correlate security events for your SecOps team. Google’s industry leading SecOps indexing, context enrichment, and search will enable your SecOps analysts to respond rapidly with a comprehensive view of threats and events.
Actions

Install & Configure Forwarders
Google SecOps SIEM forwarder is a software component that runs on a machine or device on your network, such as a server. Google SecOps SIEM forwarder can collect log data and network interface packets and forward that data to your Google SecOps SIEM instance.
- To add a new forwarder, users will select Settings in the left-side Navigation Bar and then select SIEM Settings, that will display the Settings page.
- In the Settings page, users will select Forwarders, that will display the page.
- Users can conduct search for Forwarders in the Search bar.
- Users also have the ability to Filter the list of Forwarders by selecting the Filter icon to the left of Create Forwarder.
- Users can add a new Forwarder by selecting Add New Forwarder.

- In the Forwarder Name field, can create a new Forwarder name.
- To further configure, users will expand the Configuration Values section and specify any of the following:
- Upload compression
- Asset namespace
- Label key
- Label value
- Filter description
- Regular expression
- Filter behavior
- Optional: Toggle Server Settings to configure the forwarder's built-in HTTP server, which can be used to configure load balancing and high availability options for syslog collection on Linux.
- Click Submit.
Relevant Documentation Links

Parsers
Parsers normalize raw log data into structured Unified Data Model format. Google Security Operations provides a set of default parsers that read original raw logs and generate structured UDM records using data in the original raw log.
Steps
- To add a new Parser, users will select Settings in the left-side Navigation Bar and then select SIEM Settings, that will display the Settings page.
- In the Settings page, users will select Parsers, that will display the Parsers page.
- Users can conduct search for Log Types in the Search bar or from the Log Source list.
- Users also have the ability to Filter the list of Parsers by selecting the Filter icon to the left of Create Parser.
- Users can add a new Parser by selecting Create Parser.
- Users will see a Create New Custom Parser popup.
- On the Create New Custom Parser popup, users will enter a new Log Source in the Select the Log Source field.
- To further configure a new Custom Parser, users will write a new Code in the Parser Code Terminal for the Parser, and then select Validate by selecting the Validate button.
- Users can see the UDM Output in the UDM Output Preview box, to the right of the UDM Output text box, by selecting the Preview button.
- If the UDM Output is correct and final, users will select Validate to create the Parser.
- The validation process may take a few minutes, so we recommend that you preview the Custom Parser first, make changes if required, and then validate the Custom Parser.
- Click Submit.
- The Parser is picked for normalization after 20 minutes.
Relevant Documentation Links

Create and Manage Feeds
Google SecOps allows to users to create, manage, and troubleshoot feeds using the feed management UI. Managing the feeds includes modifying, enabling, and deleting the feeds.each data feed to have its own set of prerequisites that must be completed prior to setting up the feed in Google SecOps.
Steps
- To add a feed to your Google SecOps account, complete the following steps. Users can add up to five feeds for each log type.
- From the Google SecOps menu, select Settings, SIEM Settings, and then click Feeds. The data feeds listed on this page include all the feeds that Google has configured for your account in addition to the feeds that you have configured.
- Click Add New. The Add Feed window is displayed.

- Add a feed name, by searching the Source type list, select the source type through which users intend to bring data into Google SecOps. Users can select from the following feed source types:
- Amazon Data Firehose
- Amazon S3
- Amazon SQS
- Google Cloud Pub/Sub
- Google Cloud Storage
- HTTP(S) Files (non-API)
- Microsoft Azure Blob Storage
- Third party API
- Webhook
- In the Log Type list, select the log type corresponding to the logs that the user wants to ingest. The logs available vary depending on which source type you selected previously.
- Click Next.

- Review the user’s new feed configuration from the Finalize tab. Click Submit when you are ready. Google SecOps completes a validation check of the new feed. If the feed passes the check, a name is generated for the feed, it is submitted to Google SecOps, and Google SecOps begins to attempt to fetch data.
Relevant Documentation Links

Connectors
Google SecOps SOAR uses connectors to ingest alerts from a variety of data sources into the platform. A connector is one of the items in an integration package which can be downloaded through the Google SecOps Content Hub.
Prerequisites
- Users will need to download an Integration that has a Connector in Content Hub.
Steps
- To add a new Connector, users will select Settings in the left-side Navigation Bar and then select SOAR Settings, that will display the Settings page.
- In the Settings page, users will select Ingestion dropdown menu, and select Connectors in the dropdown menu.
- A Connectors popup page will appear, that will display a Search field to select from options for Connectors.
- Users can also select the Create New Connector button at the top-right of the Connectors popup page.

- An Add Connector popup page will appear, where users can select a from a Connector list in a dropdown menu.
- The option to select a Remote Connector can be selected by click the Remote Connector checkbox.
- If no Agents are configured, users can select Install Agent in the Add Connector popup.
- Users will then select Create.

- A New Connector Configuration page will appear.
- In this page, users will be able to configure a New Connector with three tabs, consisting of the following input pages:
- Parameters- consisting of Mandatory and Advanced fields.
- Testing
- Logs
- When complete, users will select Save.
- If users need to add a Domain, they will navigate to the Settings > SOAR Settings > Environments > Domains.
- Users will click the Add button on the top right of the Domains page.
- Enter the Domain and Environment into the Add Domain popup .
- When complete users will select Add.
- If users need to add a Network, they will navigate to the Settings > SOAR Settings > Environments > Networks.
- Users will click the Add button on the top right of the Domains page.
- Enter the following information into the Add Network popup:
- Name
- CIDR Format
- Priority level
- Environment
- When complete users will select Add.
Relevant Documentation Links
- [All Steps]
https://cloud.google.com/chronicle/docs/soar/marketplace-integrations/google-chronicle#chronicle-alerts-connector - [Additional Steps]
https://cloud.google.com/chronicle/docs/soar/admin-tasks/configuration/define-domains-for-mssps
https://cloud.google.com/chronicle/docs/soar/admin-tasks/configuration/manage-networks
Next Step: Security Operations: Step 2.2 - Ingestion | Utilize SecOps Marketplace
Previous Step: Security Operations: Step 2 - Ingestion