



Author: Vasken Houdoverdov, Technical Solutions Consultant
Co-Author: Vik Singh, Senior Customer Success Manager
Security Command Center (SCC) provides comprehensive visibility into your cloud security environment. One of the ways SCC achieves this is by generating findings, which are records that are created when an issue is detected by one of the SCC services. These findings allow you to focus on actionable issues that typically require remediation, but a high volume of findings can sometimes lead to "alert fatigue" for security teams. To help your team focus on what is actionable, SCC provides a framework for managing findings using Mute Rules. These rules allow you to automatically suppress findings that are expected, low-risk, or handled by existing controls.
Quick Reference: Mute Rules in Security Command Center
| Core Objective | Reduce Alert Fatigue by suppressing expected, low-risk, or handled findings. |
| Rule Types |
|
| Implementation Checklist |
|
| Best Practices |
|
Introduction
The current cloud landscape is defined by its architectural complexity and the corresponding explosion of security telemetry data. For organizations operating at a large scale, the primary challenge has shifted from a lack of visibility to dealing with an excess of noise.
The efficacy of a security operations center is often hindered by "alert fatigue," a state where critical signals are buried beneath “noise.” Noise can refer to findings that are commonplace and easily dealt with, or findings that don’t require a response due to circumstances that are specific to the environment (like an accepted risk or a mitigating control). Tools like SCC can generate a comprehensive array of findings, but effective management of these findings necessitates a move from reactive manual intervention to the implementation of "Mute Rules” to assist with the management of findings.
This guide walks you through how to effectively implement Mute Rules to streamline your cloud security operations and prioritize critical threats.
Understanding Mute Rules
Mute Rules are configurations that use filters to automatically change the state of future findings from Active to Muted. Muted findings are not deleted; they are simply hidden from the default dashboard view, ensuring your "Active" finding count reflects only the issues requiring immediate attention.
Note that muting a finding doesn't exclude it from the Compliance page in Security Command Center, or from any related compliance checks.
Static vs. Dynamic Mute Rules
-
Static Mute Rules: Mute findings indefinitely based on a filter. These are best for persistent exceptions, such as a specific development project where certain vulnerabilities are accepted.
-
Dynamic Mute Rules: These allow you to mute findings temporarily until a specific expiration date (specified in RFC3339 timestamp format) or until the finding no longer matches the filter. This is ideal for maintenance windows or temporary risk acceptances.
| Mute Rule Type | Primary Use Case | Duration | Temporal Support |
|---|---|---|---|
| Static | Environment Isolation (e.g., Sandbox) | Indefinite | None |
| Dynamic | Maintenance Windows/Risk Acceptance | Temporary | RFC3339 Expiry Support |
Core Use Cases for Muting
Common scenarios for applying mute rules include:
-
Environment Isolation: Muting vulnerabilities in "Sandbox" or "Training" projects that do not contain production data.
-
Known Exceptions: Muting findings for resources where a compensating control is already in place (e.g., a legacy application behind a specialized WAF).
-
Noise Reduction: Muting low-severity findings that your organization has decided not to prioritize for the current quarter.
-
Maintenance Windows: Using dynamic rules to suppress alerts during scheduled infrastructure upgrades.
Step-by-Step Configuration
Follow these steps to create your first Mute Rule in the Google Cloud Console.
1. Define Your Filter
Before creating the rule, go to the Findings page and use the Query Editor to craft a refined query for exactly what you want to mute.
-
Example Query: resource.project_display_name="dev-sandbox-123" AND severity="LOW"
2. Create the Mute Rule
-
In the SCC menu, go to SCC Settings > Mute Rules.
-
Click Create Mute Rule.
-
Mute Rule ID: Provide a unique, descriptive ID (e.g., mute-low-severity-sandbox).
-
Description: Document why this rule exists and who approved the risk.
-
Conditions: Paste your query from Step 1 or use the visual filter builder.
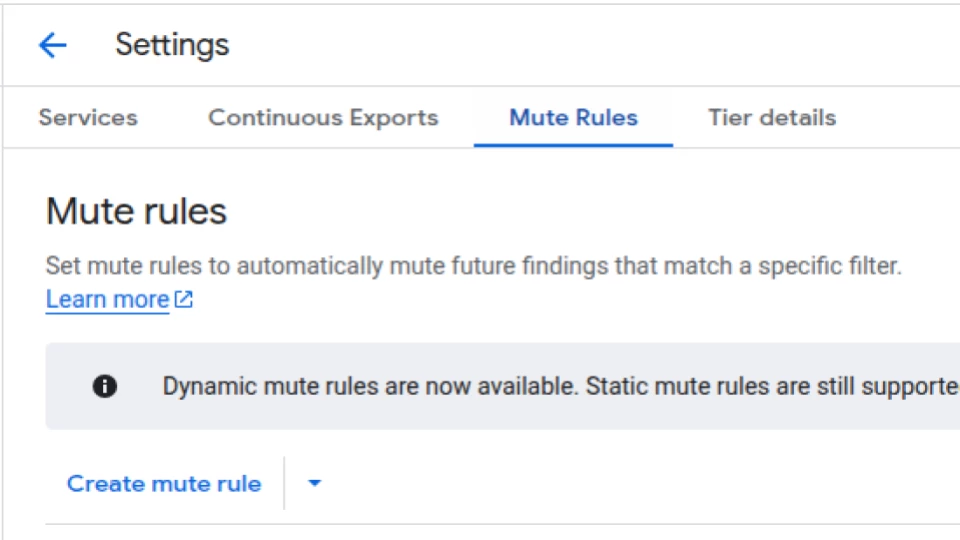
Mute rules can be found under SCC Settings.
3. Set Expiration (Optional)
If you are using a Dynamic Mute Rule, check the "Mute matching findings temporarily" box and select an expiration date.
4. Preview and Save
Always click Preview matching findings to see a list of existing findings that will be affected. This prevents accidental over-muting of critical issues. If the list looks correct, click Save.
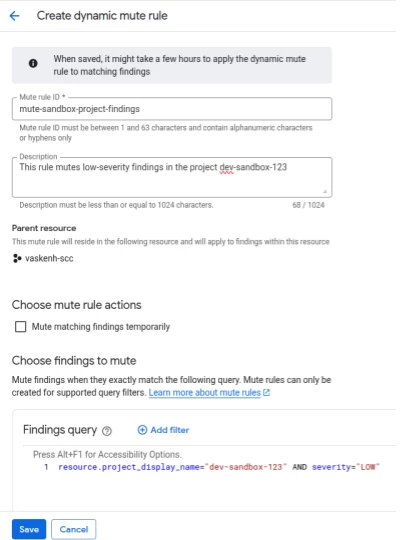
Defining a dynamic mute rule.
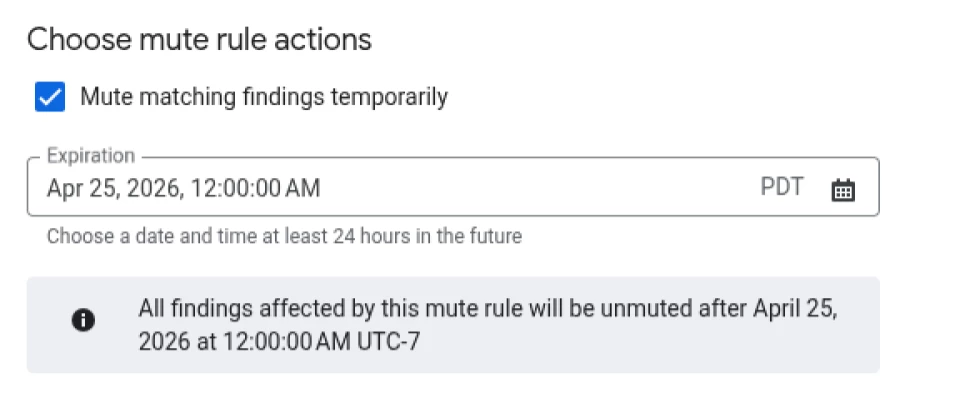
Configuring an expiration date for a dynamic mute rule.
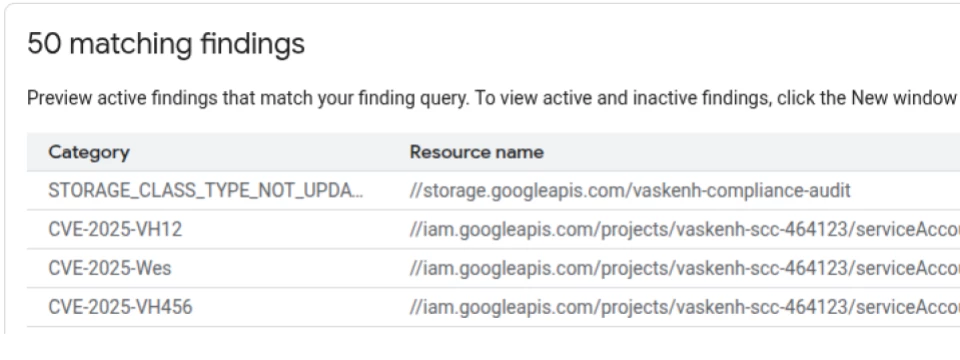
Clicking Preview matching findings lets you test your mute rule.
Best Practices for Mute Rule Management
-
Follow the Principle of Least Privilege: Ensure only authorized security administrators have the roles/securitycenter.muteConfigsEditor role to prevent unauthorized suppression of alerts.
-
Audit Regularly: Schedule a quarterly review of all active Mute Rules. Check if the "Temporary" rules need to be extended or if the "Static" rules are still valid.
-
Use Descriptive Naming: Include the team name or the Jira ticket ID in the Mute Rule ID to make audits easier.
-
Monitor Muted Findings: Occasionally filter your findings view by state="MUTED" to ensure no high-severity "critical" findings are being caught by overly broad filters.
Implementing Mute Rules with the API
Implementing Mute Rules programmatically via the API has a number of benefits.
-
Policy as Code: Use version control to track your mute rules in a repository.
-
Scalability: Apply the same rule across hundreds of projects or multiple folders instantly.
-
Dynamic Governance: Automatically create temporary mute rules that expire after a maintenance window.
Understanding Mute Rule Anatomy
Before calling the API, we should understand the three core components of a MuteConfig object:
-
Parent: The scope of the rule. This can be one of:
-
organizations/{id}
-
folders/{id}
-
projects/{id}.
-
-
Filter: The logic that determines which findings to silence. (e.g., category="OPEN_FIREWALL" AND resource.projectDisplayName="dev-test").
-
Type:
-
Static: Only mutes findings created after the rule is made.
-
Dynamic: Mutes both existing and future findings (the modern standard).
-
Implementing Mute Rules with Python
The Python Client Library is the most common way to automate SCC. First, ensure you have the library installed:
pip install google-cloud-security-center
With the library installed, we can proceed to write the rest of our Python script.
def create_mute_rule(parent_path, rule_id):
    client = securitycenter.SecurityCenterClient()

    # Define the rule configuration
    mute_config = securitycenter.MuteConfig()
    mute_config.description = "Mute low-severity noise in Dev Project"

    # The filter defines what to hide
    mute_config.filter = (
        'severity="LOW" AND '
        'resource.project_display_name="my-dev-project"'
    )

    # Setting the type to DYNAMIC ensures it covers existing findings
    mute_config.type_ = securitycenter.MuteConfig.Type.DYNAMIC

    # The request
    request = securitycenter.CreateMuteConfigRequest(
        parent=parent_path,
        mute_config_id=rule_id,
        mute_config=mute_config,
    )

    response = client.create_mute_config(request=request)
    print(f"Success! Mute rule created: {response.name}")

# Usage: 'projects/your-admin-project' or 'organizations/12345'
create_mute_rule("projects/my-security-admin-project", "mute-dev-low-noise")

Implementing Mute Rules with gcloud
Alternatively, you can use the gcloud CLI to create a Mute Rule.

gcloud scc muteconfigs create "silence-ssl-policy" \
    --organization="YOUR_ORG_ID" \
    --description="Mute non-compliant SSL policies for legacy apps" \
    --filter="category=\"SSL_NOT_ADHERED\" AND resource.name:\"legacy-load-balancer\""
Adding an Expiry Time to Mute Rules
One of the most powerful features of creating mute rules via API is being able to set the expiry_time.
In the API request, you can add an expiry_time in RFC3339 UTC format. Once this time passes, the rule is automatically removed, and the findings will reappear in your active queue—ensuring that "temporary" risks don't become permanent blind spots.
Here is an example timestamp that matches the expected format:
expiry_time = "2028-02-03T15:01:23Z"
Troubleshooting
-
Finding still showing up? Ensure your filter syntax is exact. Remember that Mute Rules apply to future findings as they are generated or updated.
-
Need to mute existing findings immediately? You can perform a Bulk Mute action directly from the Findings page by selecting multiple items and clicking Change Mute State.
Summary & Resources
Implementing Mute Rules in Security Command Center is a critical step for organizations looking to refine their cloud security operations and eliminate the burden of alert fatigue. By strategically applying static rules and dynamic mute rules, security teams can transform a high-volume findings dashboard into a focused list of actionable threats. Whether configured through the Google Cloud Console or automated via the API and gcloud CLI, these rules ensure that high-severity signals are no longer buried under low-risk or expected noise.
To maintain long-term operational excellence, it is vital to follow established best practices such as enforcing the principle of least privilege for rule management and conducting regular audits. These measures, combined with the use of descriptive naming and the tracking of muted findings, empower security administrators to maintain complete visibility while prioritizing the issues that matter most. By adopting these strategies, teams can achieve a more efficient, scalable, and responsive security posture across their entire cloud environment.
Documentation Links
