

Table of Contents
Below you'll find a table of contents for the Rules journey.
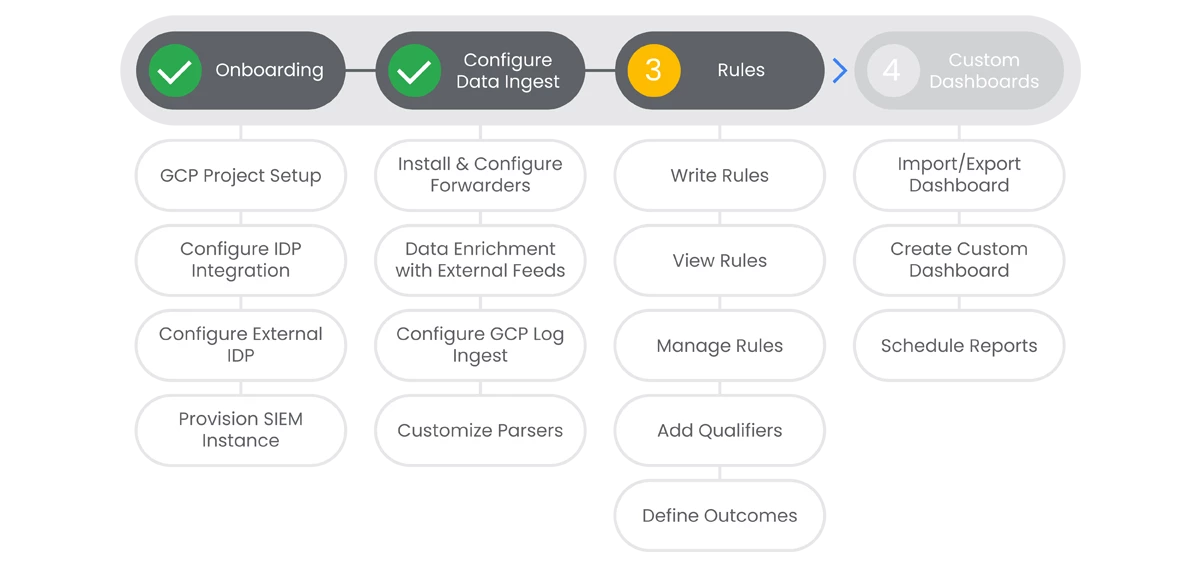
Rules are the backbone of ensuring data is actionable and aligned to your unique policies within SecOps. Rules allow your SecOps team to tailor information and alerting to the unique needs of your organization.
Prerequisites
- Entitlement for SecOps SIEM on the account and project.
Actions

Write Rules
SecOps enables you to view telemetry, entity context, relationships, and vulnerabilities as a single detection within your account. It provides entity contextualization to enable you to understand both the behavioral patterns in telemetry and the context of those impacted entities from those patterns.
Prerequisites
See the Relevant Links section for more documentation regarding the prerequisites.
- Existing Chronicle instance
- Proper access in Chronicle
Steps
-
Open the Rules Dashboard in Chronicle, select Rules.
-
Click on Rules Editor > New
-
Specifiy your source using either the
udm
or
entity
-
Specify the entity data
-
Specify UDM event data
Relevant Links

View Rules
Existing rules can be copied and edited as needed. This allows the rapid creation of new rules based on existing rules, or modification of existing rules when required.
Prerequisites
See the Relevant Links section for more documentation regarding the prerequisites.
- Existing Chronicle instance
- Existing rules
Steps
-
Click on Rules Editor, lets you edit existing rules and create new ones.
-
Use the Search rules field to search for an existing rule.
-
Select the rule you are interested in from the Rules List.
-
Use the Rules Editing window to edit existing rules and to create new rules.
-
Click New in the Rules Editor to open the Rules Editor Window.
Relevant Links

Manage Rules
SecOps enables you to view telemetry, entity context, relationships, and vulnerabilities as a single detection within your SecOps account. It provides entity contextualization to enable you to understand both the behavioral patterns in telemetry and the context of those impacted entities from those patterns.
Prerequisites
See the Relevant Links section for more documentation regarding the prerequisites.
- Existing Rules in SOAR
- Proper access to manage rules
Steps
-
The Rules Editor lets you edit existing rules and create new ones.
-
Use the Search Rules field to search for an existing rule.
-
Select the rule you are interested in from the Rules List.
-
Use the Rules Editing window to edit existing rules and to create new rules.
-
Click New in the Rules Editor to open the Rules Editor Window.
-
Relevant Links

Add Qualifiers
While writing or editing rules, you might want to add additional qualifiers for the entity context.
Prerequisites
See the Relevant Links section for more documentation regarding the prerequisites.
- Access into Chronicle
- Editing new or existing rules in the Rules Editor
Steps
-
In the rules editor, provide a after the event name. The must be graph.
-
Example:
$e.graph.entity.hostname
-
-
There are two equivalent methods of referring to a UDM event:
-
$u.udm.principal.asset_id
-
$u.principal.asset_id
-
-
Qualifiers can be mixed and matched in the rule text. You can use different qualifiers for the same event as well.
Relevant Links

Define Outcomes
Detection engine supports an outcome section that allows you to derive more information from a rule. The logic from the outcome section is evaluated against each detection.
Prerequisites
See the Relevant Links section for more documentation regarding the prerequisites.
- Access into Chronicle
- Editing new or existing rules in the Rules Editor
Steps
-
In the Rules editor, supply a rule following the guidance in the linked docs on the next slide.
-
An example can be found in the linked documentation.
-
Relevant Links
- All Steps: https://cloud.google.com/chronicle/docs/detection/context-aware-analytics#outcome_section
- Example: https://cloud.google.com/chronicle/docs/detection/yara-l-2-0-overview#rule_with_outcome_section_example
Next Steps: Security Operations SIEM: Step 4 - Custom Dashboards
Previous Step: Security Operations SIEM: Step 2 - Data Ingest