
The Challenge: Taming the 3 T's of Security with AI
In the world of security operations, we're all fighting the same battle against the "3 T's": Threat overload, talent shortages, and operational toil. The promise of agentic AI to help us tackle these challenges is massive. By leveraging Large Language Models (LLMs), we can augment our teams, automate repetitive tasks, and scale our expertise like never before, all while helping you focus on mitigating the threats that actually matter..
This idea of “supercharging security” with AI is not new, so what’s changed? We are moving beyond a purely AI-assisted phase, where AI boosts productivity by generating summaries and recommendations, into a semi-autonomous one. In this new phase, AI agents don't just provide the steps on how to do something; they can now perform those steps on our behalf. This evolution is driven by the ReAct (Reasoning and Acting) framework and the maturation of the open-sourced Model Context Protocol (MCP). MCP provides the essential, standardized bridge that allows AI to interact with code, and in our use case, control a diverse set of powerful security tools, enabling a shift from passive data interpretation to active, agentic workflows.
To help the community harness this power, Google recently open-sourced Model Context Protocol (MCP) servers for Google Security Operations (SIEM and SOAR), Google Threat Intelligence, and Security Command Center. These servers are the building blocks for creating your own AI-powered security workflows. However, as many of you have discovered, setting them up on a local machine can be a challenging experience. From wrestling with SSL certificates to navigating OS-specific nuances, the path to "hello, world" can be filled with friction.
The Solution: Your Frictionless On-Ramp with Firebase Studio
What if you could bypass the setup headaches entirely? This is where Firebase Studio comes in. It provides a consistent, browser-based development environment that gives you a clean slate to work from, every time, and it’s perfect for building, testing, and even deploying AI applications.
This guide will walk you through the simple, frictionless path to getting the Google Security MCP servers up and running using Firebase Studio and the Cline VSCode extension. No more local environment debugging – just a straightforward path to exploring agentic security. A YouTube video tutorial is also available if you prefer.
| Heads Up! Verify Your Account Permissions: The Google account used for Firebase Studio must have the necessary IAM permissions to invoke the respective APIs for the Security MCP tools you intend to use.
|
Step 1: Firebase Studio Workspace Setup
With our permissions caveat out of the way, let's get our Firebase Studio environment ready.
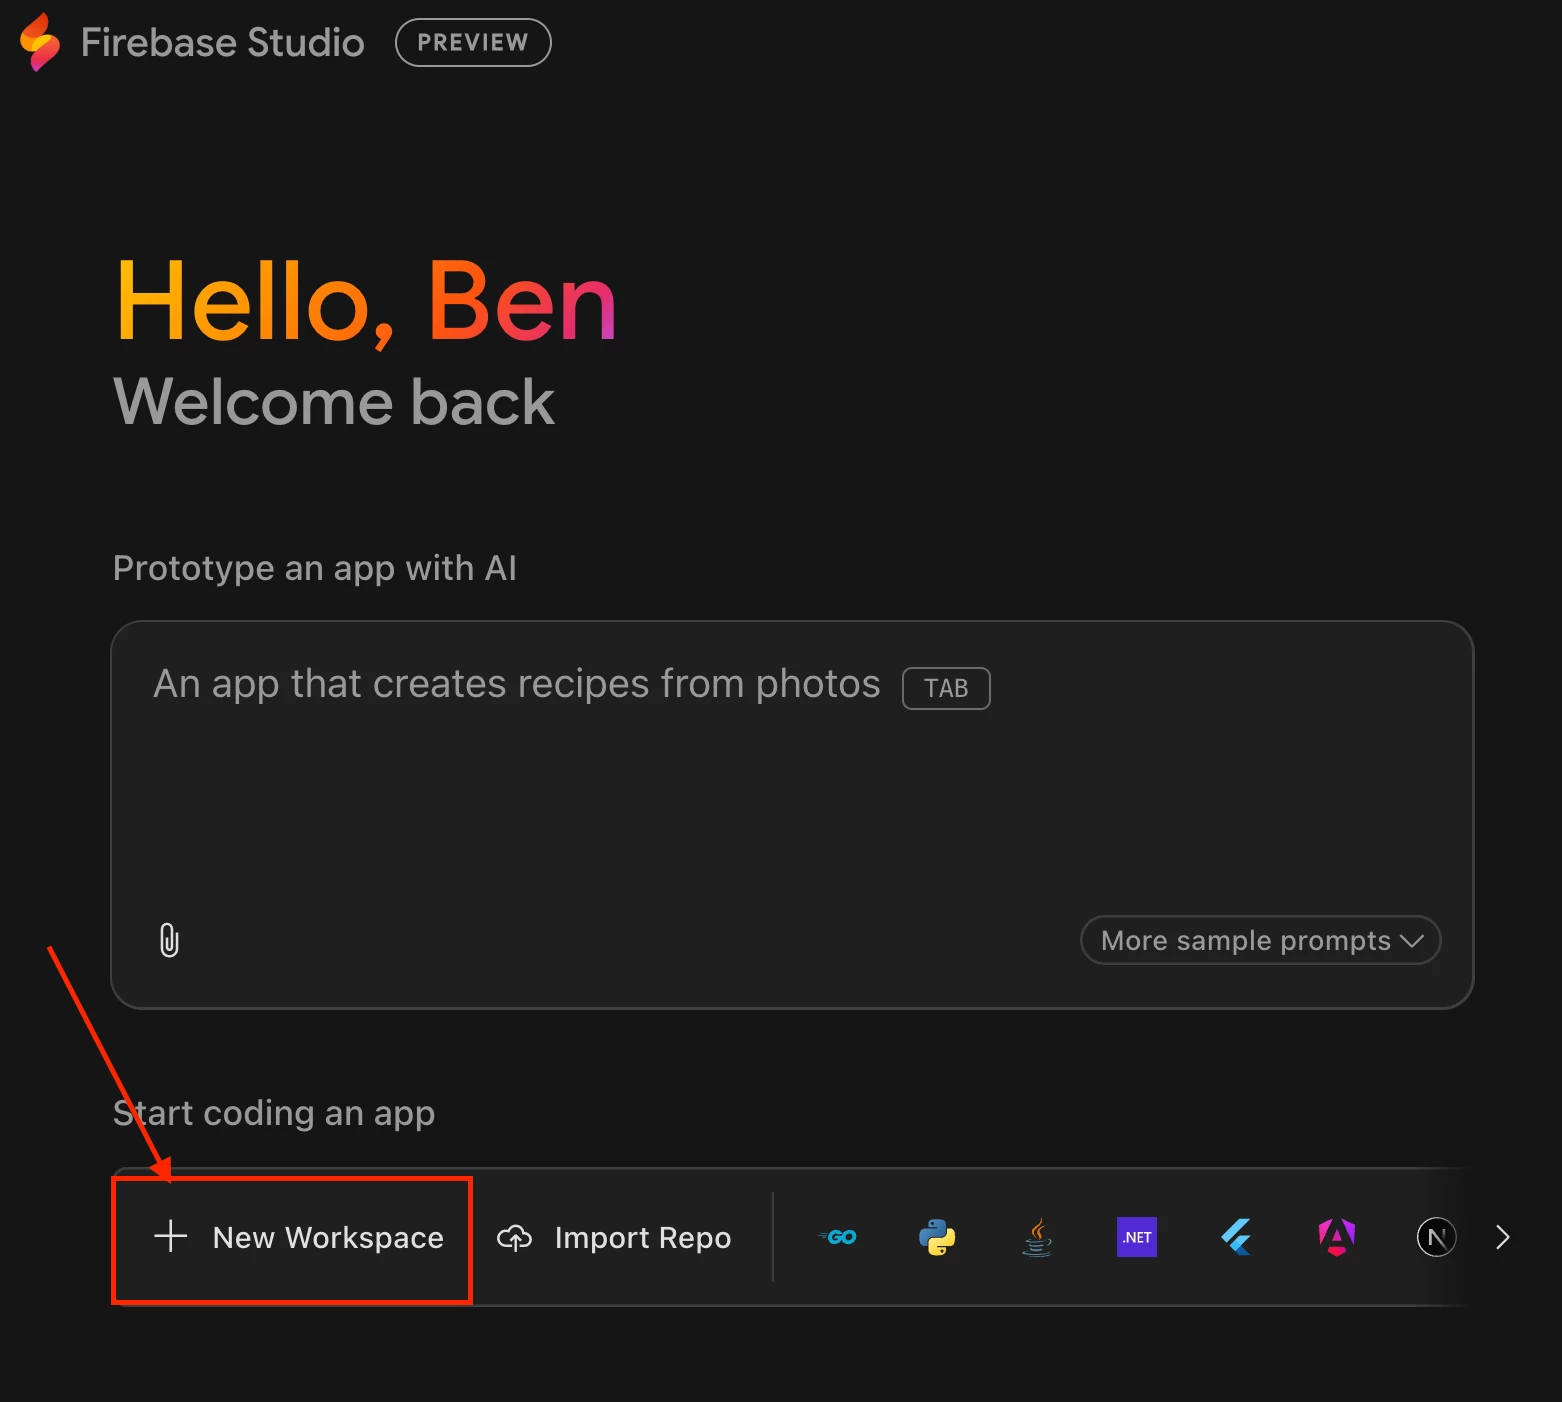
- First, navigate to Firebase Studio and click the Get Started or Try Firebase Studio button to sign in with a Google account.
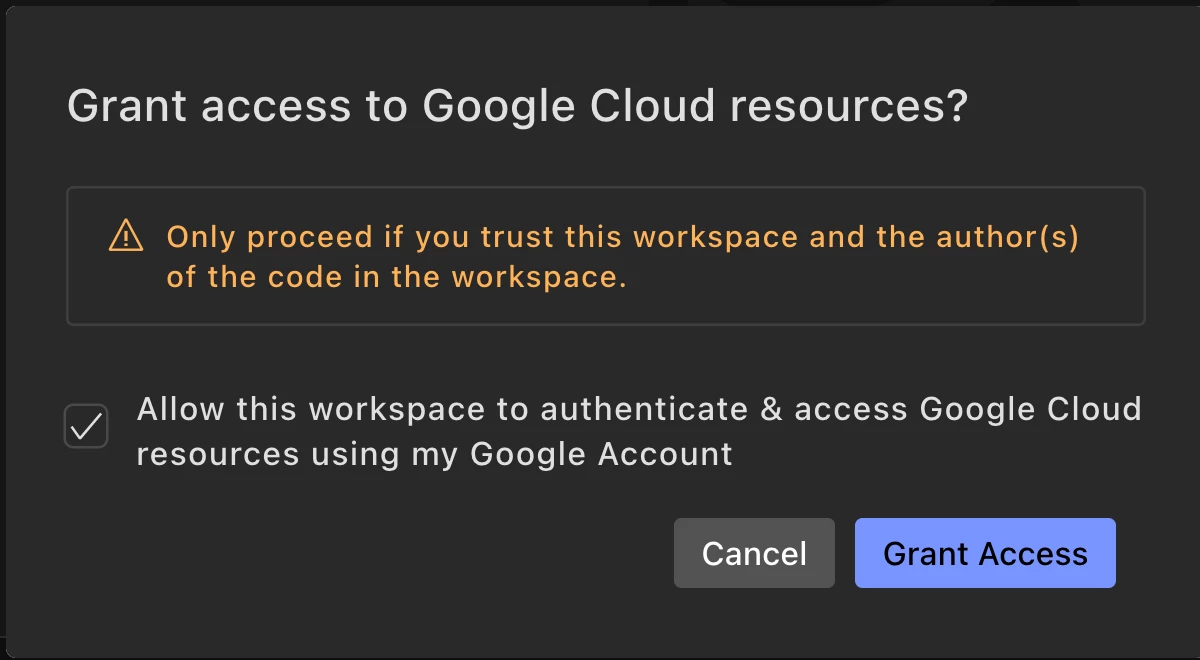
- It's important to mention that the Firebase Studio workspace you create is directly tied to the Google account you use to log in. This account's identity and permissions will be used for all subsequent authorizations.
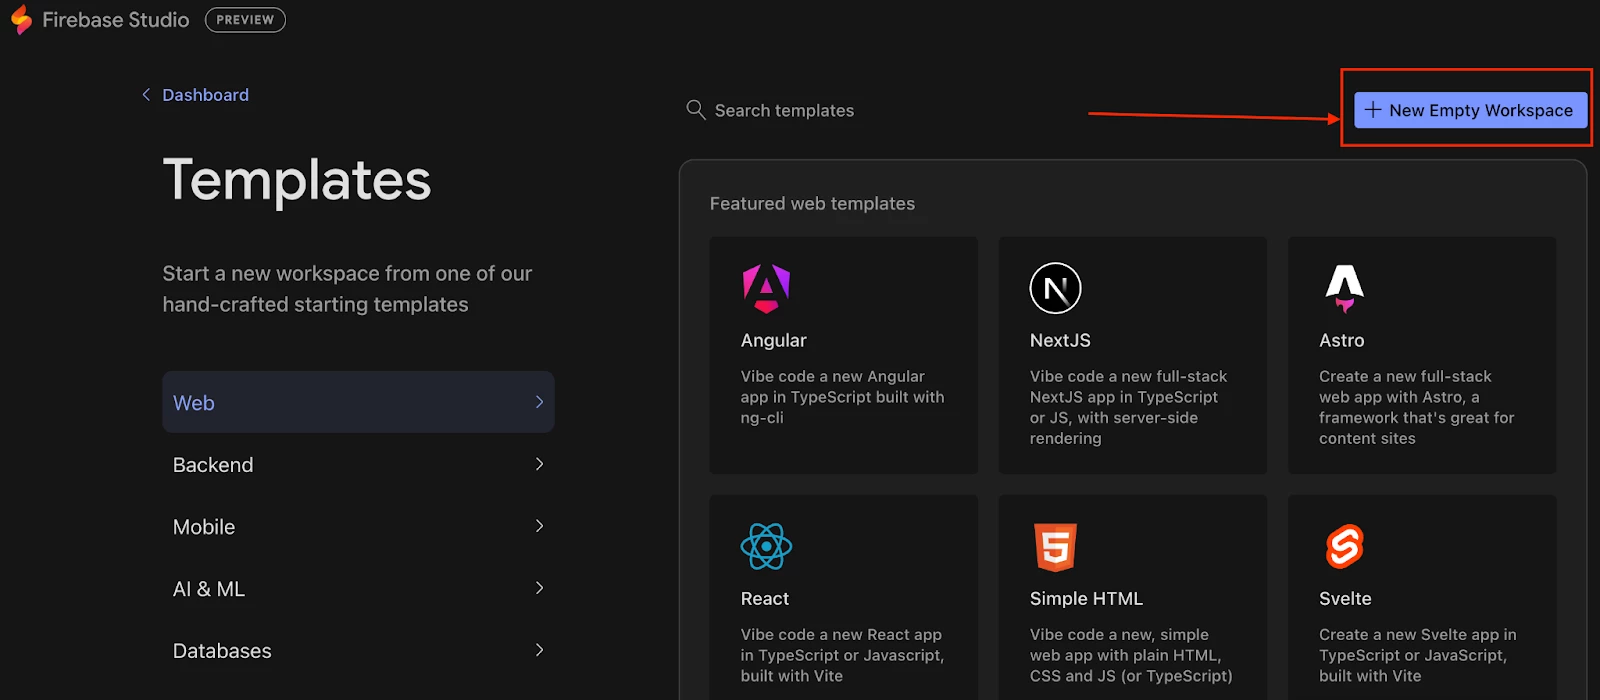
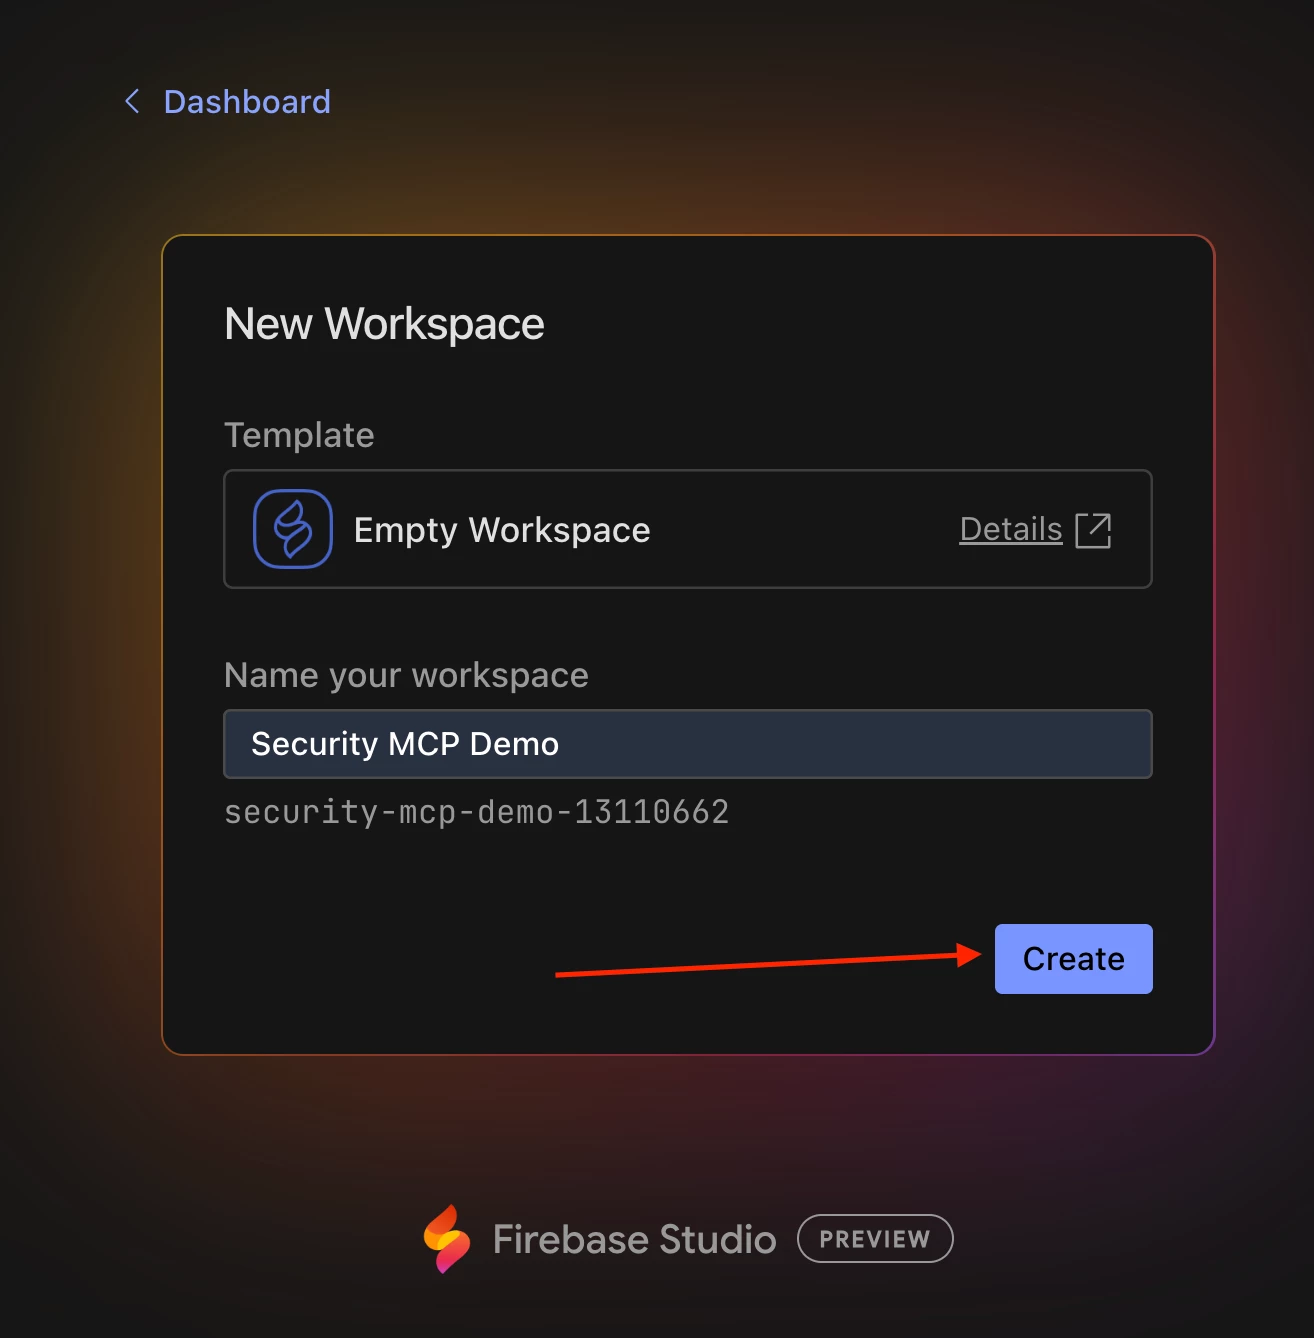
- Next, let’s create a new, empty workspace by first clicking the + New Workspace button and then clicking the + New Empty Workspace button in the top right of the next screen. Give it a descriptive name like Security MCP Demo and then click Create
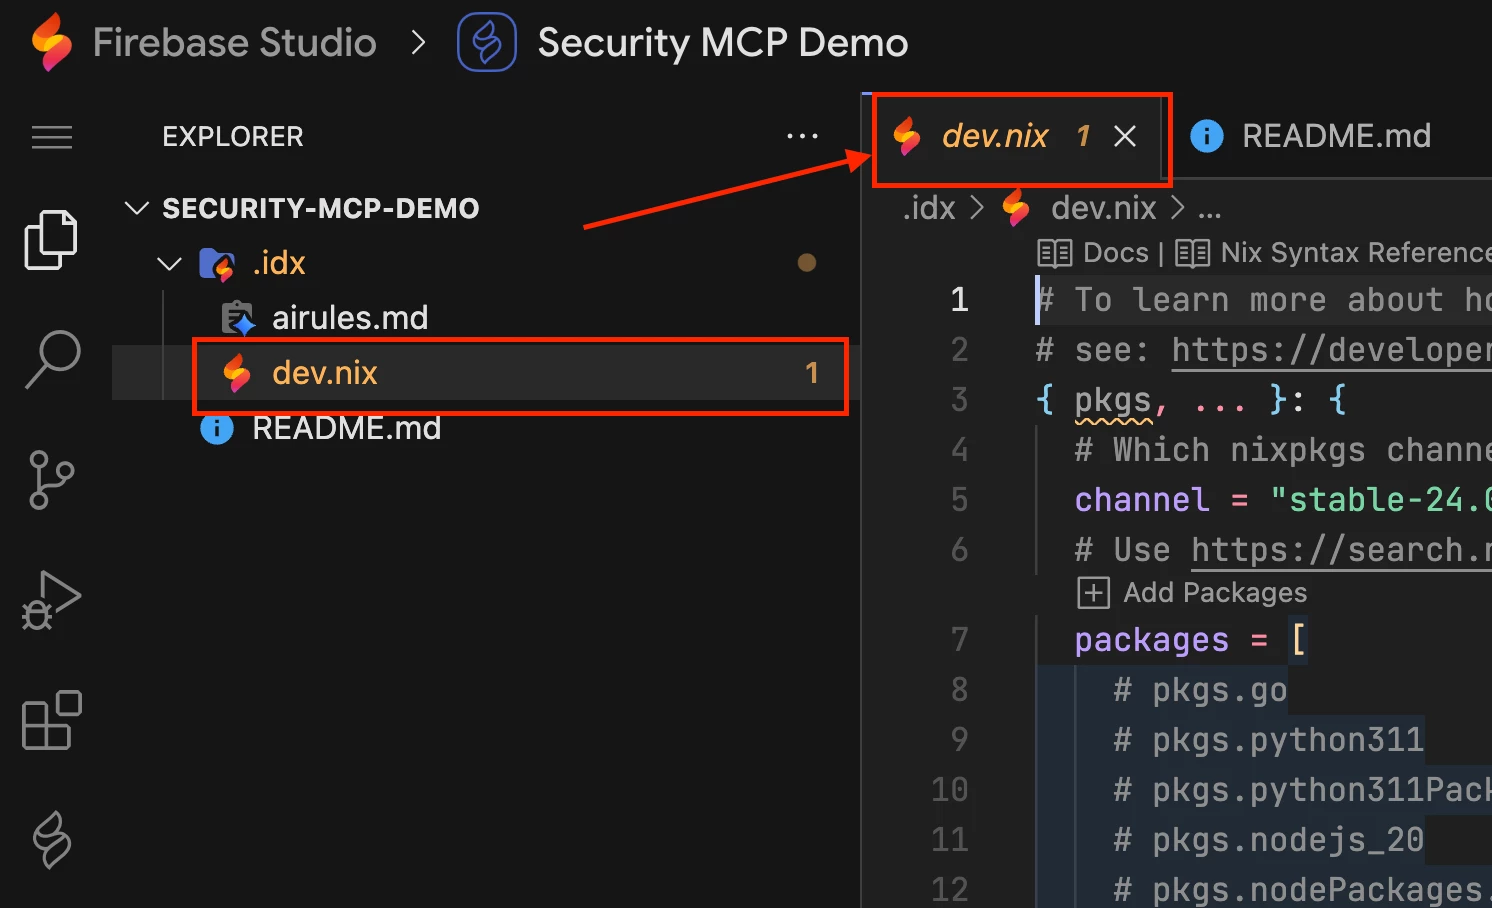
- Once the environment is built, open the dev.nix file from the file explorer on the left.
| Quick Note: Firebase Studio uses NixOS. NixOS is a Linux distribution that uses the Nix package manager to manage system configurations. Unlike traditional operating systems where software is installed and updated imperatively (by running commands that directly modify the system state), NixOS is declarative. This means you define the entire desired state of your system—including all installed packages, environment variables, and services—in a central configuration file, typically configuration.nix or, in the case of Firebase Studio, dev.nix. |
- Now, we need to modify the dev.nix file to include the cacert package and set the SSL_CERT_FILE environment variable. This is a crucial step that provides the necessary bundle of trusted CA certificates, allowing your tools to verify the SSL certificate presented by the siemplify-soar.com domain. This resolves a common stumbling block in local setups where the connection might otherwise fail due to an untrusted certificate. Your configuration should look like this (with the additions being the highlighted parts):
| Quick Note: If you are trying to copy and paste from this doc into Firebase Studio, you may need to allow the browser permissions for Firebase Studio to read from the clipboard |
{ pkgs, ... }: {
  # Which nixpkgs channel to use.
  channel = "stable-24.05"; # or "unstable"

  # Use https://search.nixos.org/packages to find packages
  packages = [
    pkgs.cacert
    # pkgs.go
    # pkgs.python311
    # pkgs.python311Packages.pip
    # pkgs.nodejs_20
    # pkgs.nodePackages.nodemon
  ];

  # Sets environment variables in the workspace
  env = {
    SSL_CERT_FILE = "${pkgs.cacert}/etc/ssl/certs/ca-bundle.crt";
  };
}- After editing the dev.nix file, a blue button will appear in the bottom-right corner. Click Rebuild environment and wait for the workspace to reload.
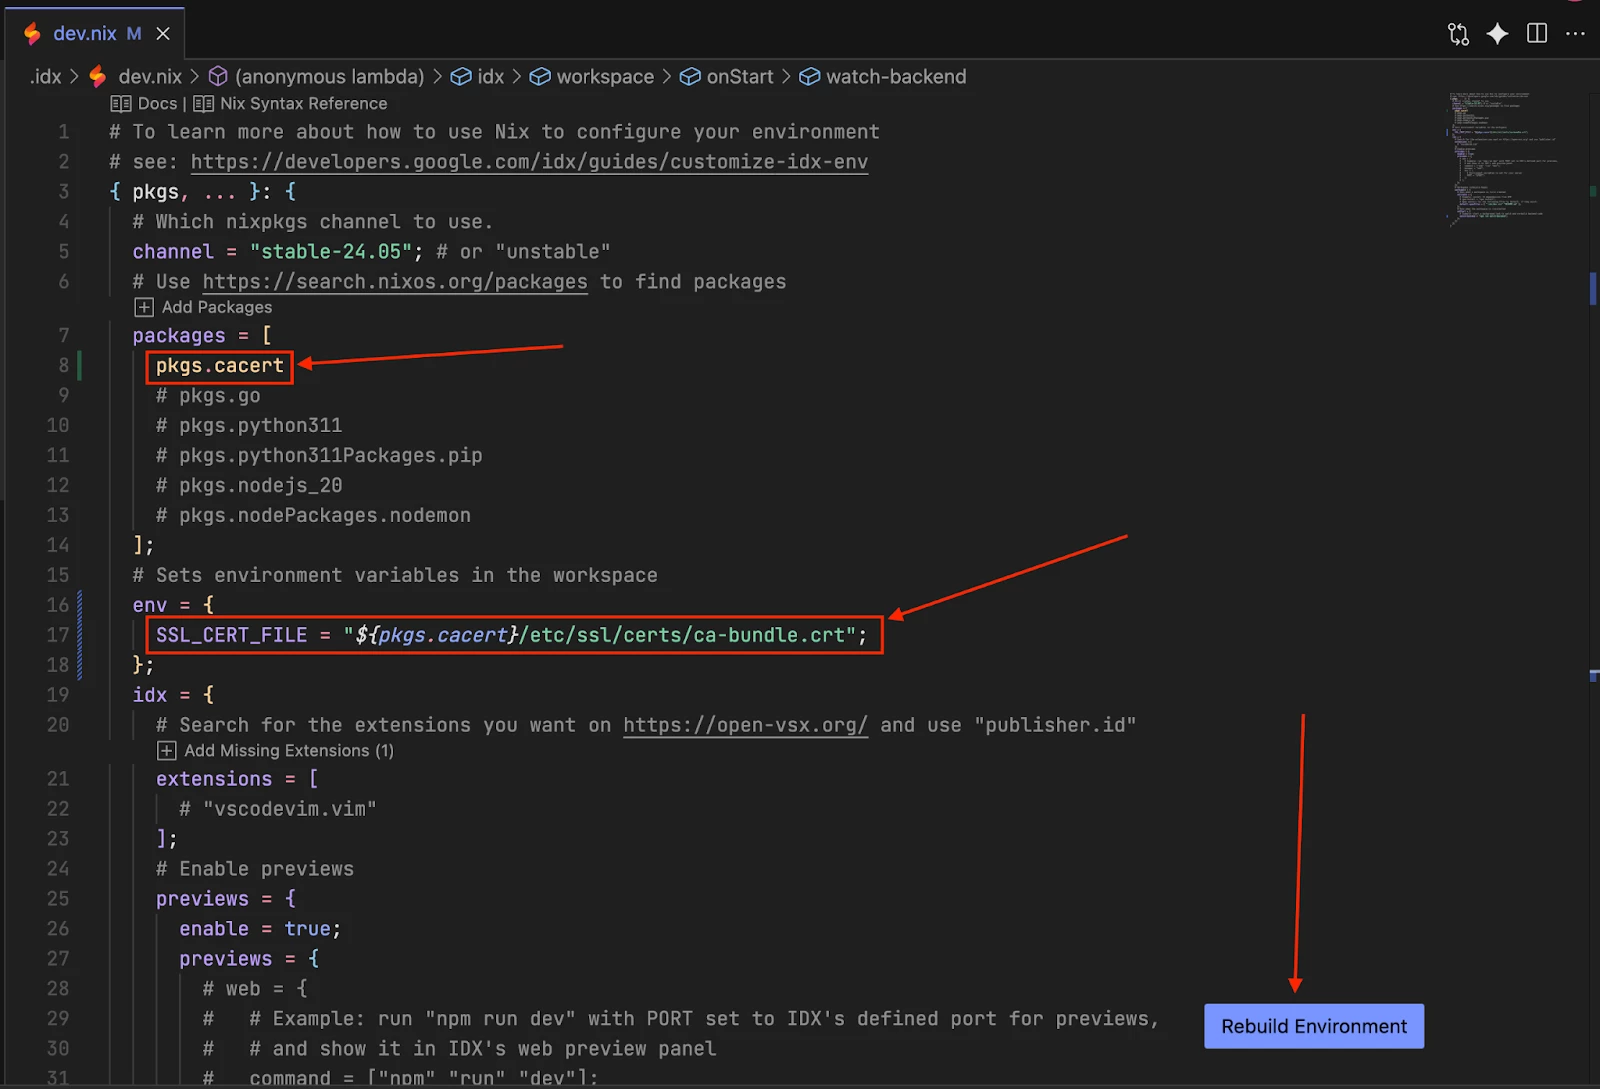
| Note: If you don’t see the "Rebuild Environment" button, double-check your dev.nix file for any syntax errors, like an extra space, missing comma or closing bracket. |
Step 2: Project and Repository Setup
With the workspace configured, let's set up the project and clone the repository.
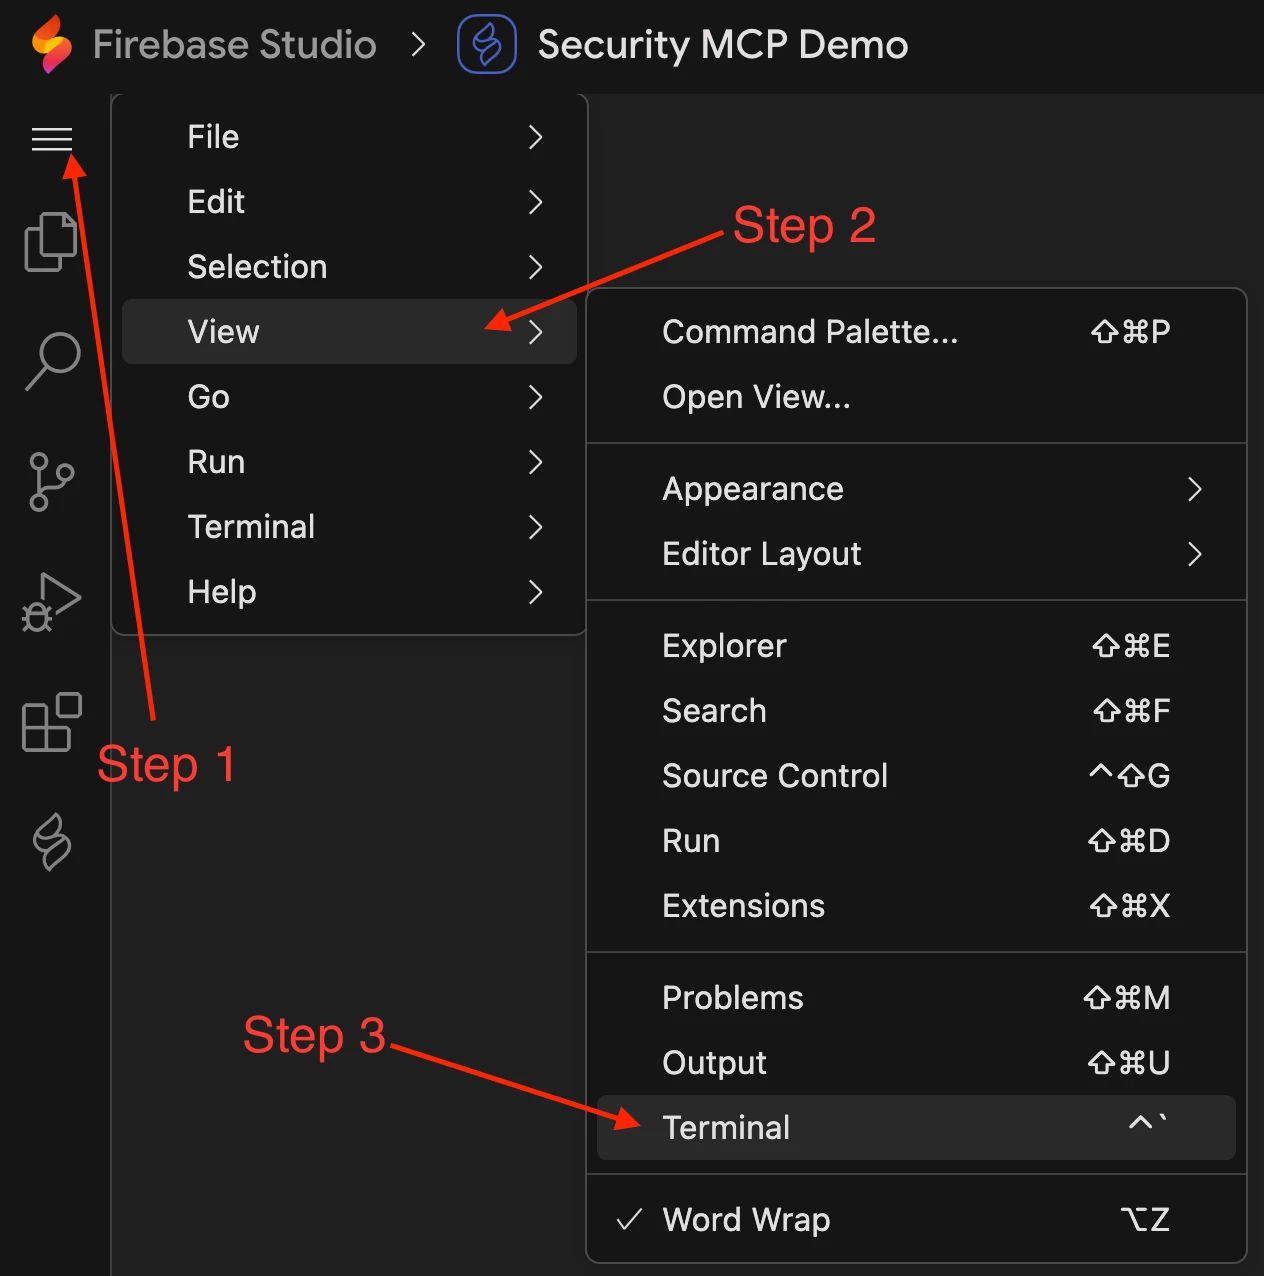
Open a terminal in Firebase Studio’s VSCode by clicking on the hamburger menu > View > Terminal (you can also use the terminal shortcut by holding Ctrl and pressing the backtick button `).
- We’ll create a project directory for your use case and navigate into it. For this example, we'll use tier1-demo.
# Replace `tier1-demo` with your desired project directory name
install -d -m 755 tier1-demo
cd tier1-demo- Now, clone the mcp-security repository from GitHub into this directory and navigate to it.
git clone https://github.com/google/mcp-security.git
cd mcp-security
Step 3: Environment Configuration
Next, we'll configure the environment variables for the MCP servers and install the required tools.
- Create a .env file in the root of the mcp-security directory you just cloned with the following command:.
# Make sure you are in the 'mcp-security' directory
# This command creates an empty file .env with correct permissions
install -m 644 /dev/null .env- Open the newly created .env file with your favorite code editor in Firebase Studio. I prefer to use the VSCode editor in Firebase Studio by running the code .env command.
- Paste in the content from the .env.example below into your new .env file:
# Google SecOps SIEM Configuration using IAM permissions of the
# Firebase Studio user logged in

CHRONICLE_PROJECT_ID="your-gcp-project-id"
CHRONICLE_CUSTOMER_ID="your-chronicle-customer-uuid"
CHRONICLE_REGION="us"

# Google SecOps SOAR Configuration
SOAR_URL="https://your-soar-instance.siemplify-soar.com:443"
SOAR_APP_KEY="your-soar-application-key-uuid"

# Google Threat Intelligence/VirusTotal API Configuration
# Get your API key from https://www.virustotal.com/gui/my-apikey
VT_APIKEY="your-virustotal-api-key-64-characters"

# SSL Certificate Configuration
# Path to SSL certificate bundle for secure connections
SSL_CERT_FILE="/path/to/your/ssl/ca-bundle.crt"
Now, let’s review where we can find these configuration values, and please ensure to preserve the quotation marks when pasting in the values.
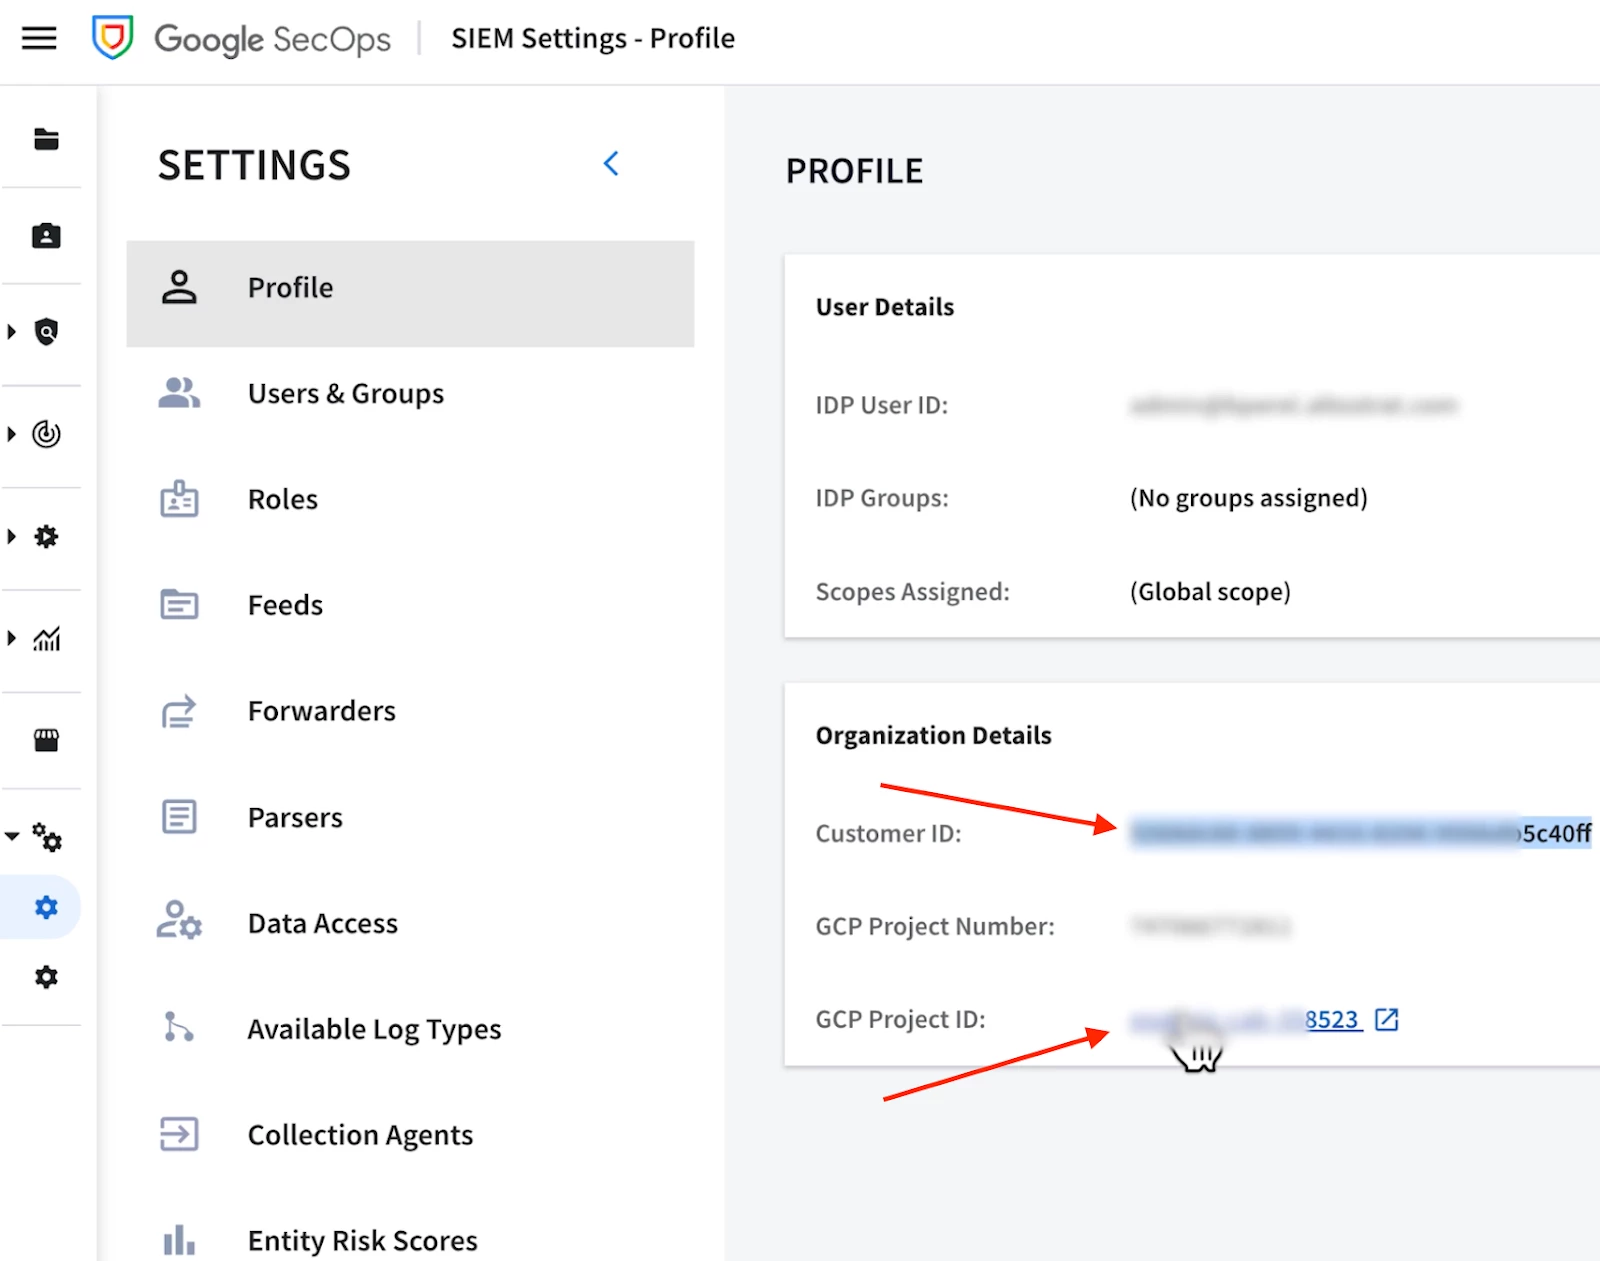
- The CHRONICLE_PROJECT_ID and the CHRONICLE_CUSTOMER_ID can be found in your Google SecOps SIEM console by navigating to the SIEM Settings > Profile
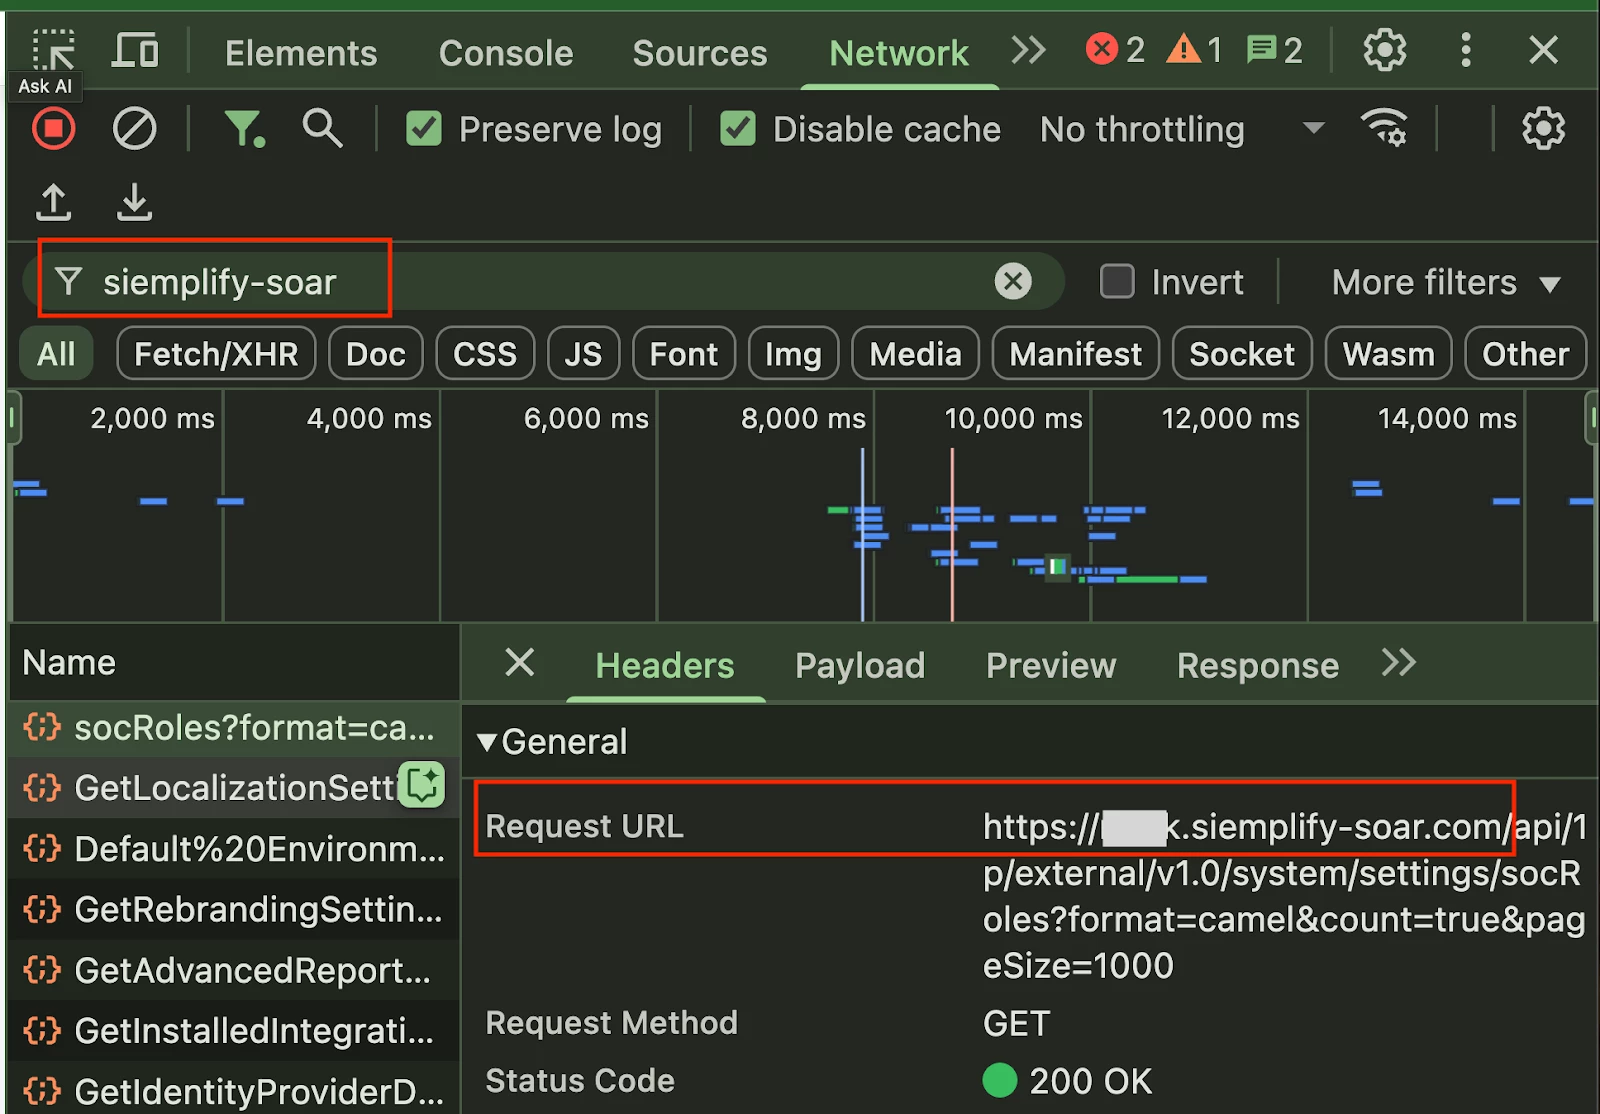
- While not immediately obvious in the UI, using your browser’s developer tools is a reliable way to uncover your unique SOAR_URL for your environment.
- With the Google SecOps console in the current browser window, the SOAR_URL can be found by opening the web browser developer tools (in Chrome that is View > Developer > Developer Tools > Network Tab) and typing siemplify-soar into the search filter to filter requests that include this string. You may need to click the refresh button in the Developer Tools page (or refresh the page altogether) to see requests be generated.
- Click on any request to open the “Headers” preview tab, and you will see a field named “Request URL” that contains a prefix with your unique siemplify-soar.com domain.
- Copy the unique code prefix in front of .siemplify-soar.com, and replace the your-soar-instance part of the SOAR_URL in the .env file.
- The SOAR_APP_KEY can be created by going to the Google SecOps SOAR console > SOAR Settings > Advanced > API Keys and clicking the + button in the top right corner. Be sure to copy the key before saving and closing the window in Google SecOps, and ensuring this key is associated with the correct Permission Group to invoke SOAR APIs.
- The VT_APIKEY API key can be found by copying the key found at https://www.virustotal.com/gui/my-apikey
- Lastly, we need to run the echo $SSL_CERT_FILE command in the terminal and copy the full output path. We’ll update the placeholder values in the .env file with the copied path and paste it for the value of SSL_CERT_FILE. This is the path that we dynamically set at runtime in our dev.nix file
Next, we need to install uv, a fast Python package manager, and then use it to install a version of Python in your workspace. We could alternatively use pip here (note that this guide uses uv), but there are many advantages to using uv, including the ability for it to handle virtual environments automatically for us. If you’re new to using uv, this repo is a fantastic resource.
# Install uv
curl -LsSf https://astral.sh/uv/install.sh | sh
# Add uv to the current session PATH
source $HOME/.local/bin/env
# Install latest version of Python (can optionally specify version)
uv python install| Quick Note: We install uv this way to ensure we're getting the latest version. The "correct" NixOS way to do this would be to add pkgs.uv and pkgs.python3 to the dev.nix file and have them installed declaratively. The problem is the default NixOS release channel often has an older version of uv that doesn't support the --directory flag, which is necessary for the Google Security MCP servers to launch. While you could change the release channel to get a newer version, this curl method is the most reliable way to get the latest version of uv. |
Step 4: Cline and MCP Server Configuration
Finally, let's install and configure the Cline VSCode extension to bring our MCP servers to life.
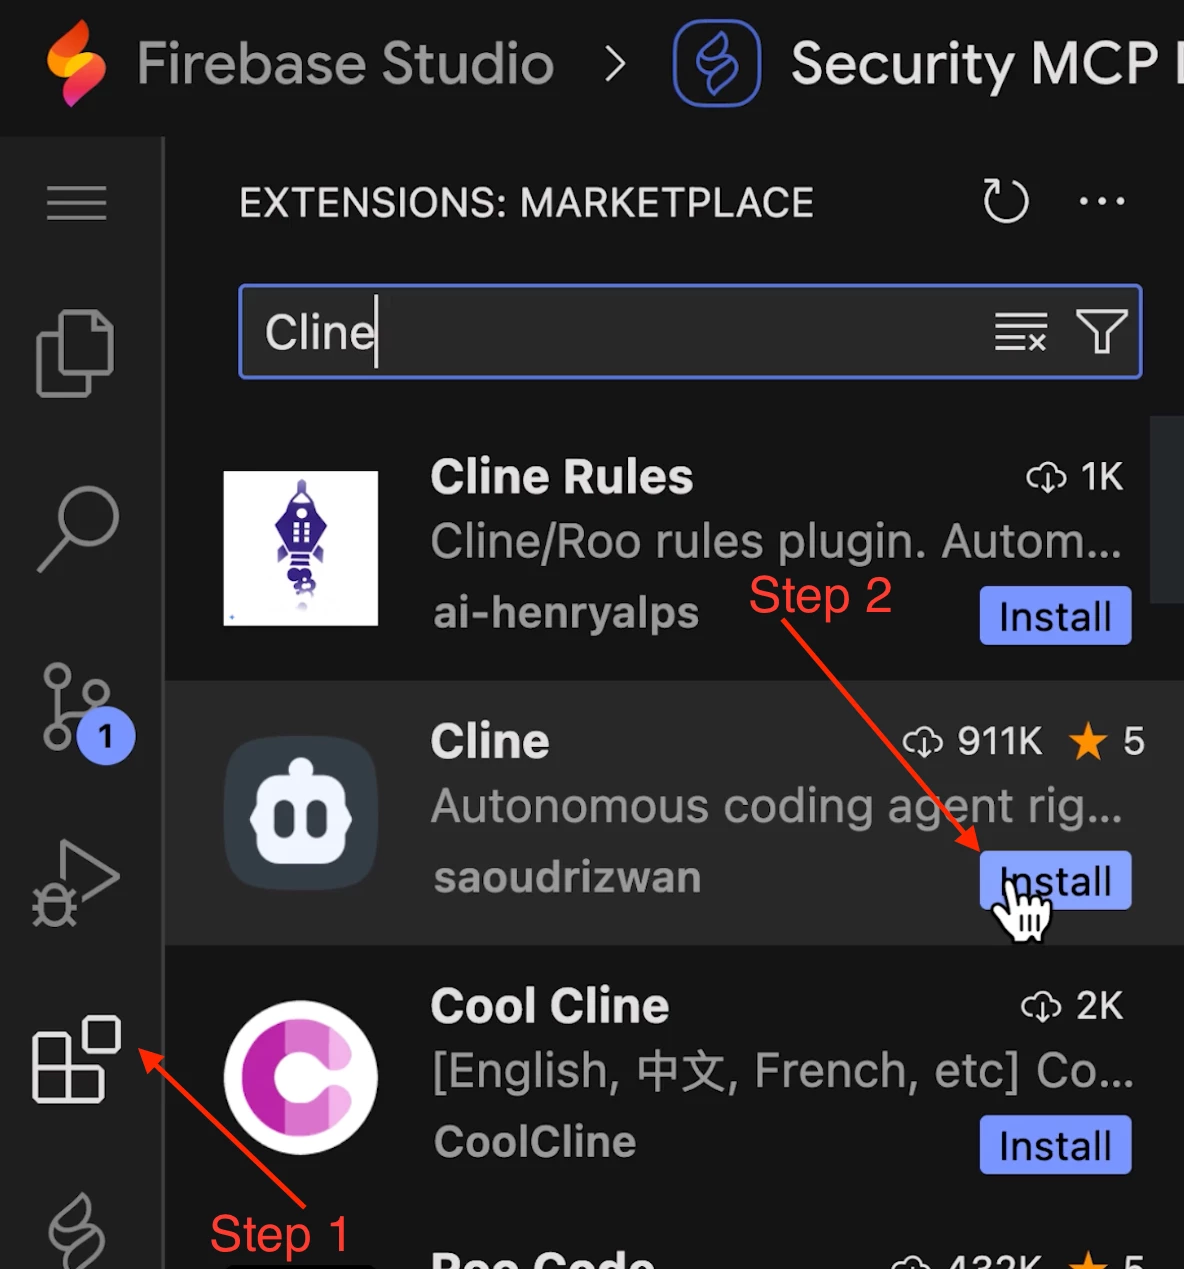
- In the VSCode Activity Bar (left pane), go to Extensions, search for "Cline", and click Install.
- Open Cline from the Activity Bar, click "Use your own API Key", and configure it with your preferred LLM provider. You can get a Google Gemini API key from AI Studio if needed. This step gives Cline the ability to work with LLMs.
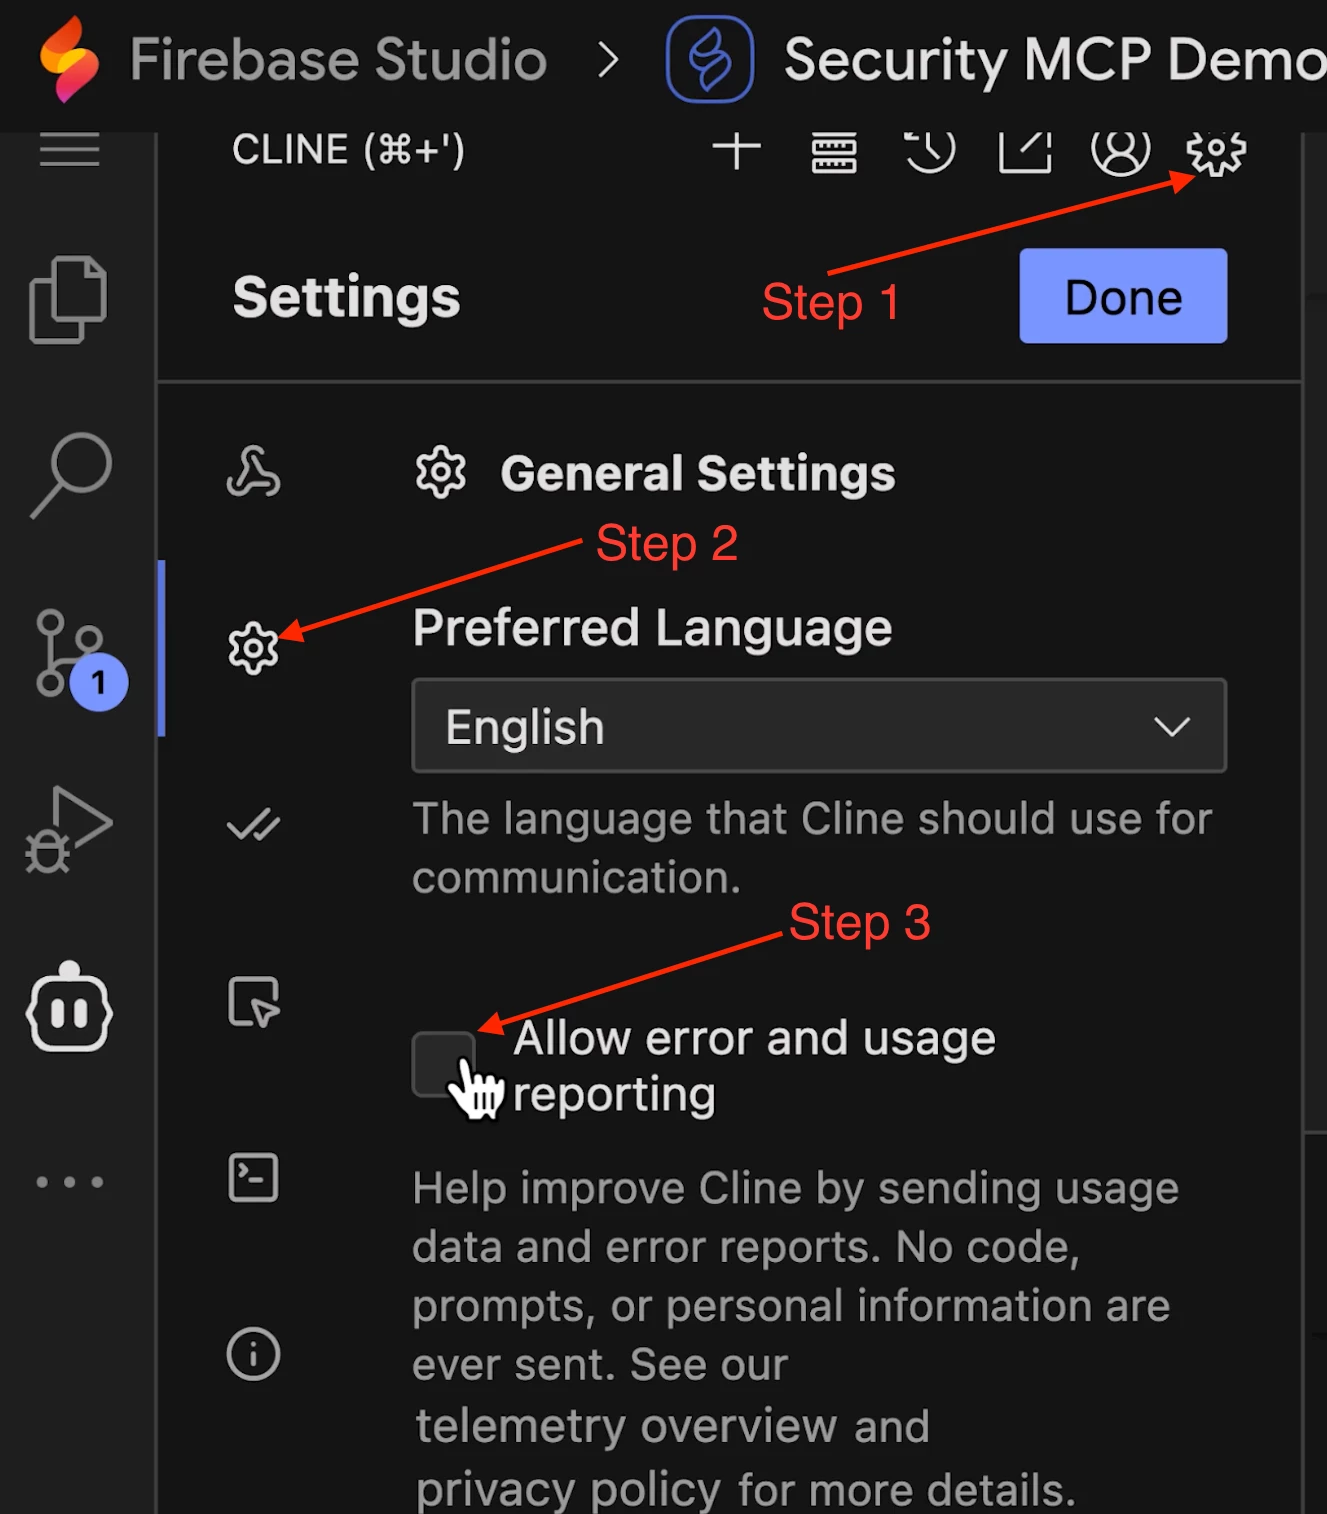
- In Cline's settings, we recommend disabling "Anonymous usage collection" and setting the “MCP Display Mode” to “plain text” for security use cases to prevent any potentially malicious domains from being automatically resolved (your IT/SOC teams will thank you).

- Navigate to the MCP server configuration section in Cline (it looks like a server icon) and click Configure MCP Servers. This will open a cline_mcp_settings.json file.
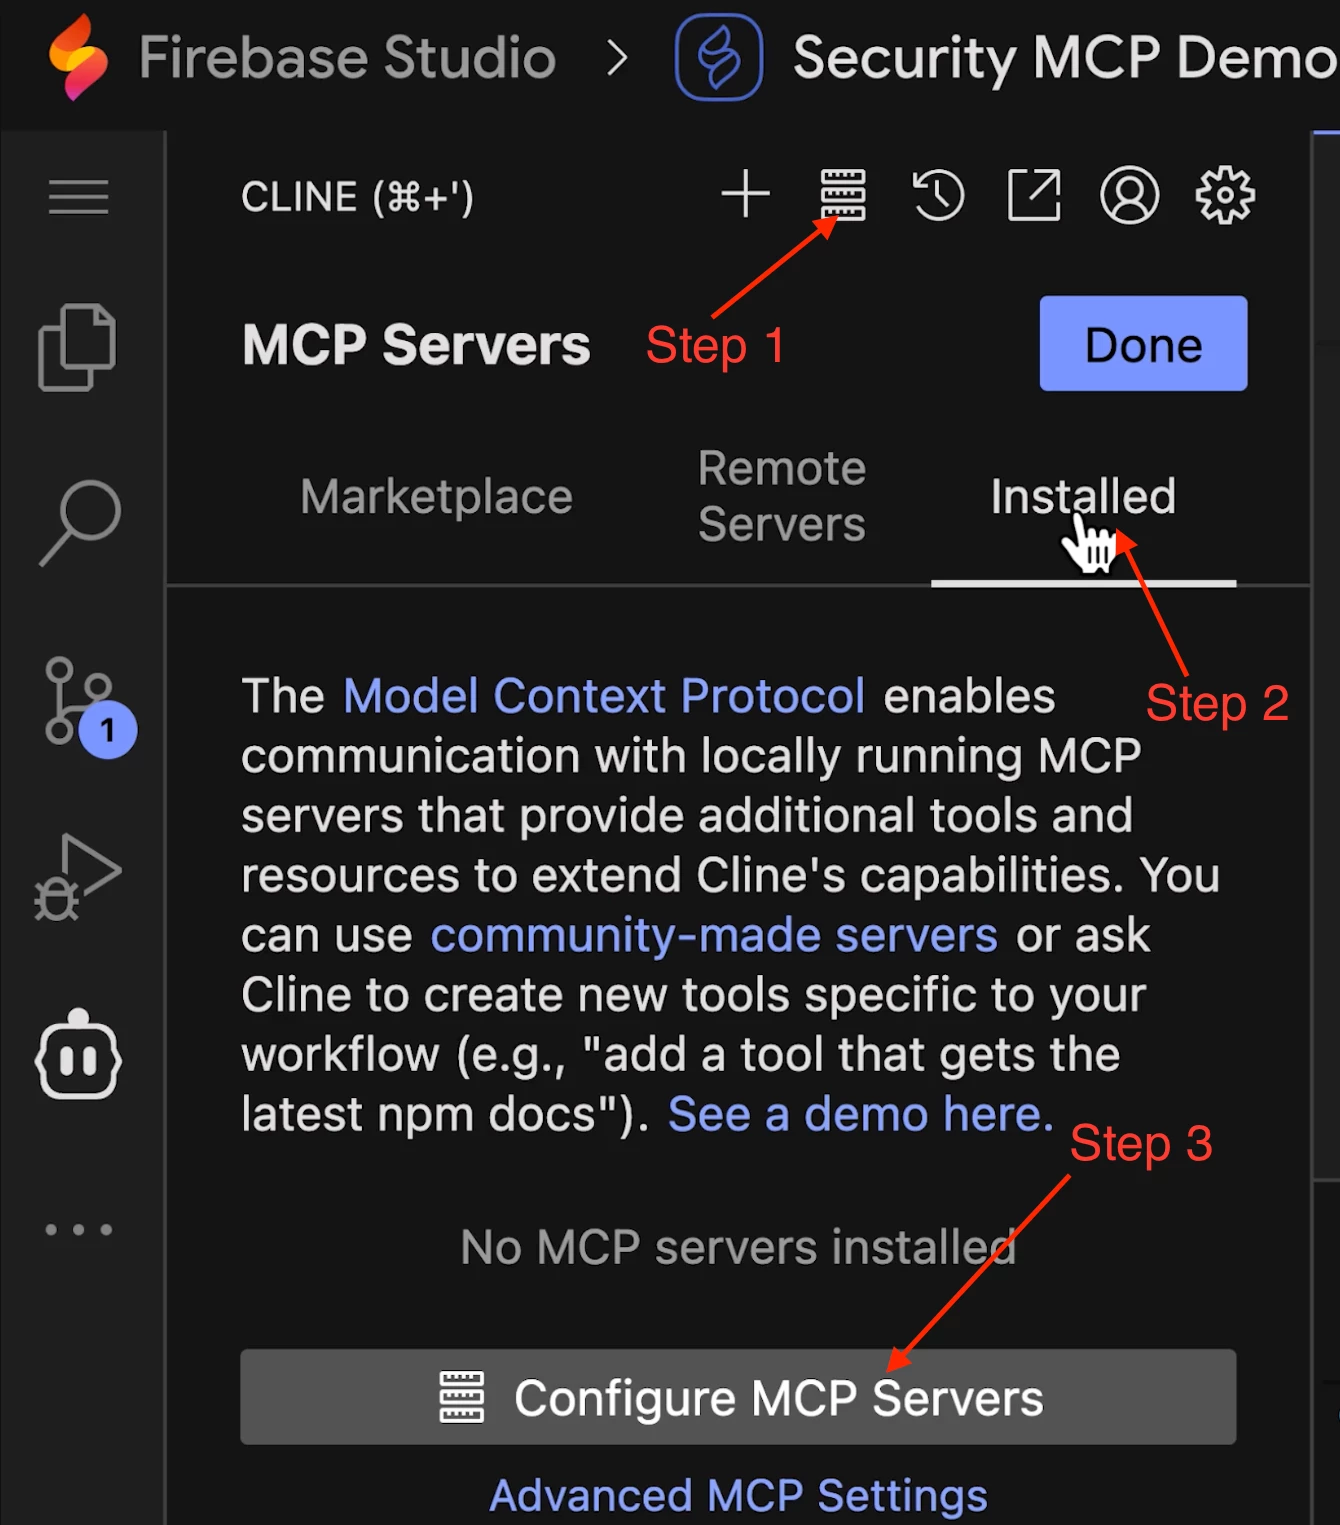
- Replace the entire contents of this file with the configuration below and fill out the correct values for the placeholders (find and replace all is useful here). .
| Caution: Double-check that the file paths in the args arrays match your Firebase Studio workspace and project directory names. If you used different names, you will need to replace the YOUR-WORKSPACE-NAME (e.g. security-mcp-demo in this guide) and YOUR-PROJECT-DIR (e.g. tier1-demo in this guide) placeholders in the paths with your actual workspace and project directory names. 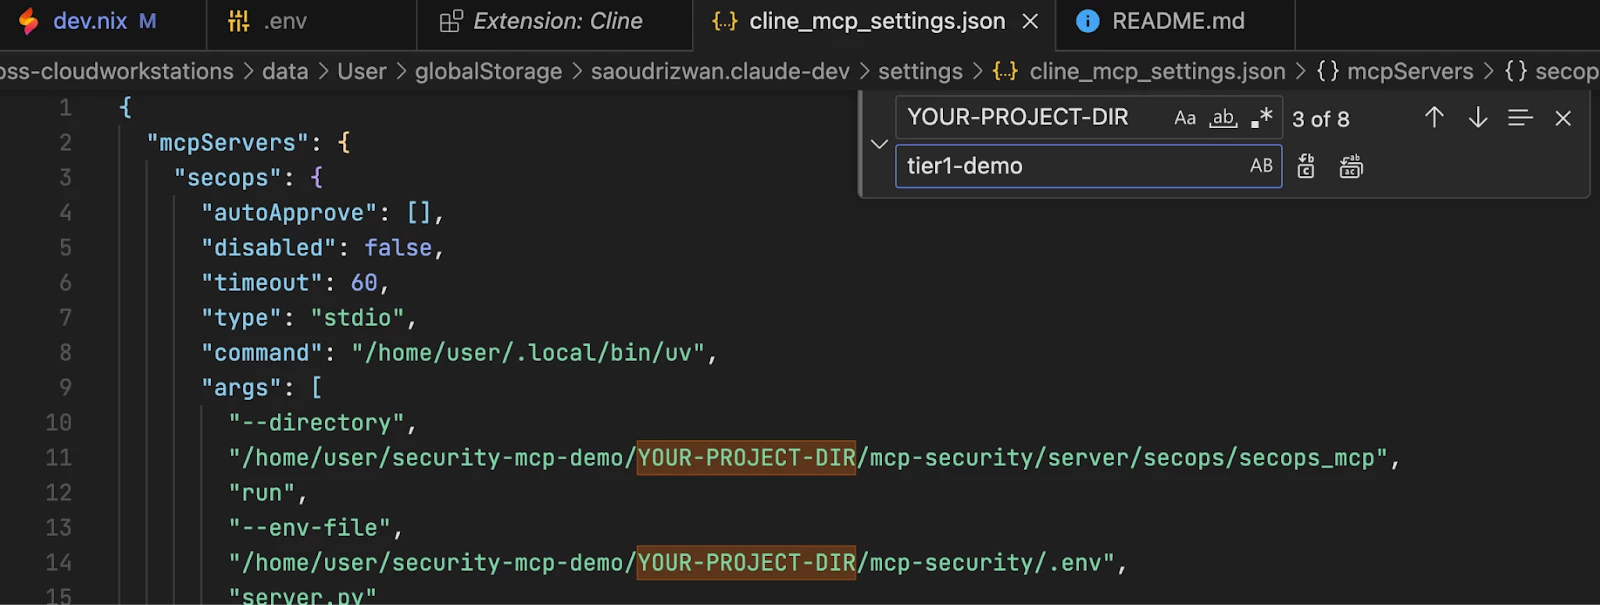 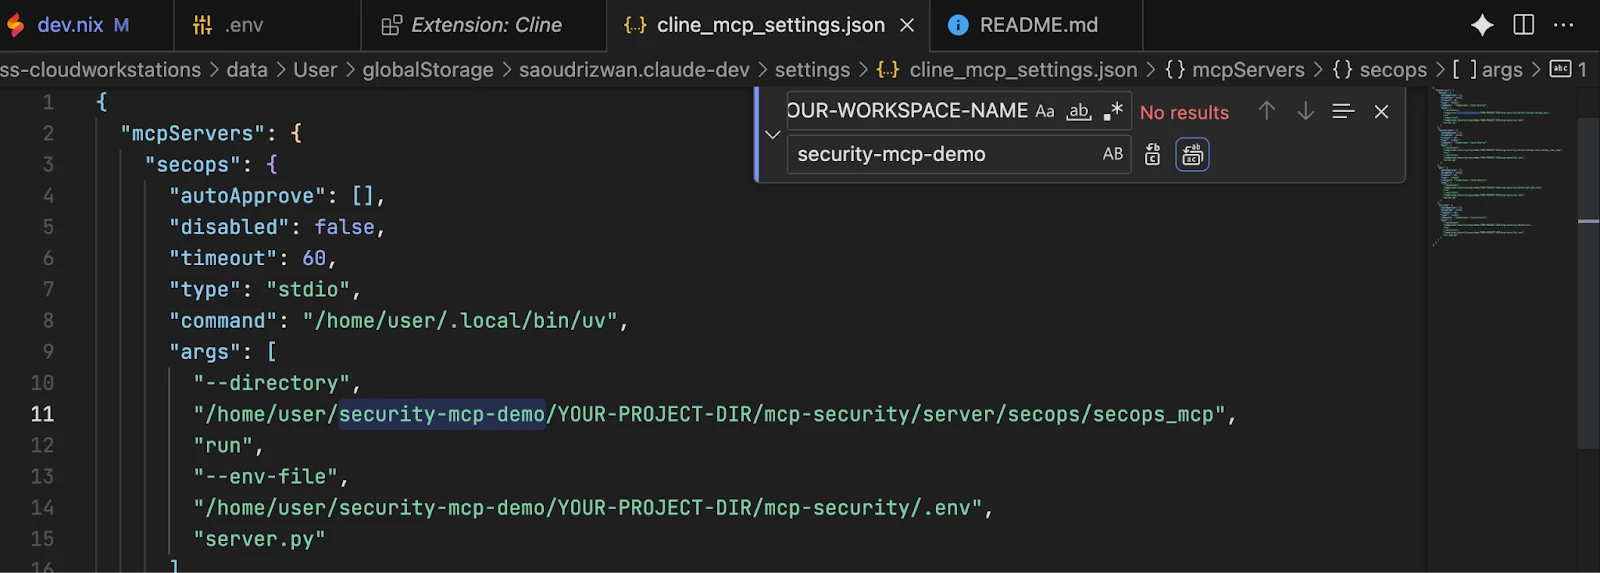 For example, if you named your workspace security-mcp-demo and your project directory tier1-demo, as in this guide’s example, the path for the 'secops' MCP server would be "/home/user/security-mcp-demo/tier1-demo/mcp-security/server/secops/secops_mcp” |
{
  "mcpServers": {
    "secops": {
      "autoApprove": [],
      "disabled": false,
      "timeout": 60,
      "type": "stdio",
      "command": "/home/user/.local/bin/uv",
      "args": [
        "--directory",
        "/home/user/YOUR-WORKSPACE-NAME/YOUR-PROJECT-DIR/mcp-security/server/secops/secops_mcp",
        "run",
        "--env-file",
        "/home/user/YOUR-WORKSPACE-NAME/YOUR-PROJECT-DIR/mcp-security/.env",
        "server.py"
      ]
    },
    "secops-soar": {
      "autoApprove": [],
      "disabled": false,
      "timeout": 60,
      "type": "stdio",
      "command": "/home/user/.local/bin/uv",
      "args": [
        "--directory",
        "/home/user/YOUR-WORKSPACE-NAME/YOUR-PROJECT-DIR/mcp-security/server/secops-soar/secops_soar_mcp",
        "run",
        "--env-file",
        "/home/user/YOUR-WORKSPACE-NAME/YOUR-PROJECT-DIR/mcp-security/.env",
        "server.py"
      ]
    },
    "gti": {
      "autoApprove": [],
      "disabled": false,
      "timeout": 60,
      "type": "stdio",
      "command": "/home/user/.local/bin/uv",
      "args": [
        "--directory",
        "/home/user/YOUR-WORKSPACE-NAME/YOUR-PROJECT-DIR/mcp-security/server/gti/gti_mcp",
        "run",
        "--env-file",
        "/home/user/YOUR-WORKSPACE-NAME/YOUR-PROJECT-DIR/mcp-security/.env",
        "server.py"
      ]
    },
    "scc-mcp": {
      "autoApprove": [],
      "disabled": false,
      "timeout": 60,
      "type": "stdio",
      "command": "/home/user/.local/bin/uv",
      "args": [
        "--directory",
        "/home/user/YOUR-WORKSPACE-NAME/YOUR-PROJECT-DIR/mcp-security/server/scc",
        "run",
        "--env-file",
        "/home/user/YOUR-WORKSPACE-NAME/YOUR-PROJECT-DIR/mcp-security/.env",
        "scc_mcp.py"
      ]
    }
  }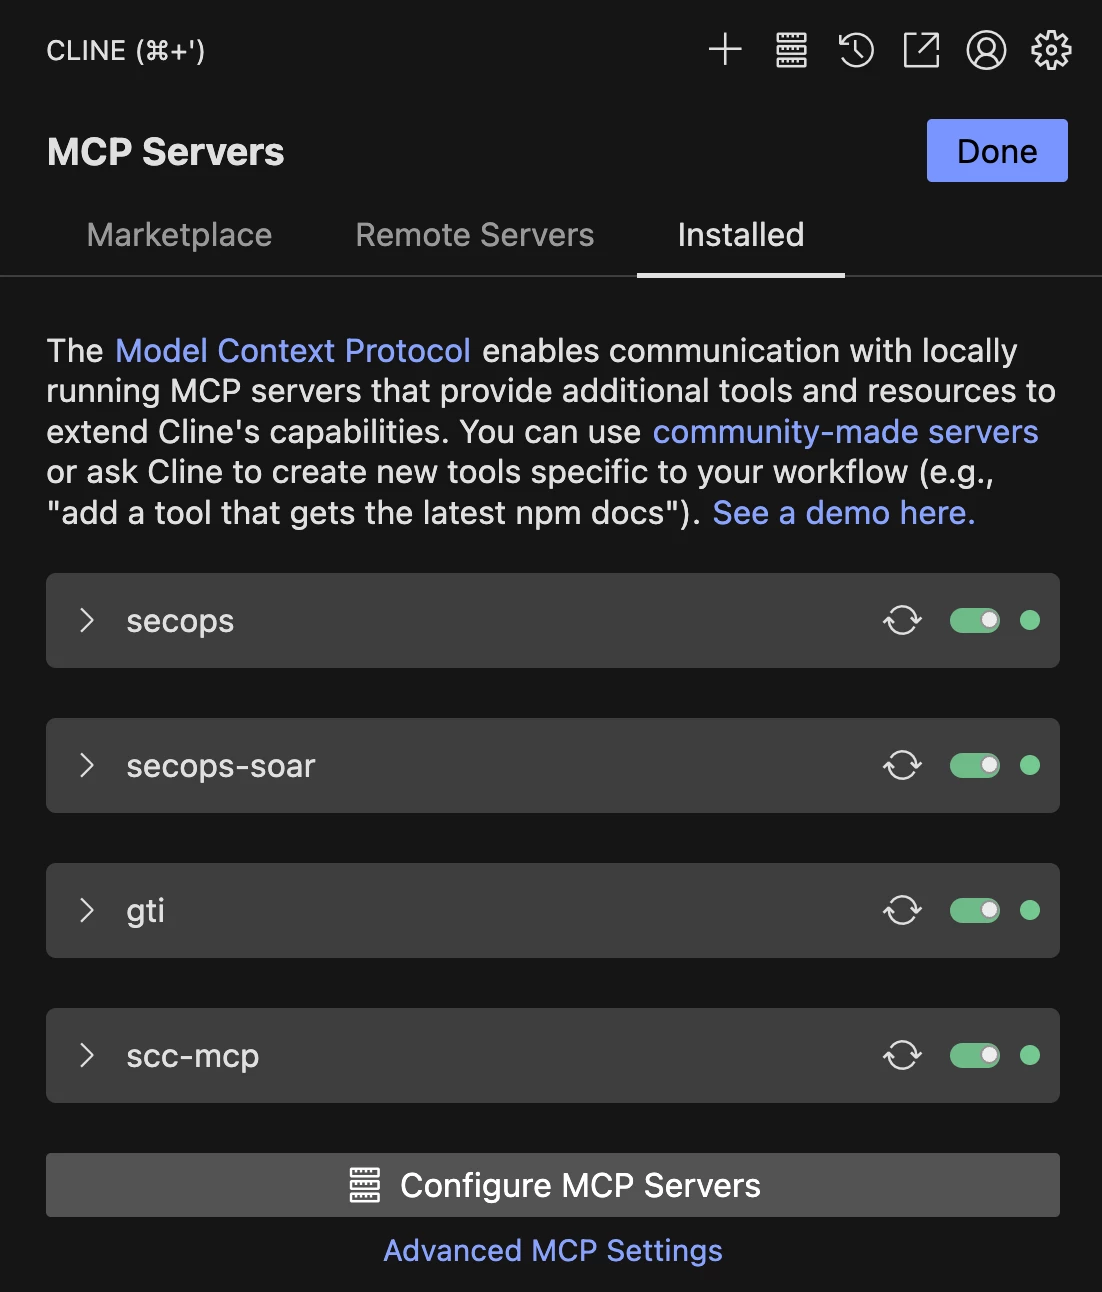
}- Save the cline_mcp_settings.json file. The MCP servers will now begin to initialize in Cline. This might take a few minutes the first time as their dependencies are installed.
- Once complete, the servers will show a green status light. You can expand each one to see the available tools.
Conclusion: You're Ready to Build!
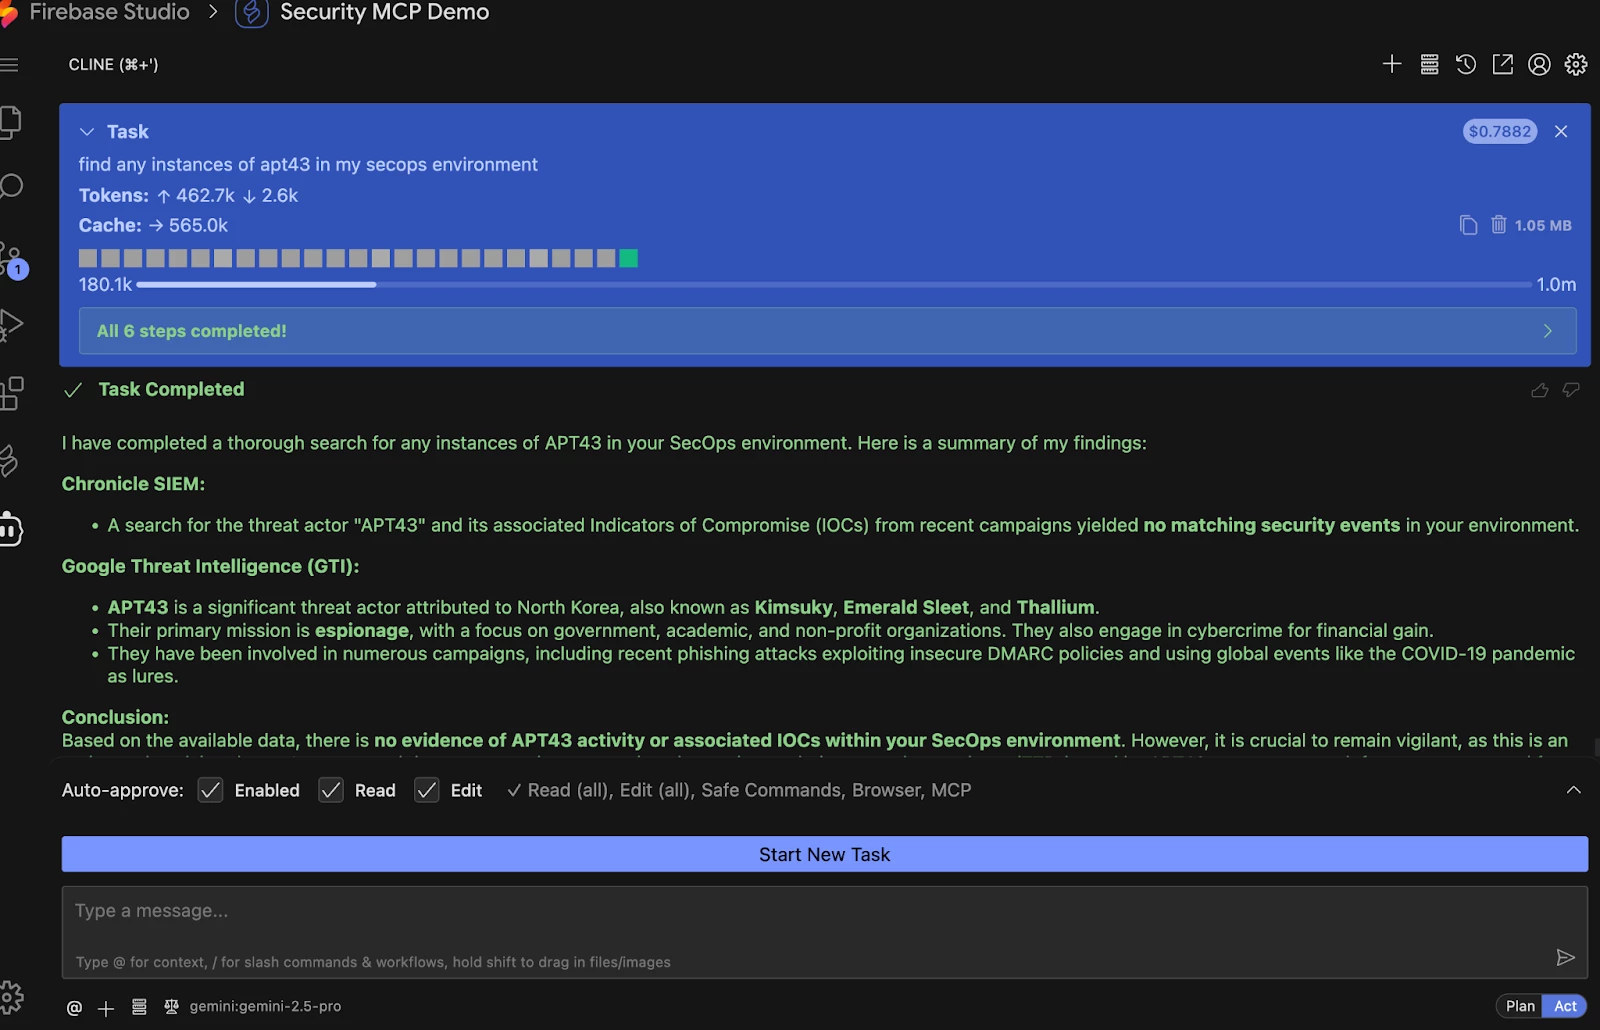
That's it! You are now fully set up to use the Google Security MCP servers in Firebase Studio. You've bypassed the common setup hurdles and now have a powerful, extensible environment for building and testing your own agentic security use cases.
The Google Threat Intelligence and Google SecOps SOAR MCP servers currently use API keys, which grant the entire permission scope defined by a single role. It is important to understand that anyone who has access to these MCP servers, can run these respective tools, and ultimately, the underlying APIs based on the associated scope. The typical API key security considerations are still at play, as well as proper guard rails (e.g. including a human-in-the-loop for high fidelity or high risk actions).
We encourage you to explore and contribute to the google/mcp-security repository, experiment with the examples, and start thinking about how you can use natural language to truly ‘supercharge’ your security workflows.
Have questions or want to share what you've built? Join the conversation in the Google Cloud Security Community!