

This post is co-authored with @DanDye.
Introduction
Google recently published a suite of MCP servers for the following security products
- Google SecOps (SIEM and SOAR)
- Google Threat Intelligence (GTI)
- Security Command Center (SCC)
You can find them on GitHub. They enable customers to interact with security products using natural language, break silos (with unified access) and also help bridge the cybersecurity skills gap.
This opens opportunities for customers who use Google Security products and 3rd party (security and other) products together.
Usually -
- These customers have different teams (generally vendors) handling different security products.
- A security issue resolution requires a lot of to and fro between multiple teams
- There is no overarching expert who can guide these teams
- Not having easy access and skill to cross reference products leaves the security posture and response less than stellar.
This post details the process of using and configuring a ready-made agent, built on the Google Agent Development Kit (ADK), to integrate third party MCP servers with Google security products’ MCP servers and address security inefficiencies and enhance customer security outcomes.
Everything explained in this blog post is demonstrated in the following Youtube video.
Scope
Using this post the customers -
- Efficiently run the MCP servers using the prebuilt agent. Deploy (Cloud run and Agent Engine) and register on Agentspace.
- Should be able to integrate Google Security MCP servers with a third party (security or non security) MCP servers. What does integration mean in this case? - please check the Goal section below.
Google MCP servers (and the prebuilt agent) are published on google/mcp-security GitHub repository. Partner MCP servers are expected to be published on their respective GitHub repositories.
Agent
Currently the security-mcp repository includes an ADK based agent.
We chose to provide an ADK based agent as -
- It is open source (source here)
- Multimodal and Feature rich
- Deployable (an agent access can be provided across teams without minting / sharing the credentials every time)
- Programmable (We can add sessions, memory, artifacts, ability to send signed URLs for reports, limiting log and data sprawl, behaviors leading to cost optimizations and performance enhancement)
- Control the sensitive data (e.g. logs, prompts etc.) and access.
Goal

A common agent that facilitates easy integration between Google and 3rd party security/non security products via respective MCP servers should focus on following aspects
- Ease of integration
- Ease of deployment
- Opinionated runbooks for most common use cases (please check the demo in the Runbooks (for carrying out SOC tasks) section)
- Security (including Authn, Authz and Access control)
- Performance
- Cost optimization incentivising customers to use the MCP servers
- Agent evaluation framework
The following sections focus on each of the above. Generally, the customer has to use various configurations already available in the prebuilt agent.
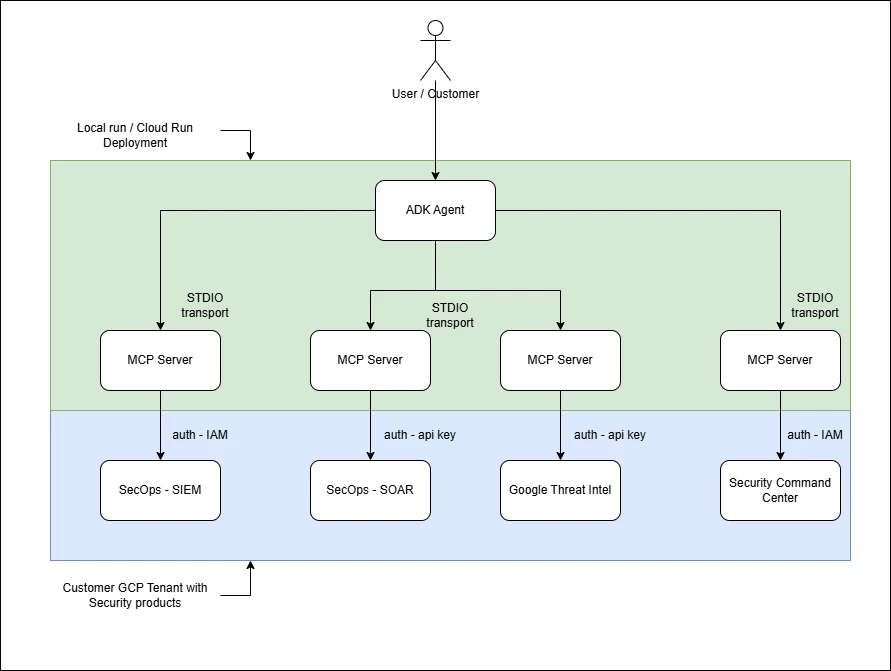
Running Google MCP Servers using the prebuilt agent
Before you integrate other MCP servers with the Google MCP servers, you must first test the MCP servers with the prebuilt agent. This makes sure that when you are ready to integrate third party MCP servers you have a working baseline.
The detailed steps (which are regularly updated), can be found in Prebuilt Agent Usage Guide on GitHub
Integrating Google MCP Servers with Third party MCP Servers (under ADK Based Agent)
This section focuses on how to integrate a third party MCP server(s) with the Google MCP servers under the prebuilt ADK agent.
At high level, you are doing following
- Integrate sample MCP servers provided as part of the code repository.
- Test with the sample MCP servers.
- Integration third party servers using the learnings from 1 and 2
Here is the detailed documentation to achieve the same - Integrating your own MCP servers with Google Security MCP servers
Local run and deployments
This section focuses on
- How to deploy the agent as a service
- How to use sessions and memory for efficient and restartable interactions
- How to share artifacts (e.g. case summary created by the agent)
In the section - Running Google MCP Servers using the prebuilt agent above, you have already run the agent locally.
But for multiuser access or across team usage - the agent should be deployed along with the MCP servers.
For deployment we provide 3 options (links to the most updated documentation are provided)
- Deploying to Cloud Run and accessing using prebuilt ADK WEB console (documentation).
- Deploying to Agent Engine and accessing using prebuilt custom UI (documentation).
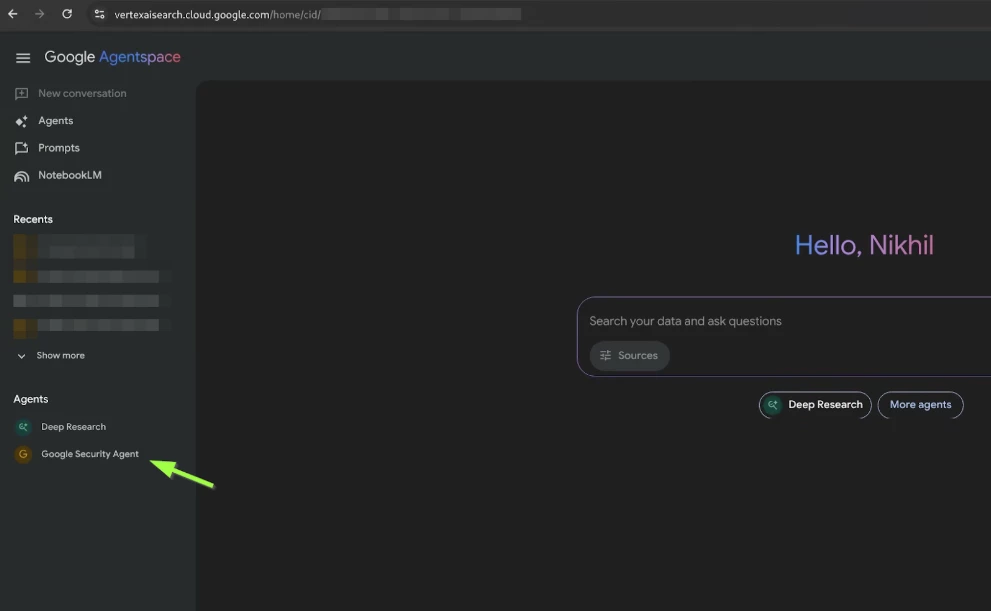
- Integrating Agent Engine Agent with Agentspace App And accessing the Agent Engine Agent using Agent Space (documentation)
When the Agent is registered successfully (“state”: “CONFIGURED”). You can use the agent by navigating to Agentspace page - Apps - Your App - Integration - Copy the link - open the link - Expand the Left hand menu to access the Agent (Screenshot below)
Securing runs and deployments
This section focuses on
- Access Control
- Protecting the agent application
- Limiting logging and Log access control
Especially when the agent is deployed, protecting your agent against unauthorized access while facilitating easy access to your team becomes paramount.
The agent can be accessed using the following three means with the modes of access control mentioned in the bracket.
- Cloud Run (Secure the adk web UI with IAM Authentication - link)
- Agent Engine (IAM permissions - roles/aiplatform.user, More fine grained control can be provided using specific roles from Predefined roles for Vertex AI)
- Agentspace (Provide these IAM permissions to the users)
Moreover, limited logging goes a long way for protecting your conversations (prompt and responses) with your agent. Please refer Adjust Logging Verbosity for that.
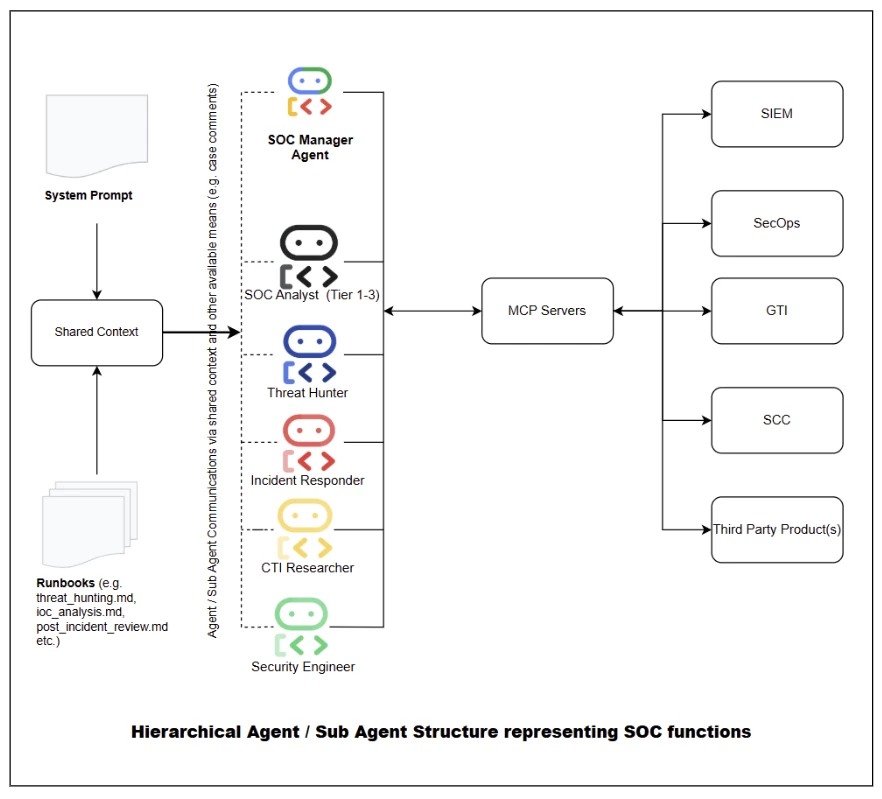
Runbooks (for carrying out SOC tasks)
In an SOC (Security Operations Center) - most operations involve carrying out predefined, validated and standard SOPs (Standard Operating Procedures / runbooks) for handling incidents, threat hunting etc.
We try to achieve these functions using
- SOPs implemented with runbooks
- A hierarchical arrangement of agents and subagents implemented as SOC personas
You can find the implementation in rules-bank.
Before you explore runbooks further, please check out the following demo
Runbooks can generally be included in the context window of applications hosting MCP servers through .dotfiles (i.e. .clinerules, .gemini, .claude, etc.). To include them in the context for an agent, the files are concatenated and added to the description parameter of the Agent() constructor. Note that this increases token usage, since every subsequent call includes those files’ content whether or not they are needed for the task at hand. One way to improve efficiency of token usage is to specialize agents and only include the context/runbooks that are needed for that role. Another approach is to add the runbooks as MCP Resources. However, since the ADK framework does not currently support MCP Resources, so we are not exploring this option as of now.
Like the docstrings for MCP Tools, runbooks require considerable tuning. This involves iteratively using them and then prompting the LLM for feedback on how to improve them. When properly tuned, the LLM chooses the right tools, uses the tools without false starts, and makes good decisions on the subsequent action. Ideally, the LLM is able to carry out many complete tasks without any user interaction: the agent is autonomous.
You can arrange your SOC process agentic flow using the reference implementation provided here.
Evaluating agent functionality
Customers may need to evaluate agent behavior -
- For accuracy and
- For the path it takes solving a particular problem.
Please read more - Why evaluate?
This section focuses on helping customers prepare evaluations for both agent trajectory and eventual response.
While the documentation provided by the ADK team is exhaustive, here's the quick set of steps with screenshots on how to start evaluating your agent.
Setting up Initial Evaluation
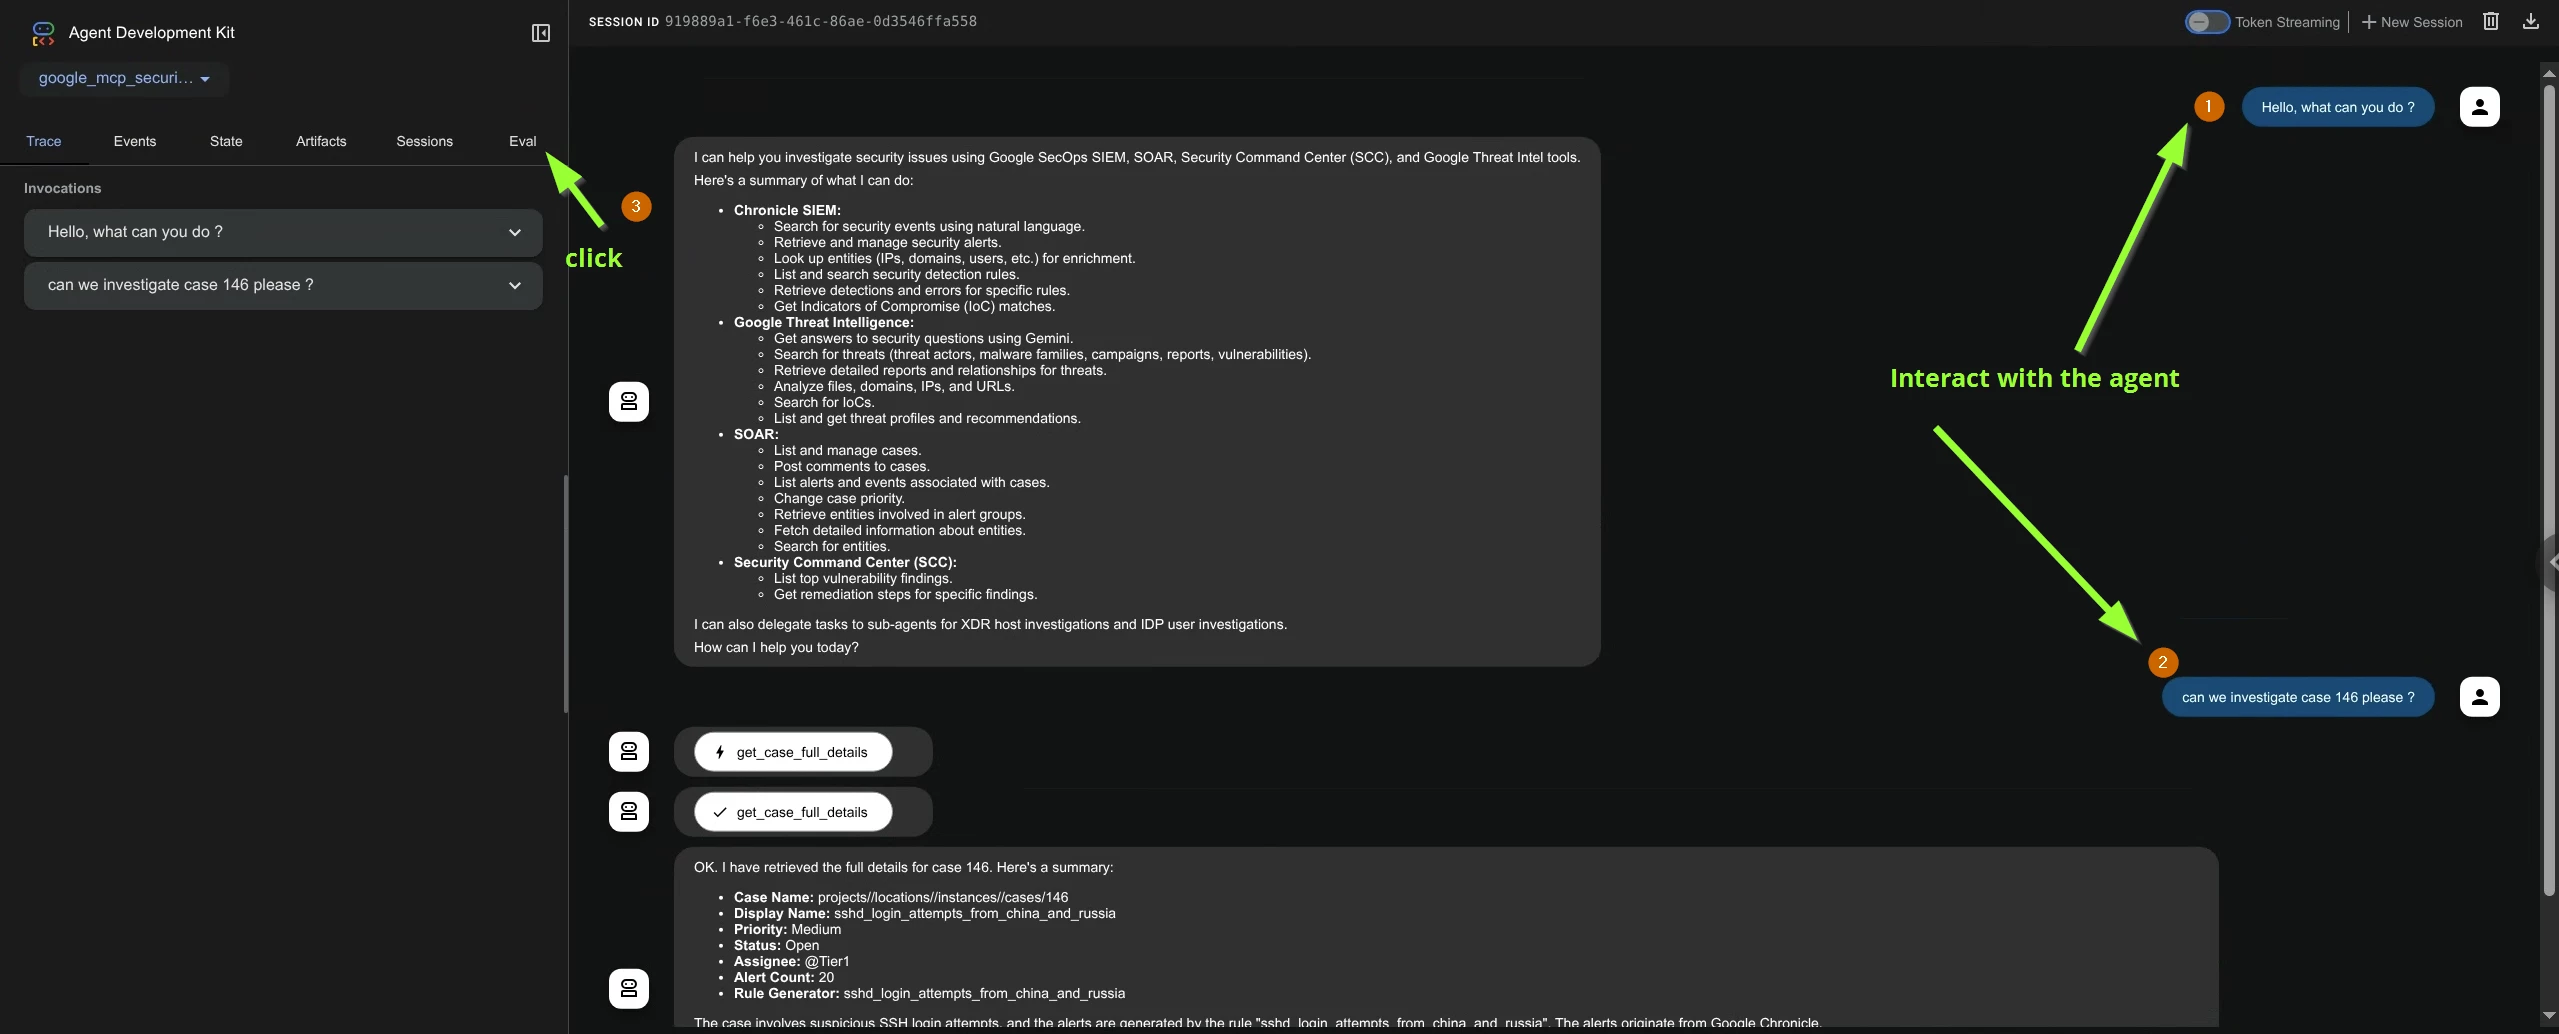
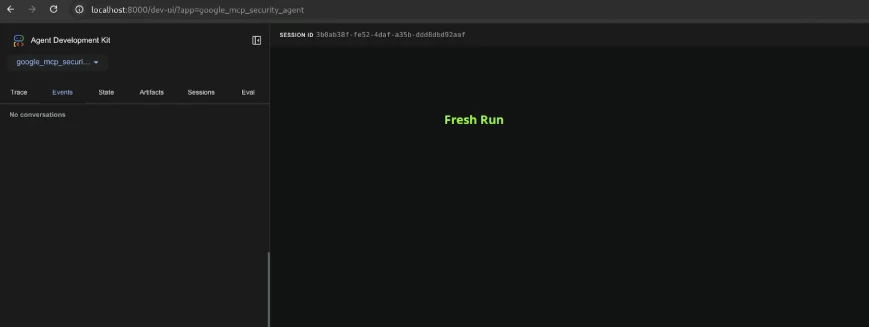
- Run the agent locally
- Open http://localhost:8000/dev-ui/?app=google_mcp_security_agent in the browser.
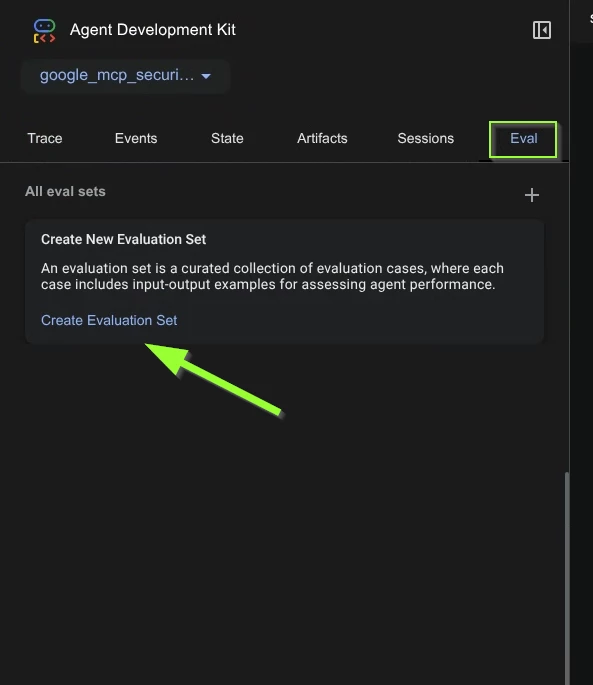
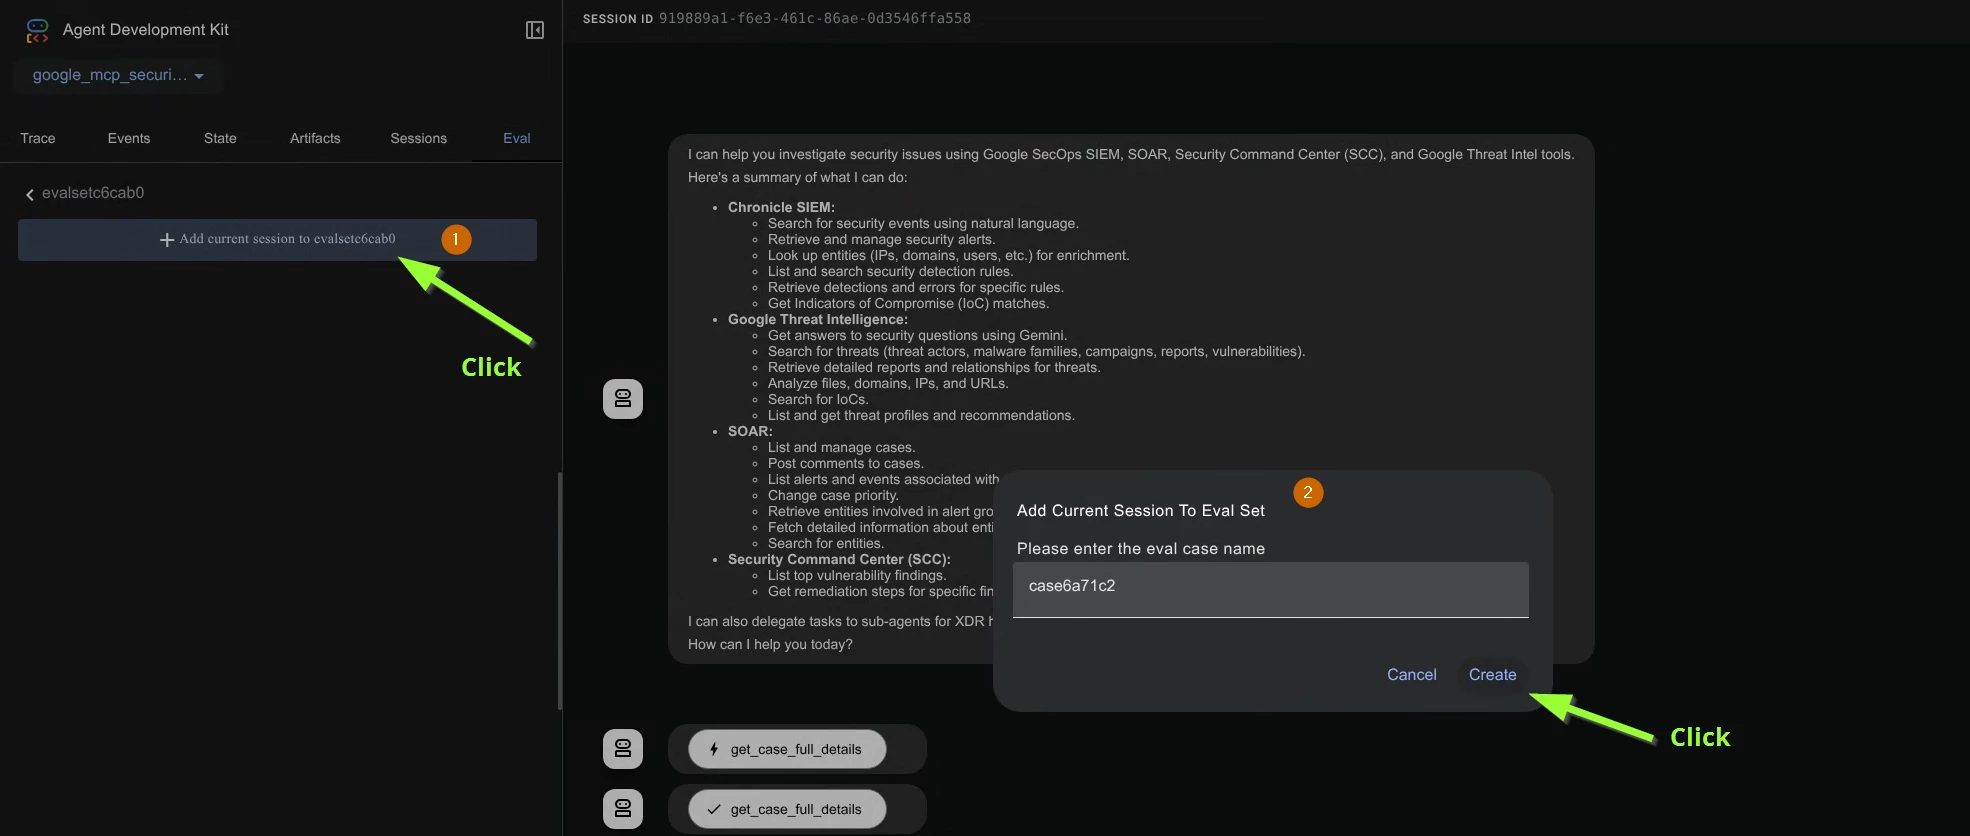
- Start interacting with your agent (2 to 3 interactions and at least one involving a tool call) - please check the screenshot below. Click the Eval tab.
- The evaluation setup needs the followingA. Evaluation setB. Evaluation case(s) within evaluation setThis is similar to Test Suite and Test cases when performing standard Unit Testing.So let’s create an evaluation set
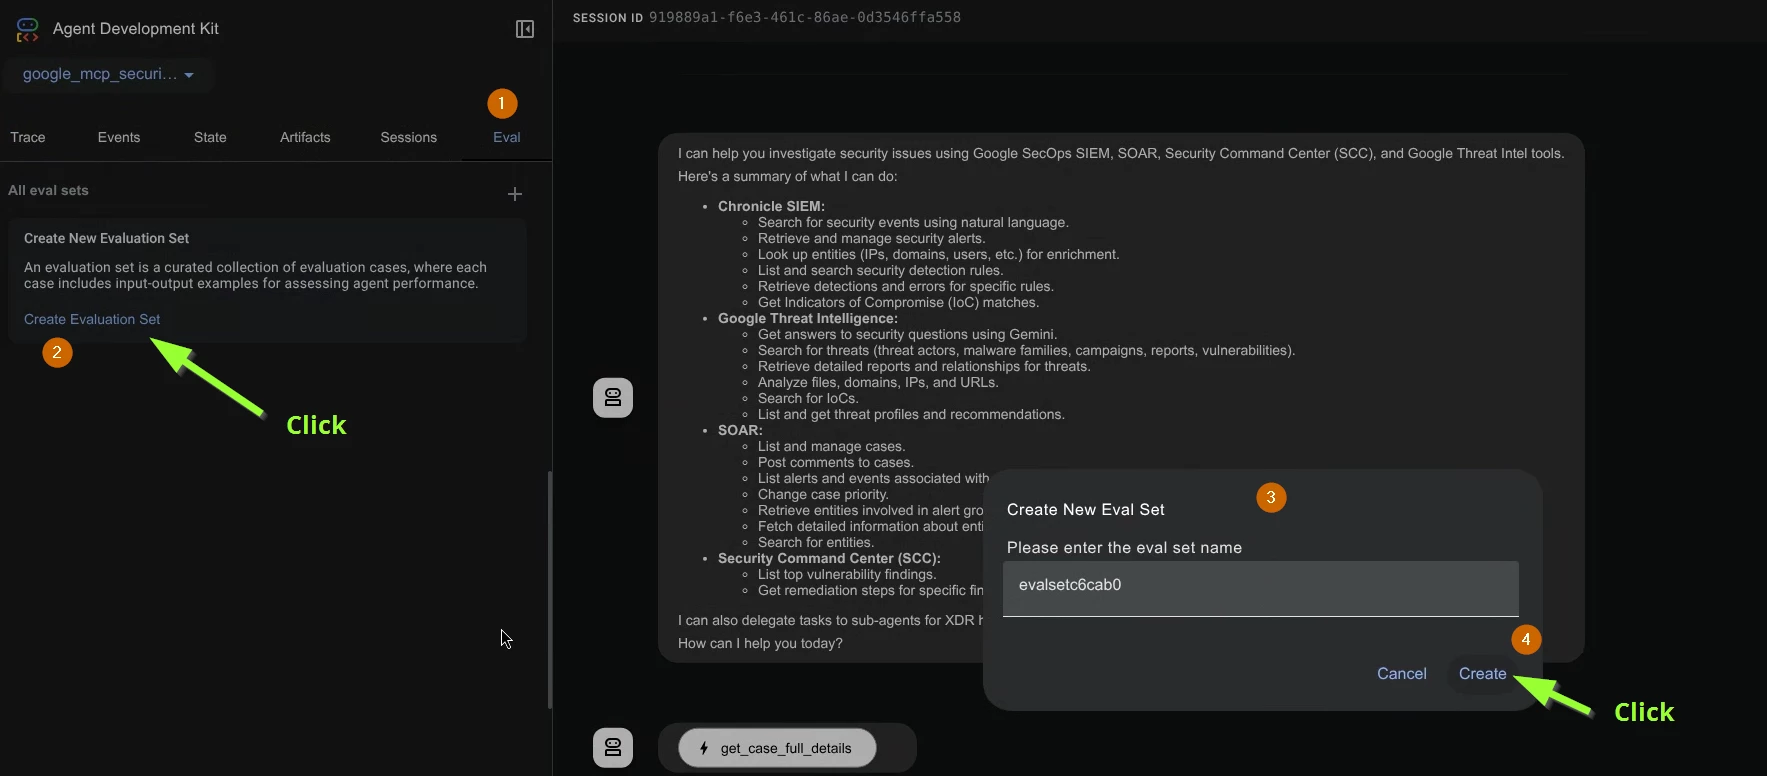
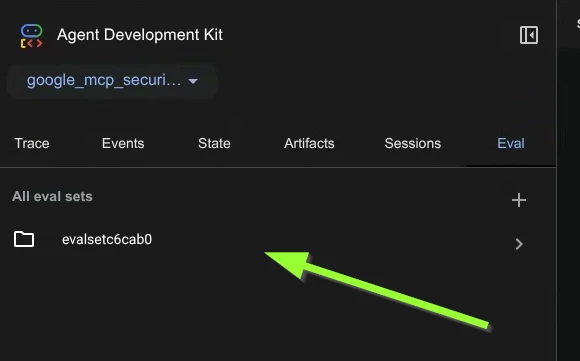
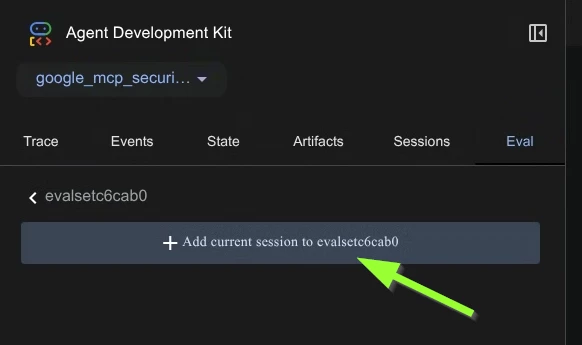
- Now you have created the evaluation set. Go ahead and click it and add the current session to this evaluation set. This creates a test case within this evaluation set.
- In the editor now you should have the Eval set JSON with a Eval case within it

- Congrats you have created the Initial Evaluation set with an Evaluation Case within it. You can use it as a template to add more cases. You can also update the json file and update the responses to your expectations.
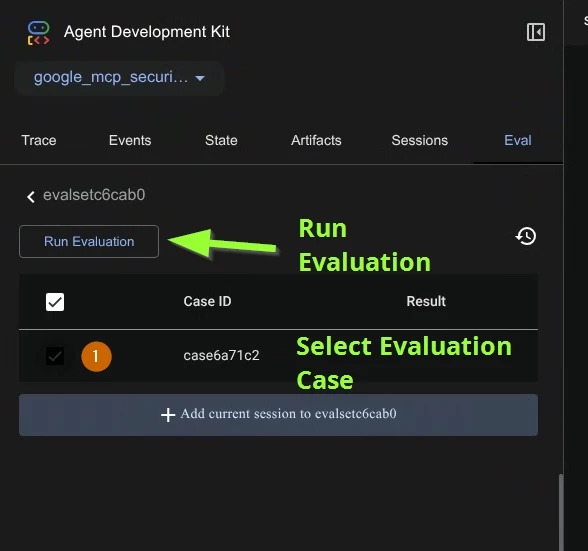
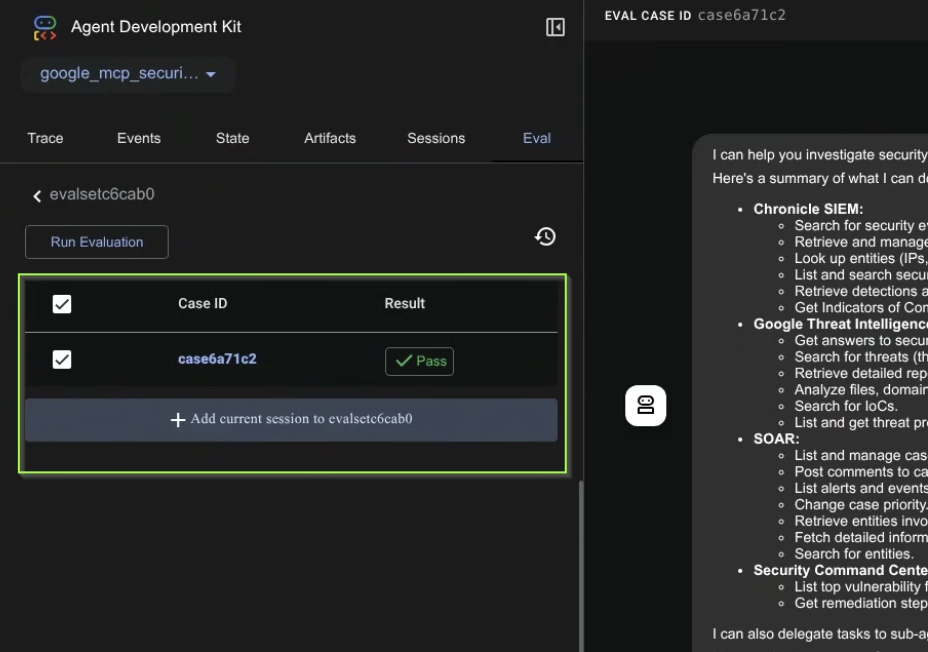
- But for now let’s run an evaluation. Adjust the Evaluation Metric accordingly (check screenshots below). Generally you want the agent to select the tools exactly as you expect it to be but the actual response (from the LLM) might vary.

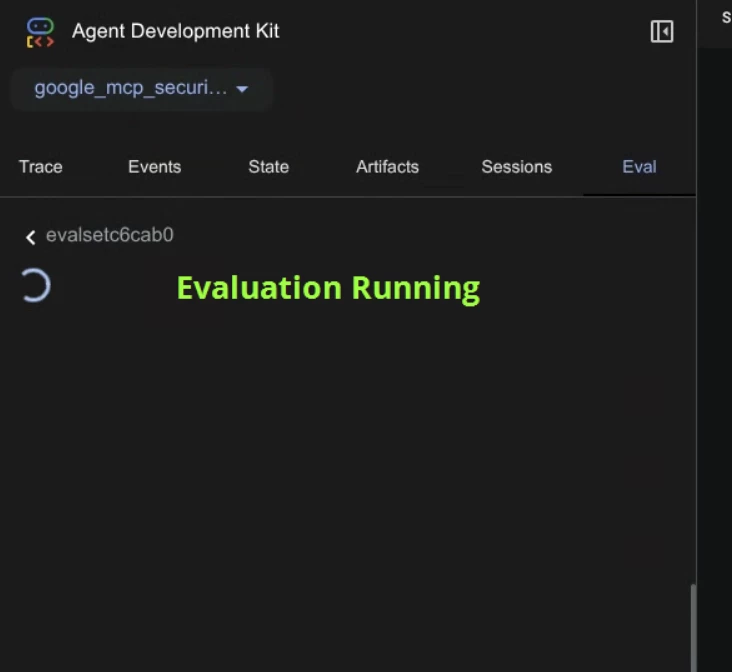
- The evaluation runs all the user interactions within the evaluation case and comparing the results with the expected results. You can check that in the editor. Notice the console running the evaluation and the .adk folder containing the evalset result.
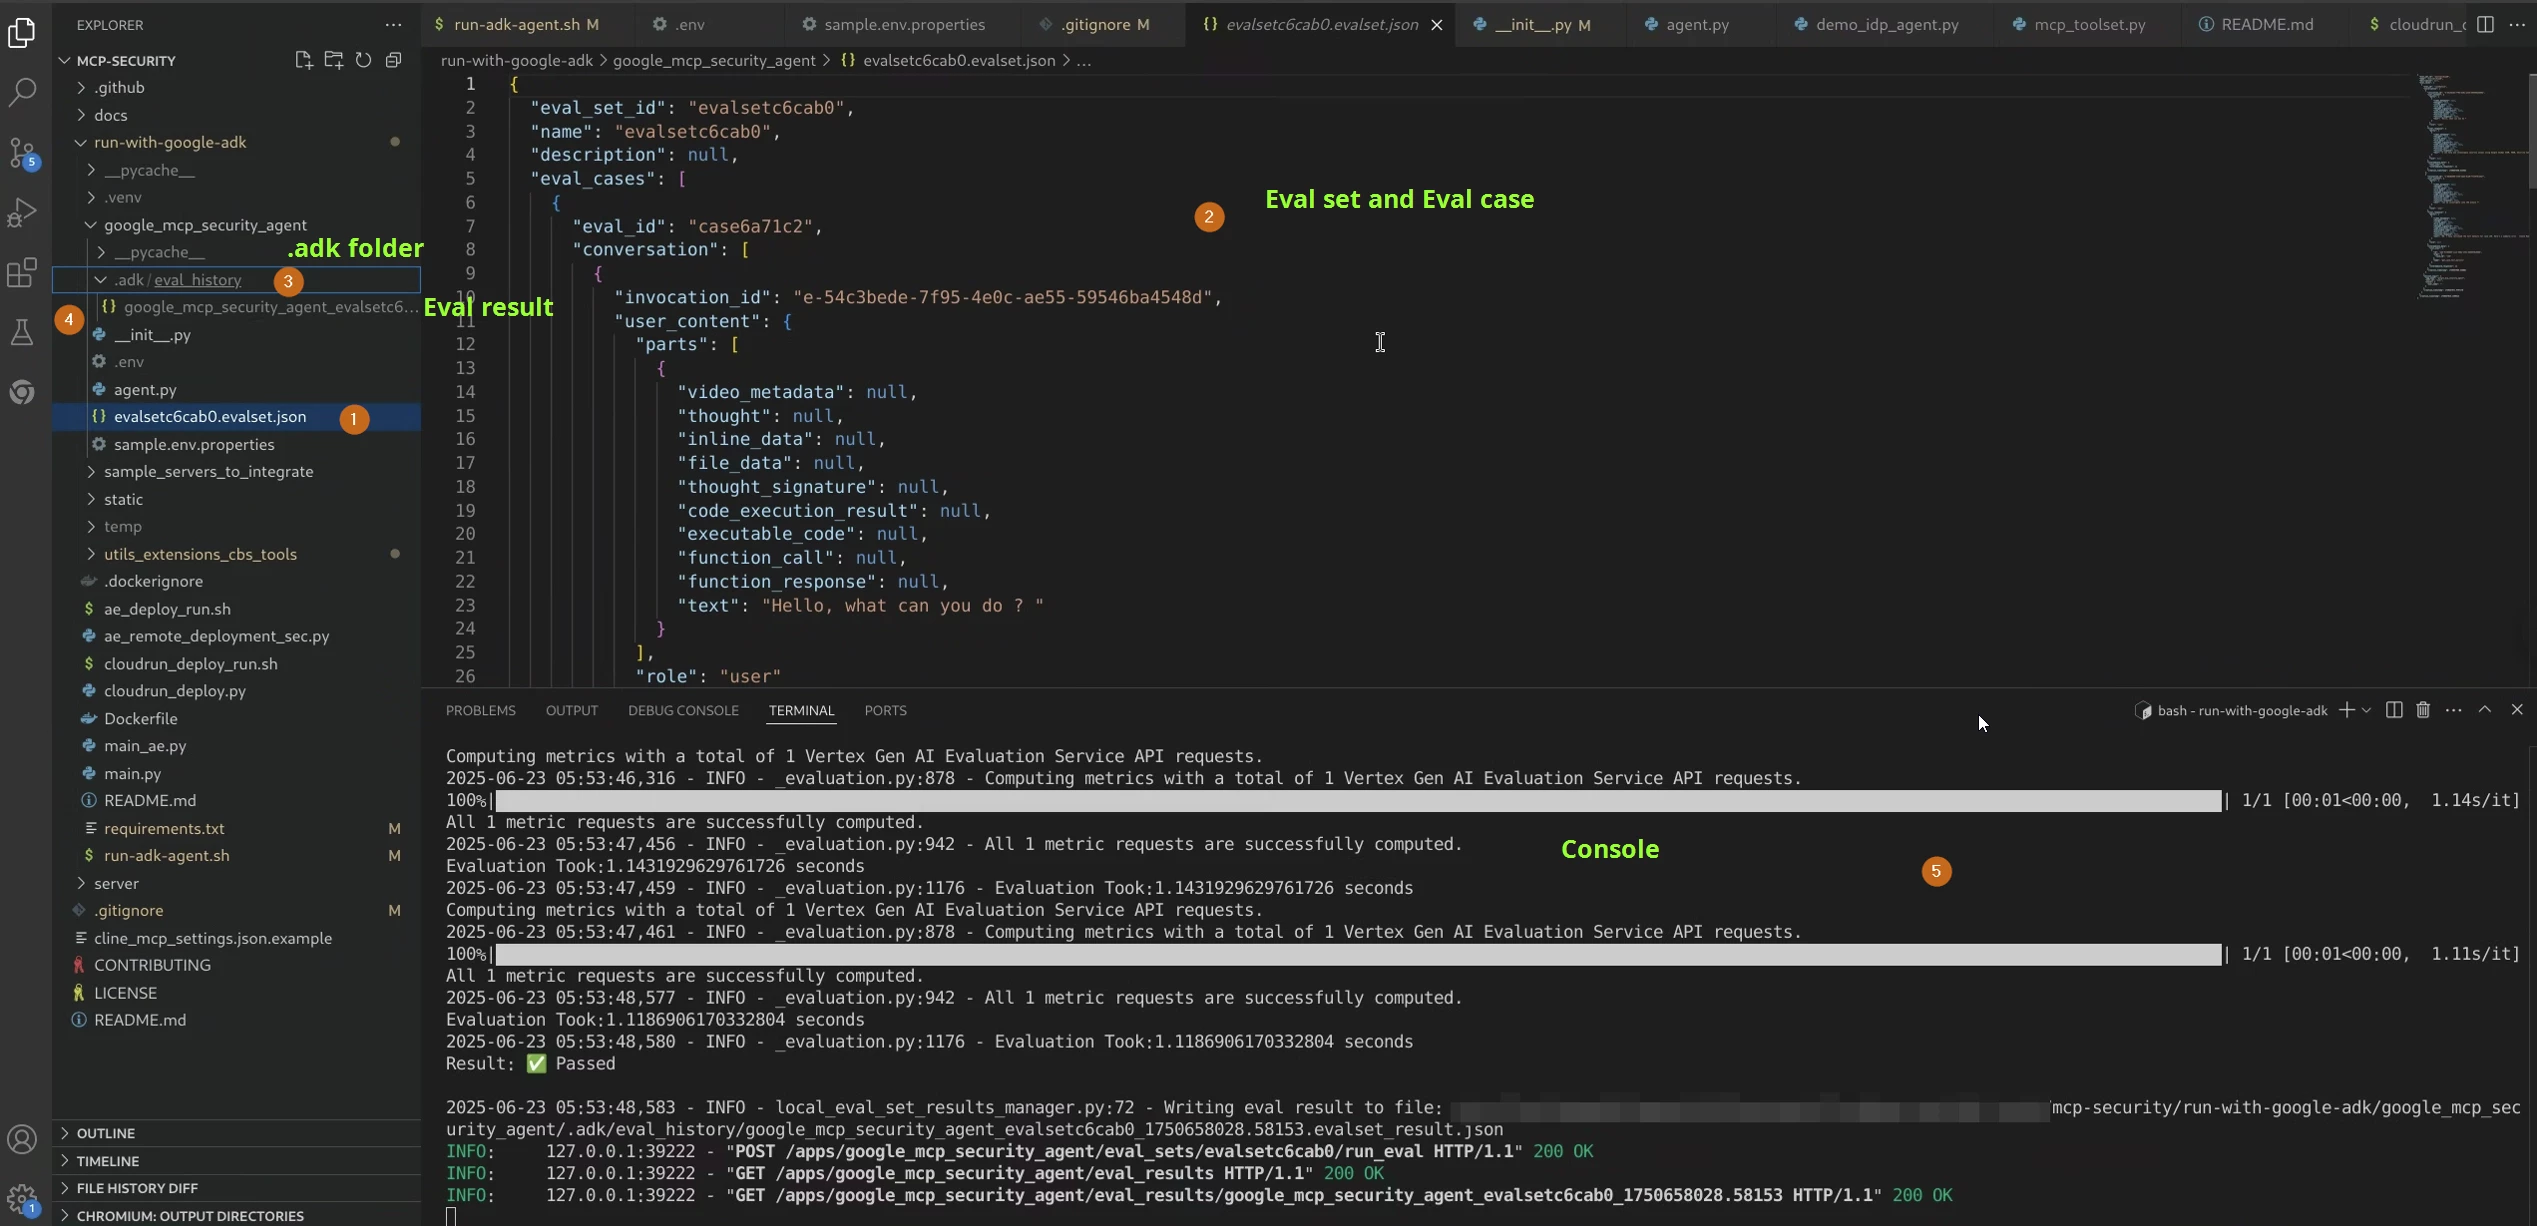
- Now the web console should also show the result
Using the evaluation set blueprint created to add additional evaluations.
Now you add more Evaluation sets, cases and modify the ones you already created by directly in the JSON file or by using the UI. Let’s check how we can do that.
Updating expected responses into evaluation sets / cases
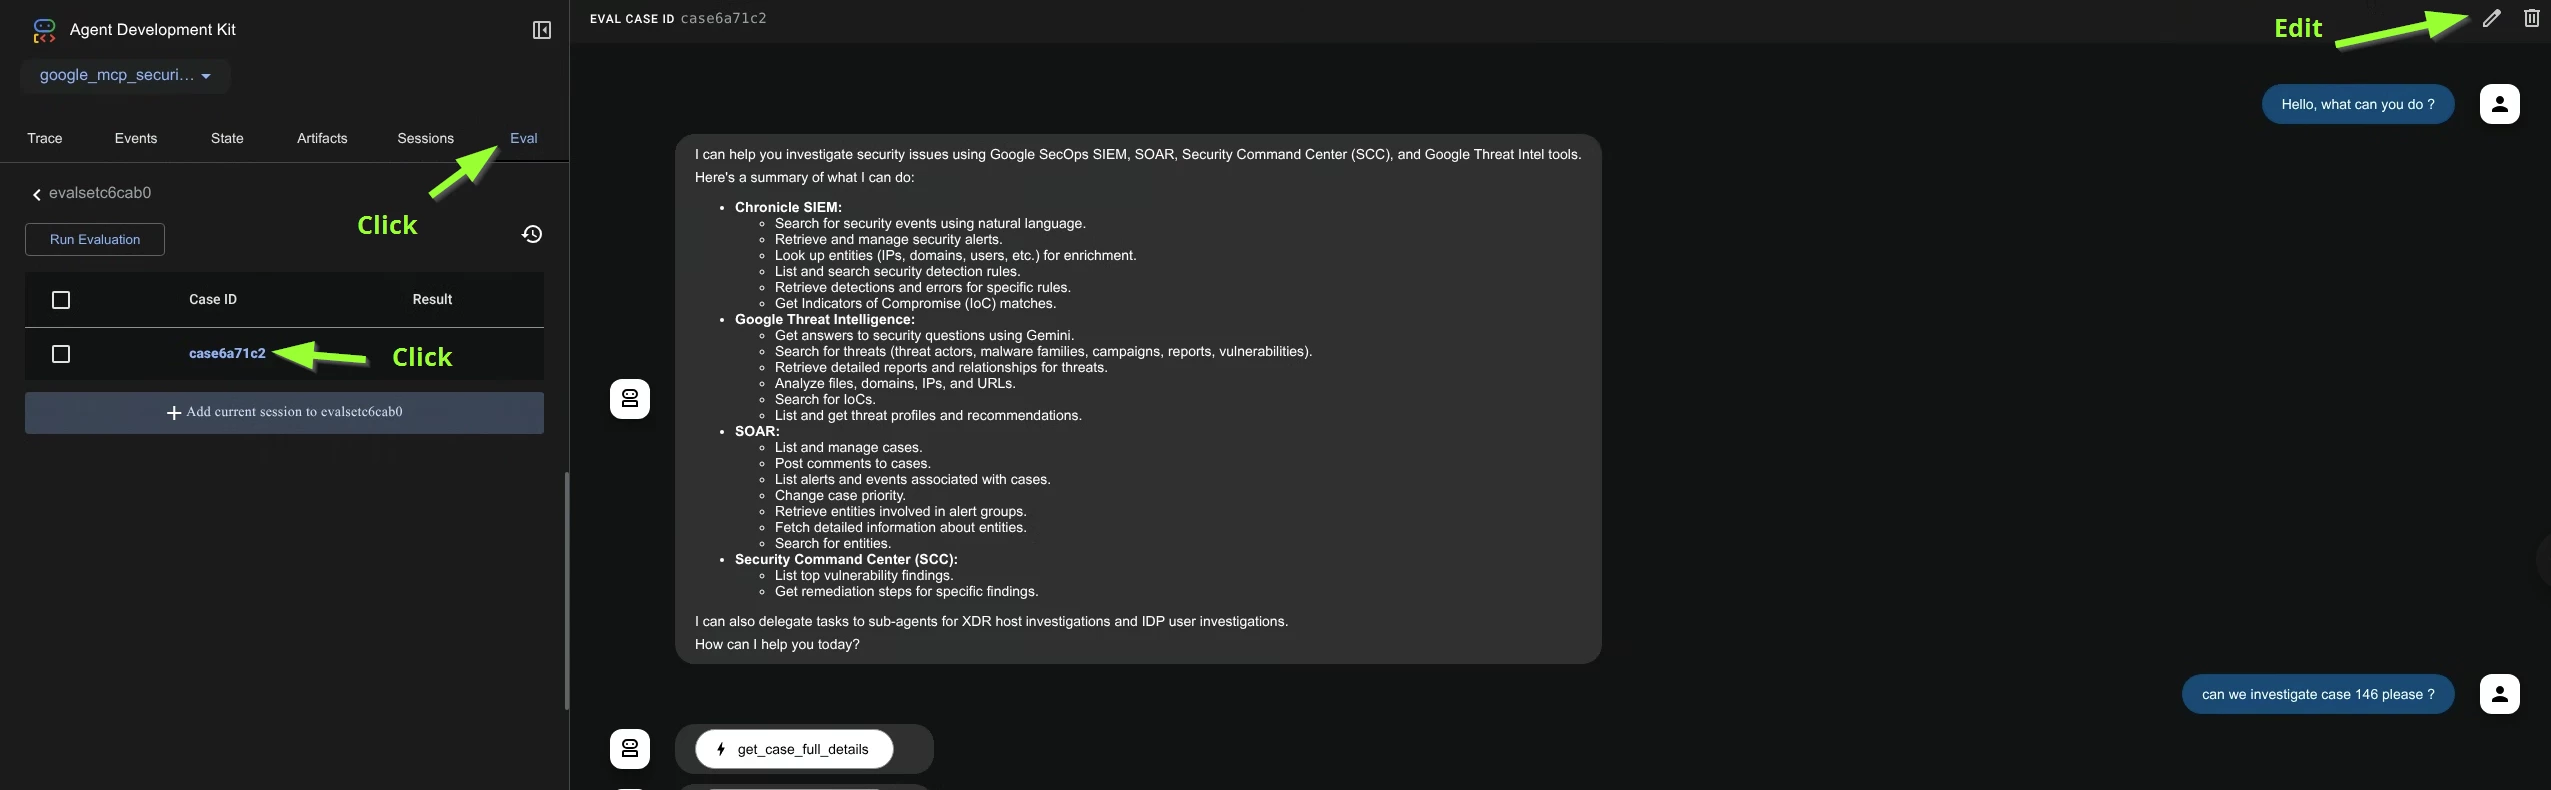
- Stop and start your agent
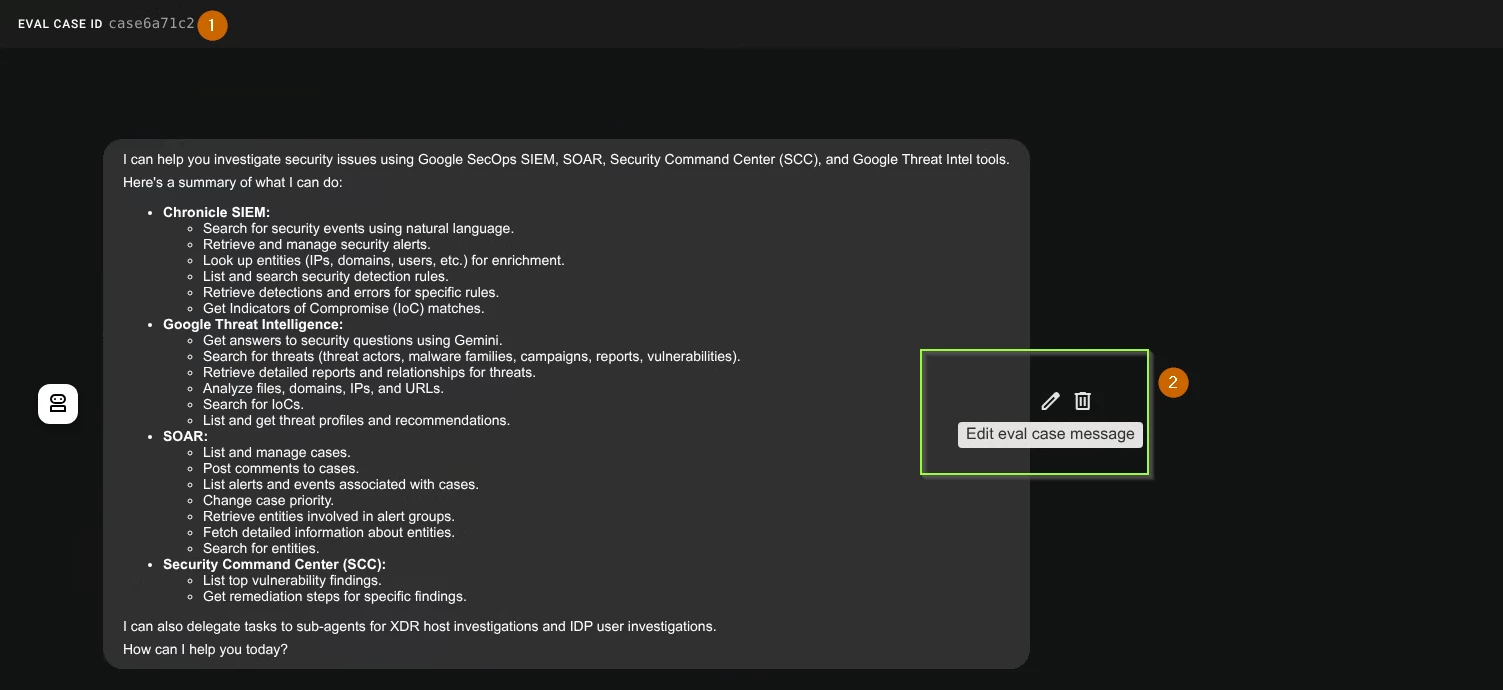
- Now go to the Eval tab as before and notice your evaluation set is loaded (from the json). Click the first case. Click Edit Icon.
- Now you can edit the expected response and save the test case. Then you can retest the Evaluation Set with updated expected response

Evaluating Agent Trajectory
Using the template JSON Evaluation case you have you can create evaluation cases like following (to evaluate whether the agent is following the expected trajectory or not)
- On a particular prompt (e.g. get host information for web-server-iowa), the Agent should do following
- Authenticate by calling authenticate
- Use get_host_informationtool
- Then on the subsequent interaction (get XDR findings for web-server-iowa), the Agent should do the following
- Use get_alerts_for_host without calling authenticate again
Of course as shown above you could also add /change the agent responses to compare with your expected responses (e.g. the Agent must greet the user). Please refer to the ADK documentation to create additional Evaluation sets and Evaluation cases.
Improving response time / performance and optimizing costs.
Any agent interaction involves following steps -
- Initial LLM call (user says - I want to investigate case 146)
- LLM responds asking for a tool usage (e.g. get case details)
- Agent execution logic runs the tool
- Agent sends the LLM request with the output from 3.
- LLM responds with summary
- Many times there could be even more steps (involving multiple function calls) to resolve a query.
A snappy agent is a usable agent.
The agent code abstracts a lot of performance improvements but a user can configure the agent to only use a configured number of recent interactions to improve the turn around time (especially for the LLM). Please refer to Improving performance and optimizing costs.
As seen in above, the steps an agent takes to resolve a query involves interacting with the LLM. There are costs associated with LLM calls (the customer is generally charged for the number of tokens). For long context queries (like those involving verbose responses for both 1st and 3rd party security products) the costs will be higher. There will also be deployment costs if the customer chooses to run the deployed version.
The LLM costs can be reduced / optimized by carefully tweaking the configuration. And the deployment costs can be improved by starting small (smaller containers on cloud run and also controlling the automatic scaling configuration).
Not providing blanket access especially on Agent Engine and Agent space is another way to reduce costs.
Demo Links
This section provides demo links.
Appendix
This section provides additional material.