



Introduction
Your custom YARA-L rules are some of the most valuable content in Google SecOps. Each one captures months of tuning, threat research and hard-won knowledge about your environment. A rule that is deleted by mistake, broken by a rushed edit, or needed again after a migration is painful to rebuild from memory.
The quick fix is a script that exports every rule using a service account key. Many organizations can no longer do that: their cloud policies ban long-lived service account key files, because a leaked key gives an attacker the same access until someone notices and revokes it.
This guide shows a better way. A small Cloud Run function, triggered daily by Cloud Scheduler, exports every rule to a Cloud Storage bucket. It authenticates with its own service account through short-lived tokens, so there is no key to download, store or rotate. Setup takes about 30 minutes in the Google Cloud console, with no software to install.
This guide deploys a Cloud Run function that backs up every YARA-L rule in Google SecOps to a Cloud Storage bucket on a daily schedule. The function runs as a service account with no key file, and every step is done in the Google Cloud console in about 30 minutes.
How it works
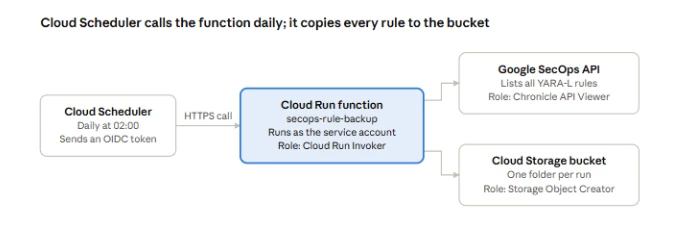
Every call uses the secops-rule-backup service account's short-lived tokens. Each role shown is granted to that service account on the resource it sits on.
Before you start
You need the Owner role on the Google Cloud project linked to your SecOps instance, or an admin who can enable APIs and create service accounts, buckets, Cloud Run functions and Cloud Scheduler jobs. Nothing is installed on a PC; everything happens at console.cloud.google.com.
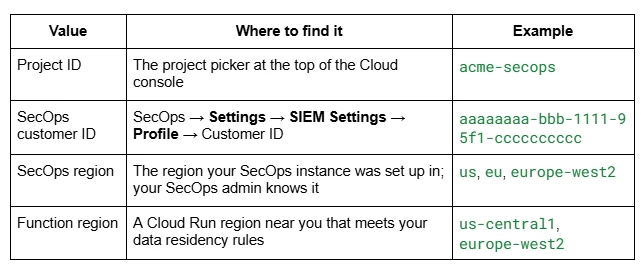
Collect these values first:
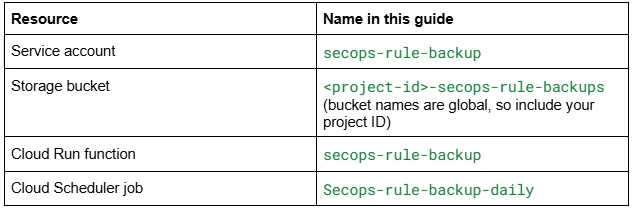
This guide uses the names below. You can choose others, but use them consistently:
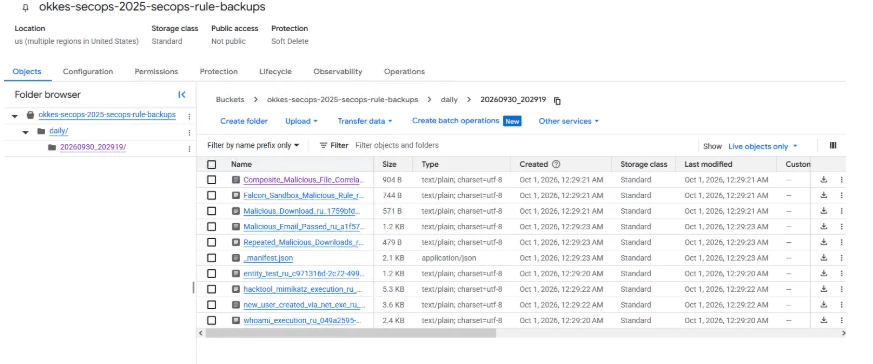
When you finish, each run creates a folder named after its UTC time, such as 20261001_020000/. It holds one .yaral file per rule plus a _manifest.json that records how many rules were found, saved, skipped and failed.
Let's start.
Part A: Prepare the project
1 - Enable the required APIs
Go to console.cloud.google.com and check that your SecOps project is selected in the project picker at the top.
In the search bar, search for each API below, open it and click Enable:
- Cloud Run Admin API
- Cloud Build API
- Artifact Registry API
- Cloud Scheduler API
The Chronicle API is already enabled on a SecOps project.
***
2 - Create the service account
The function runs as this service account. Google Cloud gives it short-lived tokens automatically, so no key file is ever created.
- Search for Service Accounts and open IAM & Admin → Service Accounts.
- Click + Create service account.
- Service account name: secops-rule-backup. The ID fills in automatically. Click Create and continue.
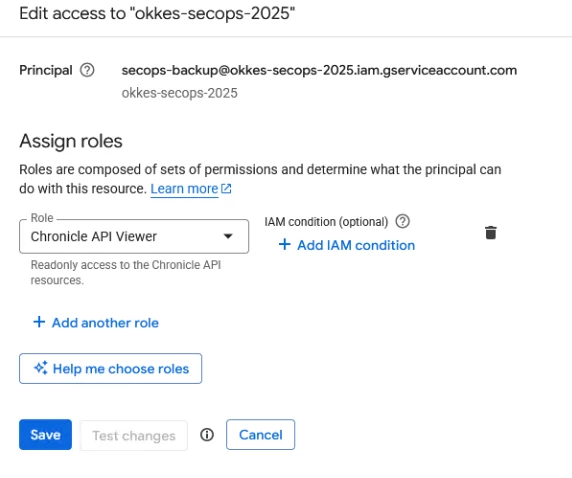
- Under Grant this service account access to project, choose the role Chronicle API Viewer. Click Continue, then Done.
- Copy the service account's email from the list, for example secops-rule-backup@acme-secops.iam.gserviceaccount.com. You need it in the next steps.
Do not open the Keys tab or create a key. The setup does not use one.
***
3 - Create the backup bucket
- Search for Buckets and open Cloud Storage → Buckets.
- Click + Create.
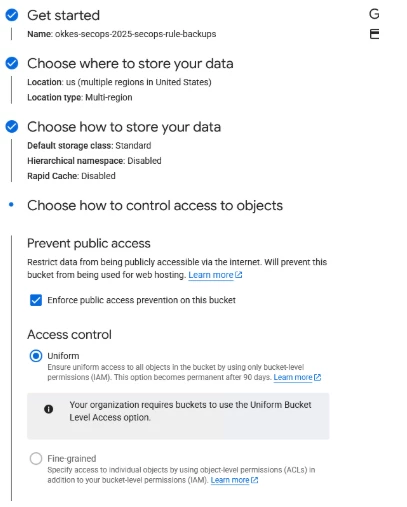
- Name: <project-id>-secops-rule-backups. Click Continue.
- Location type: Region, and pick your function region. Click Continue.
- Storage class: Standard. Click Continue.
- Access control: keep Enforce public access prevention on this bucket ticked and Uniform selected. Click Continue.
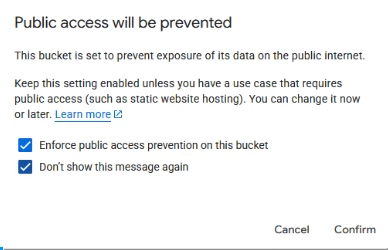
- Leave the protection settings as they are and click Create. If a pop-up says public access will be prevented, click Confirm.
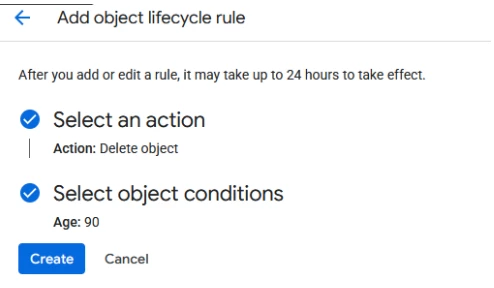
Optional: To delete old backups automatically, open the bucket's Lifecycle tab, click Add a rule, choose Delete object, set Age to 90 days and click Create.
***
4 - Allow the service account to write to the bucket
- Open the bucket and go to the Permissions tab.
- Click Grant access.
- New principals: paste the service account email from step 2.
- Role: Storage Object Creator.
- Click Save.
Storage Object Creator can add new files but cannot read, overwrite or delete existing ones, so the function can never damage earlier backups.
***
Part B: Create the Cloud Run function
5 - Navigate to Cloud Run
In the search bar, enter Cloud Run and open it. Google has merged Cloud Functions into Cloud Run, so functions are created from here.
***
6 - Start creating a new function
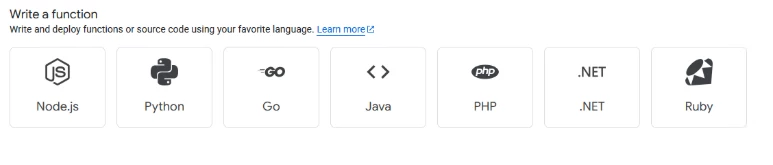
Click Python button under Write a function.
***
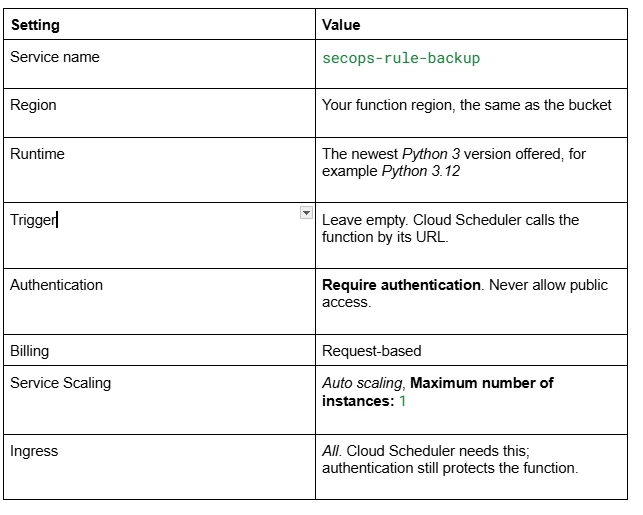
7 - Set the function name, region and access
Fill in the top of the page:
***
8 - Set the timeout, environment variables and service account
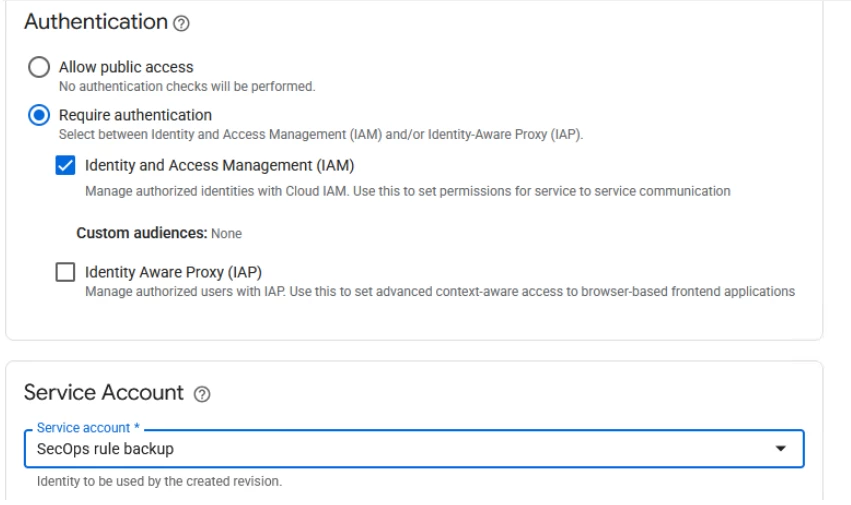
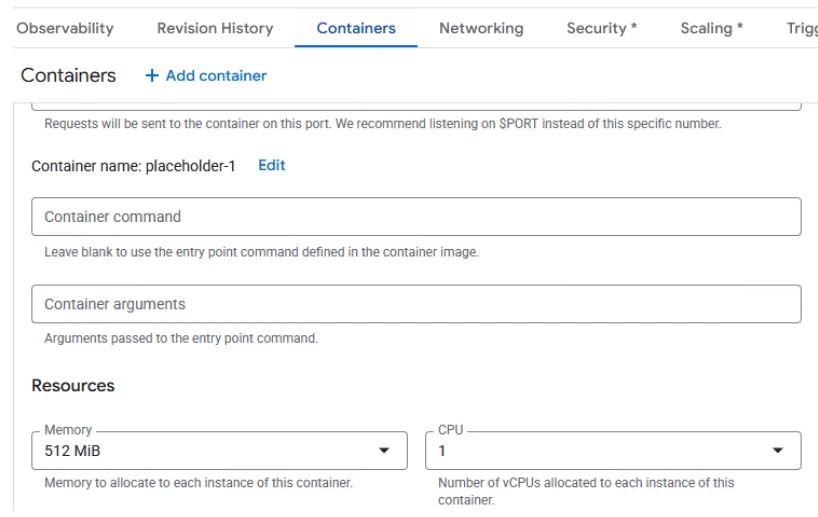
These settings are on tabs across the top of the page: Containers, Networking, Security, Scaling and so on. On older console versions they are grouped under Containers, Volumes, Networking, Security instead.
- Containers tab → Resources → Memory: 512 MiB
- Scaling tab → Requests → Request timeout: 900 seconds
- Security tab → Service account: secops-rule-backup
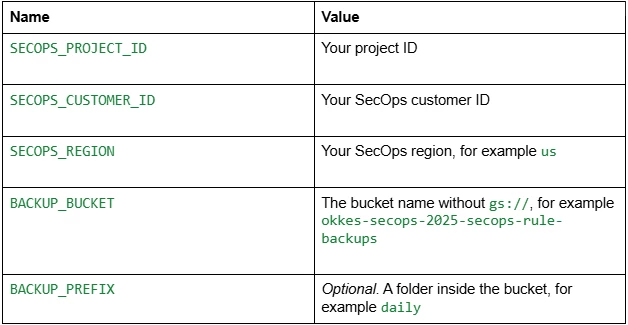
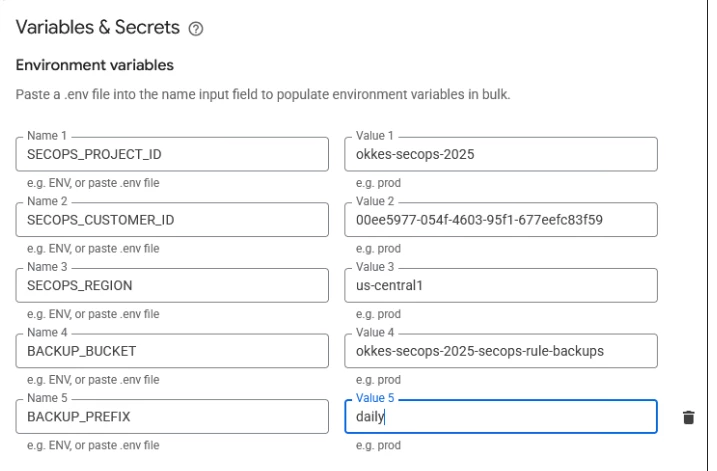
On the Containers tab, under Variables & Secrets → Environment variables, click + Add variable for each of these:
Click Create. Cloud Run deploys a sample function and opens its Source tab.
If you are editing a service that already exists, finish with View diff & redeploy → Deploy changes instead of Create.
***
9 - Add the code and deploy
On the Source tab, the editor shows two files.
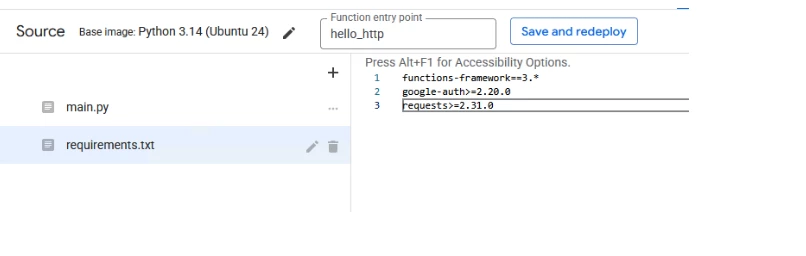
Click requirements.txt and replace everything in it with:
functions-framework==3.*
google-auth>=2.20.0
requests>=2.31.0
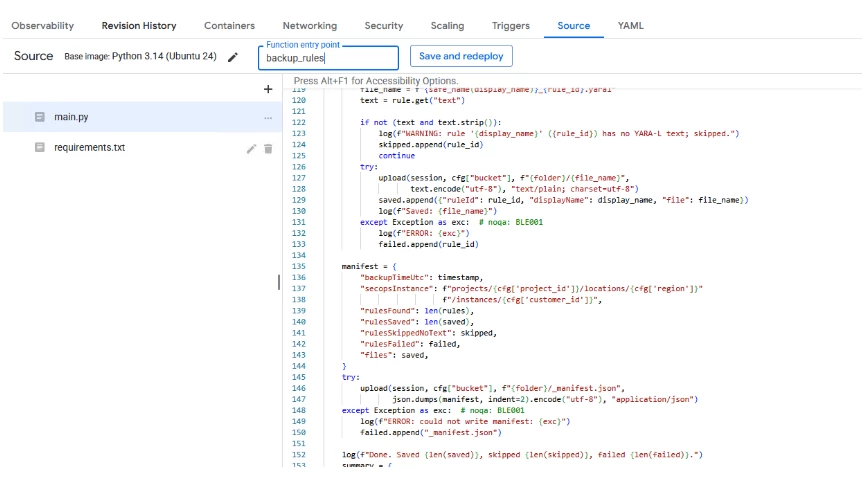
Click main.py and replace everything in it with the main.py attached to this guide.
Then:
- Set Function entry point to backup_rules.
- Click Save and redeploy.
- If a pop-up asks to grant permissions for the build, click Grant.
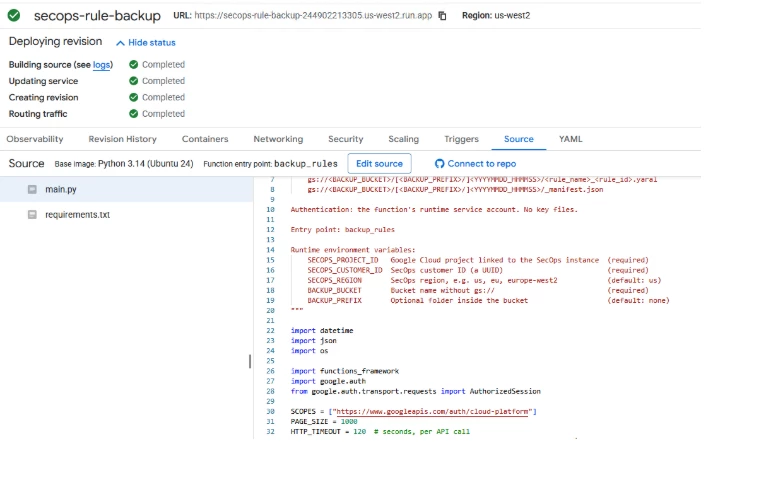
- Wait for the green check next to the service name. The first build takes 2–4 minutes.
- Copy the URL shown at the top of the service page, for example https://secops-rule-backup-123456789012.us-central1.run.app. You need it in step 11.
Part C: Schedule the backup
10 - Allow the service account to call the function
The function requires authentication, so Cloud Scheduler must call it as an identity that is allowed to. This guide reuses the secops-rule-backup service account.
- Go to Cloud Run → Services.
- Tick the checkbox next to secops-rule-backup and click Permissions at the top. Click Show info panel if the panel is hidden.
- Click Add principal.
- New principals: the service account email.
- Role: Cloud Run Invoker.
- Click Save
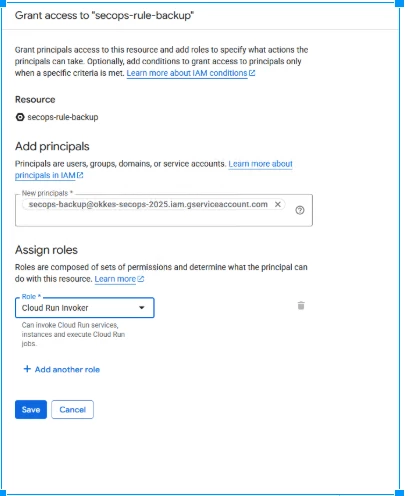
If you prefer a command, open Cloud Shell and run:
gcloud run services add-iam-policy-binding secops-rule-backup \
--region=<function-region> \
--member="serviceAccount:secops-rule-backup@<project-id>.iam.gserviceaccount.com" \
--role="roles/run.invoker"
***
11 - Create the Cloud Scheduler job
Search for Cloud Scheduler, open it and click + Create job.
Under Define the schedule:
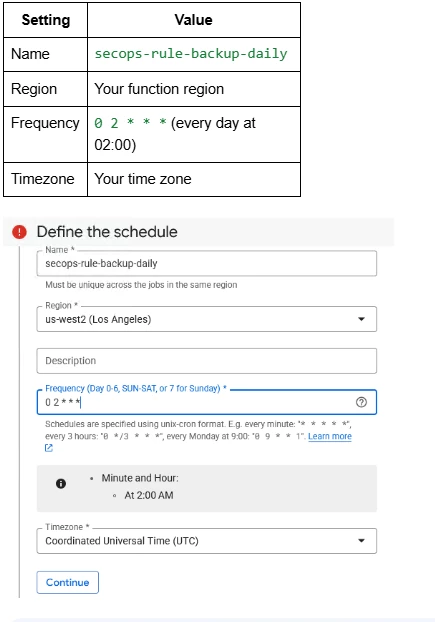
Click Continue. Under Configure the execution:
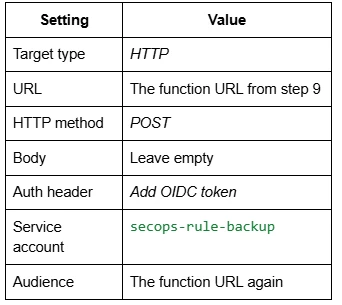
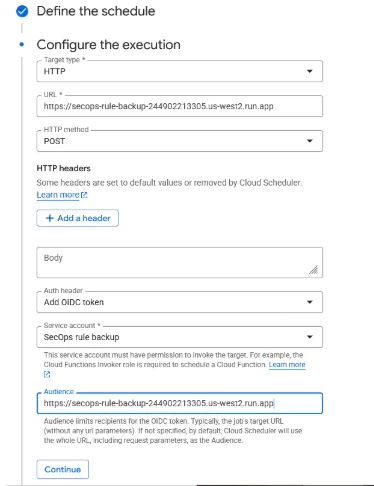
Click Continue. Under Configure optional settings:
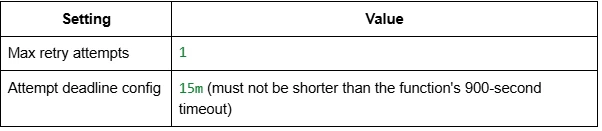
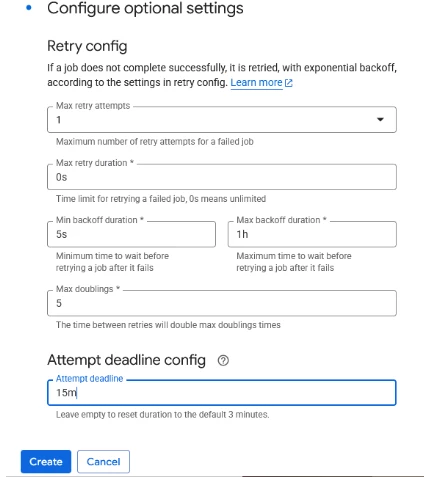
***
Part D: Test the backup
12 - Run the job now
In Cloud Scheduler, click the ⋮ menu next to secops-rule-backup-daily and choose Force run. After a minute or two, refresh the page. Last run should show Success.
***
13 - Check the function's logs
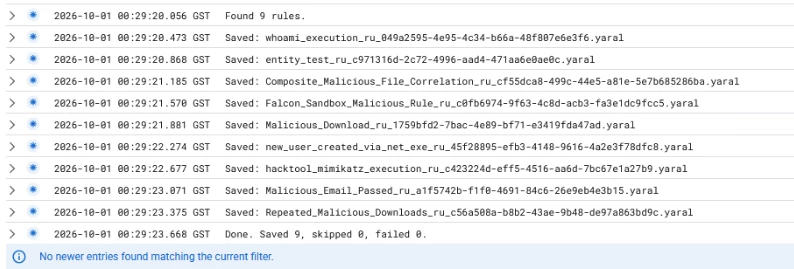
Go back to Cloud Run, click secops-rule-backup and open the Logs tab. You should see entries like these:
Backing up SecOps rules to gs://acme-secops-secops-rule-backups/20261001_020000/
Found 42 rules.
Saved: Suspicious_PowerShell_ru_1a2b3c4d-....yaral
...
Done. Saved 42, skipped 0, failed 0.
Permissions summary
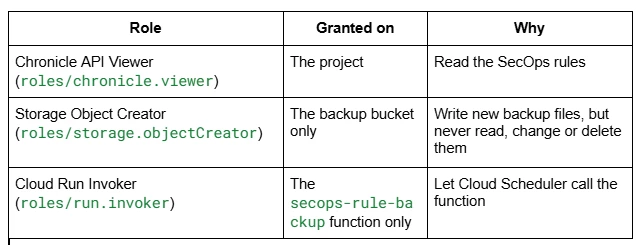
The service account holds three roles, each scoped as narrowly as possible. No key file, user account or Workload Identity Federation setup is involved.
Summary
You now have a daily, fully automated backup of every YARA-L rule in your SecOps instance, stored in a bucket where each run gets its own timestamped folder and manifest. No key files are involved: the function runs as a dedicated service account with three narrowly scoped roles, and it can add backups but never change or delete them. Restoring a rule is a copy and paste, and each day's run shows up in Cloud Scheduler and the function logs, so you can alert on failures. The same pattern of Cloud Scheduler, a keyless Cloud Run function and a Cloud Storage bucket works for other SecOps content too, such as reference lists and data tables, with only small changes to the code.
