

Author: Kyle Martinez
This guide will demonstrate how to translate security processes into an effective SecOps playbook. We will explore a simple use case and demonstrate how we can use playbooks to facilitate the case handling process.
Use Case
When a malware type alert gets created, we need to run through our SOC process which includes getting information about the host and the user involved. We also need to check Virus Total to get any information about the hash involved. If the hash comes back as suspicious, we need to escalate to our tier two analyst. We also need to check if the hash has been seen before on our network. At this point, our analyst will need to review important information about the alert to determine if we need to raise it as an incident. If it becomes an incident, we will need to contain the endpoint.
After questioning the process further, we determined there are repeatable processes that can be created as blocks so they can be re-used in other playbooks. We also identified all integrations that we would need. We take all of this information and create a use case design. The next section will show case our simple use case design. Each step will have an “A” or “M” next to it to denote whether the step is automated or manual.
Blocks
User Enrichment
This block will enrich user and host entities
- Enrich users with GSuite’s Enrich Entities action (A)
- Run Siemplify’s Is In Custom List action (A)
- Add a condition to check if the user is in the custom list (A)
- Add VIP tag (A)
- Add alert scoring information (A)
IOC Enrichment
This block will enrich IOCs and sets the alert’s priority
- Enrich IPs and Domains with Google Chronicle (A)
- Add severity record based on findings from the Chronicle enrichment with a condition (A)
- Chronicle enrichment severity high -> High Alert Severity (A)
- Chronicle enrichment severity medium -> Medium Severity (A)
- Else -> Informational Severity (A)
- Enrich IOCs with Virus Total (A)
- Set alert priority with a condition (A)
- If less than 5 engines flag as malicious -> priority low (A)
- If 5-10 engines flag as malicious -> priority medium (A)
- If 11-15 engines flag -> priority high (A)
Containment
This block will facilitate the containment process for endpoints
- Identify if the asset is a workstation or server with a condition (A)
- If server
- Send email to get approval to contain (A)
- Contain host with CrowdStrikes Contain Host Action (M)
- Else
- Contain host with CrowdStrikes Contain Host Action (M)
Playbook
Malware Playbook
This playbook will handle all endpoint malware alerts. It will facilitate our response process through enrichment, investigation, and containment.
- Set case stage to triage (A)
- Assign case to Tier1 (A)
- Run User Enrichment block (A)
- Run IOC enrichment block (A)
- Run CrowdStrike’s Get Host Information action (A)
- Set case stage to assessment (A)
- Use a condition to check for suspicious IOCs (A)
- If not suspicious
- Add False Positive tag (A)
- Close alert (A)
- If suspicious
- Set case stage to investigation (A)
- Assign case to Tier2 (A)
- Prompt Analyst with a Multiple Choice Question to review case information and to choose to raise as an incident (M)
- True Positive
- Set case stage to incident (A)
- Add True Positive tag (A)
- Run the Containment block (A)
- Close alert (A)
- False Positive
- Add False Positive tag (A)
- Close alert (A)
- True Positive
Now that we have our use case design planned, we can start to implement the playbook. First we’ll start with creating the blocks.
The most significant benefit of using Blocks in Google SecOps is their inherent reusability, which allows you to standardize and scale your automation efforts. Think of a Block as a self-contained, reusable mini-playbook that encapsulates a common, multi-step process. Instead of building the same sequence of actions over and over again in different playbooks, you can build it once as a Block. This not only saves an immense amount of development time but also ensures that your core processes are executed consistently and reliably, no matter which playbook calls them.
The real power of Blocks is realized when you start turning your established internal processes into modular components. Every Security Operations Center has standard procedures, for instance, a "User Enrichment" process might involve checking Active Directory for the user's manager, querying an IAM solution for their roles, and searching past alerts involving that user. You can create a new Block named "Standard User Enrichment" and build this entire, multi-step workflow inside it. Once saved, this complex procedure is condensed into a single, manageable item that can be added to a playbook as if it were any other action.
This modular approach revolutionizes how you build new automation. When constructing your playbook, you no longer need to manually add and configure all the individual user enrichment steps. You simply drag in your pre-built "Standard User Enrichment" Block. Similarly, you could have other Blocks for "Create ServiceNow Ticket," "Analyze File Hash," or "Isolate Endpoint with Approval." By creating a library of these standardized Blocks, you can assemble new, complex, and reliable playbooks with incredible speed, snapping together tested components rather than starting from scratch every time.
Creating User Enrichment Block
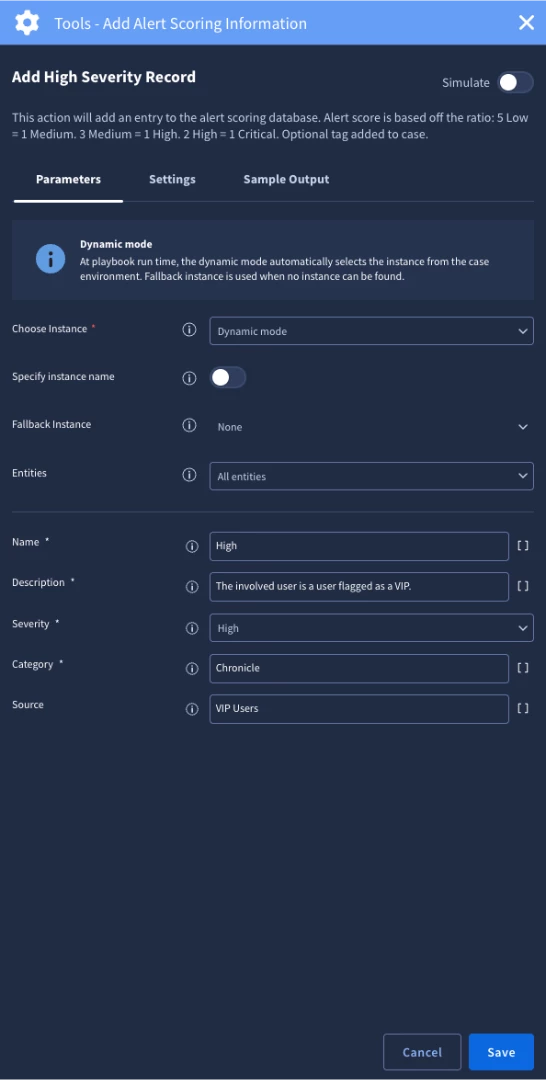
According to our use case design, this block will run an enrichment action from GSuite. It will then check to see if the user is in the VIP User custom list. If the user is in the VIP User custom list, then we will add alert scoring information and a tag.
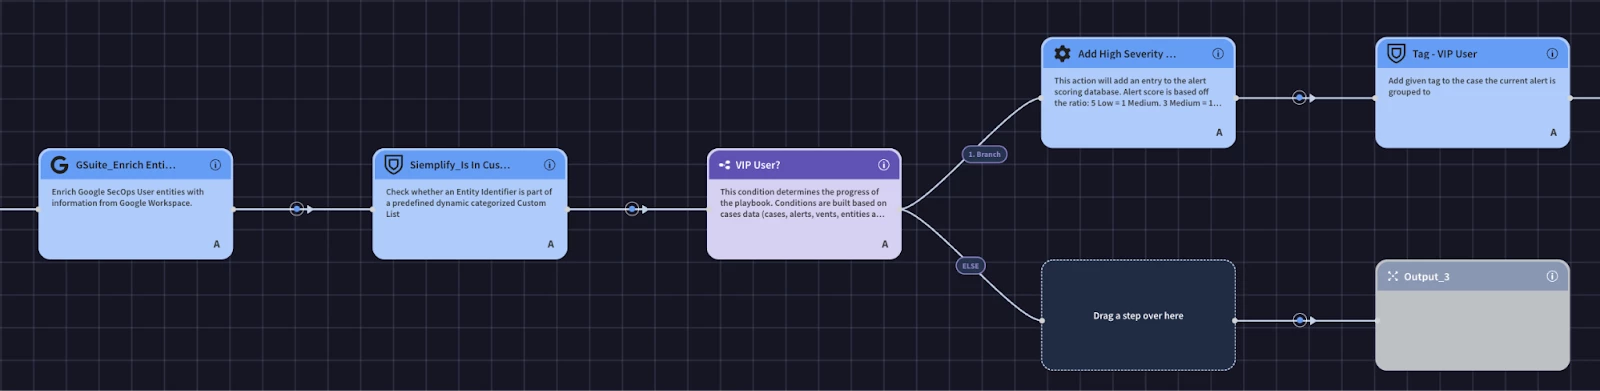
The custom list is a great feature because it allows organizations to maintain lists to use in playbook logic. For example, in our user case design we will check to see if the user entity in the alert is in the ‘VIP User’ custom list. If we find a match, we can create a branch of logic to perform more actions. In our case, we are going to add a ‘VIP User’ tag. We are also going to add alert scoring information that we can use to help set the priority and highlight important information.
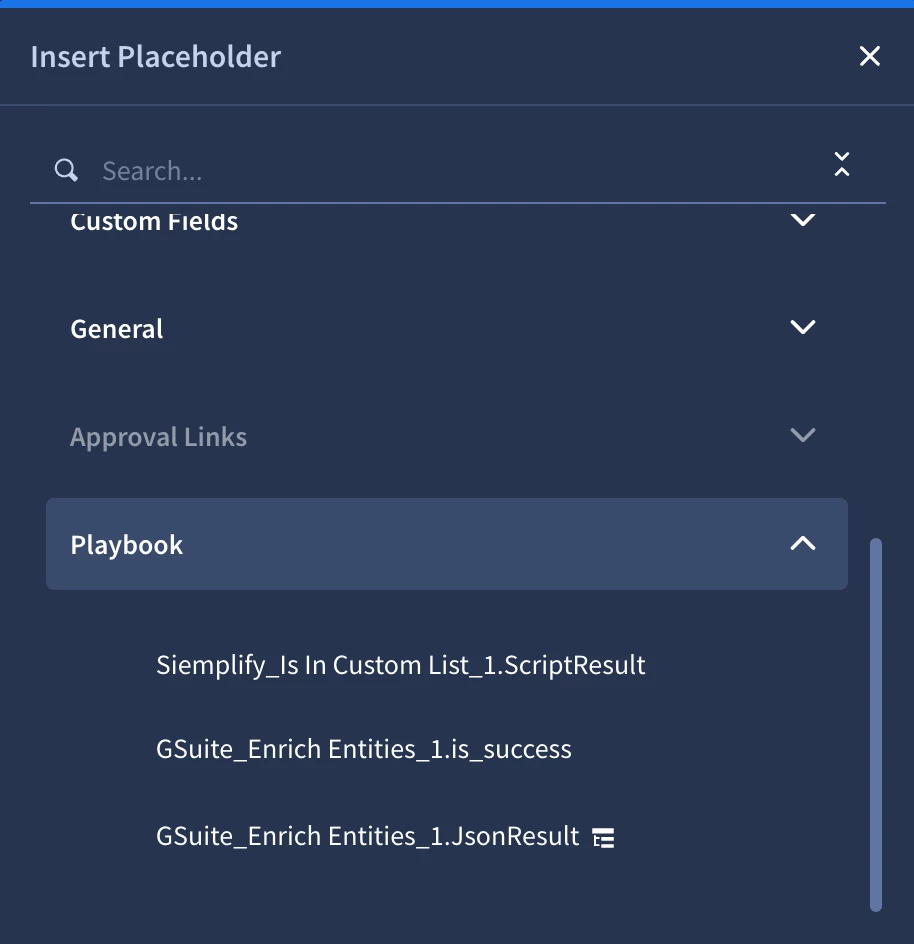
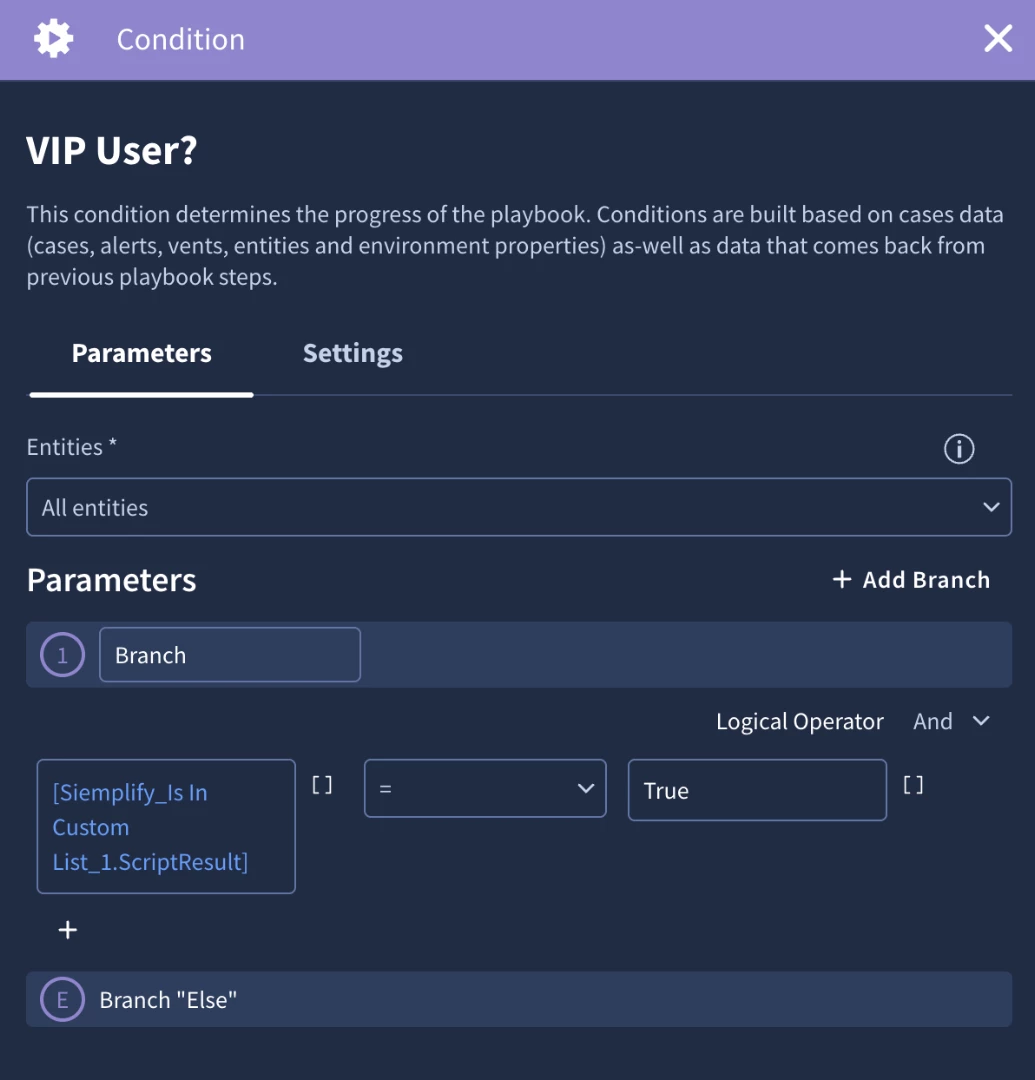
In our condition we’ll run into our first placeholder. The core benefit of using placeholders in Google SecOps is that they make your automated playbooks both dynamic and specific. Think of placeholders as variables that automatically pull in real-time data from the alert—like user names, IP addresses, file hashes, or alert severities. This allows you to build actions that are tailored to the exact context of each case, eliminating the need for manual data entry, reducing errors, and ensuring that every automated step is directly relevant to the incident being processed.
Placeholders are indispensable for creating meaningful, context-aware automations. When your playbook automatically creates a ticket in your ITSM tool, you can use placeholders like [Entity.Identifier] for the file hash to populate the ticket's title and description with the exact details. Similarly, if you need to send a notification email, you can use a placeholder to ensure it goes to the right person. This makes your automated communications and actions precise, providing analysts and other systems with the specific information they need without any manual intervention.
For our condition we will need to check the script results equals True to determine if there was a match. To do this we’ll click the placeholder icon and add the Siemplify_Is In Custom List_1.ScriptResult placeholder
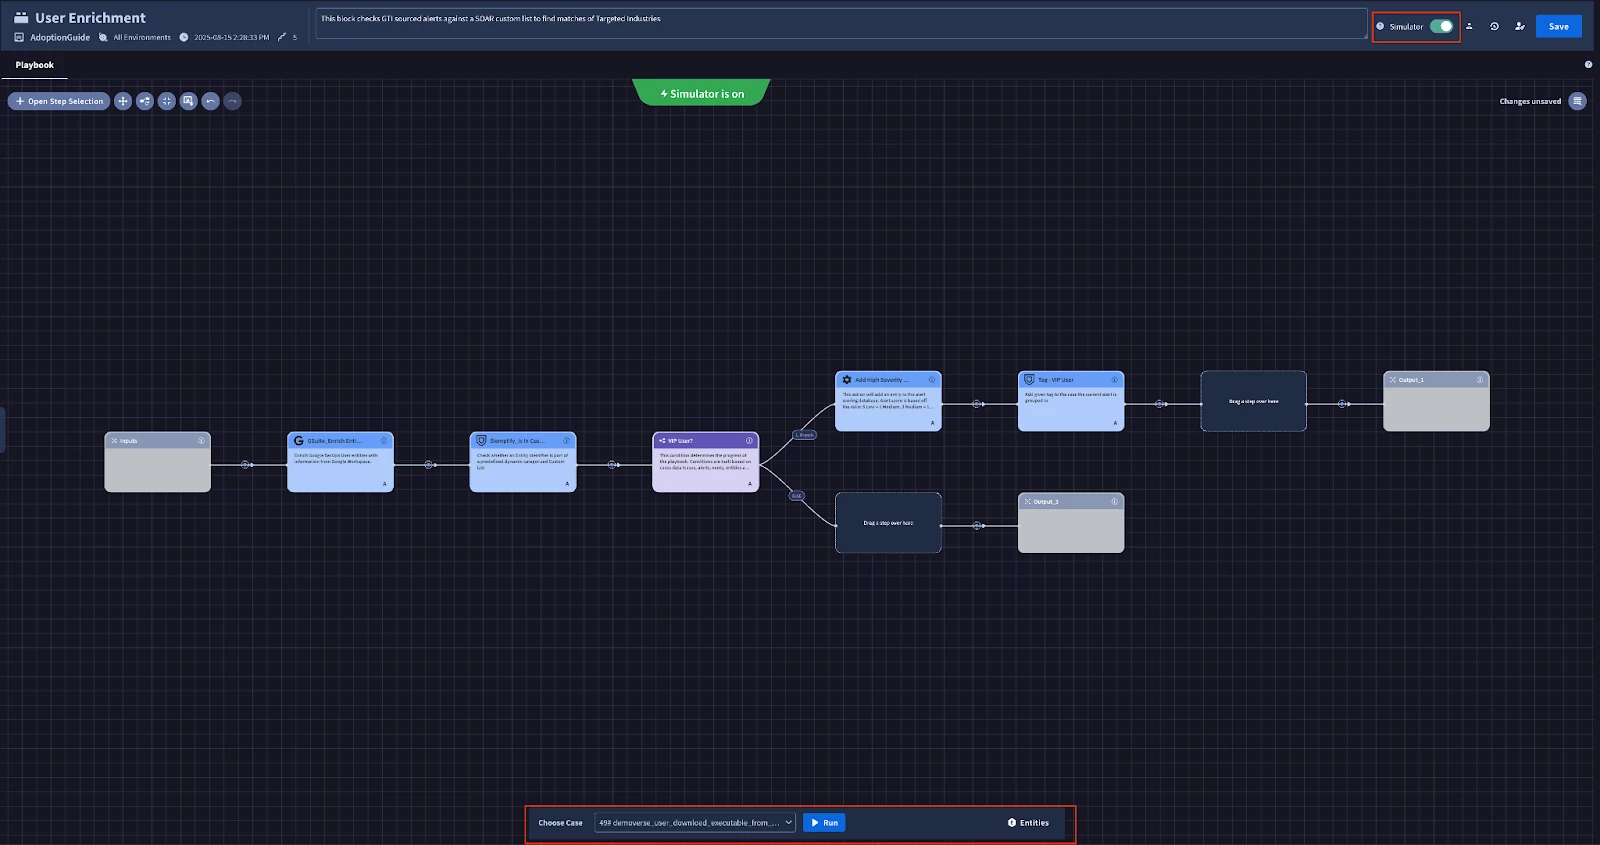
Now that we have the block built, it’s time to test it using the simulator. The primary benefit of the Playbook Simulator is that it provides a structured environment to test, validate, and debug your automation using data from real historical cases. It is the essential bridge between building a playbook and activating it. By running your playbook against a known past incident, the simulator allows you to observe how your logic will behave with realistic data, providing a high degree of assurance that the playbook will function as designed.
It is critical to understand that the simulator executes the playbook's actions, including making live API calls to your integrated tools. If an action is configured to "Isolate Endpoint," running the simulator against a case with that endpoint will send a real command to your EDR solution. This is why you must use the simulator judiciously. It is best practice to run simulations against historical cases involving non-critical or test endpoints. The purpose is to find and fix logic errors, misconfigured actions, or flawed assumptions in a controlled manner before the playbook is deployed to handle live, critical incidents.
The simulator should be an integral part of your development lifecycle, not just a final check. It's most effective when used iteratively; after you add a new block of logic, a complex condition, or a new integration, you should immediately run it through the simulator to verify that specific piece works as expected. This iterative testing makes troubleshooting far more efficient than trying to debug a dozen new steps at once. It should always be used for a final, end-to-end validation run before you activate the playbook for production use.
For your malware detection playbook, the process is straightforward. You would open the playbook in the editor, enable the simulator, and then select a past "malware detected" case (ideally one involving a test machine). The simulator will then visually step through your entire workflow using the data from that chosen case. You can watch as it extracts the file hash, observe the live API call being made to VirusTotal for enrichment, and confirm the results are returned and parsed correctly.
This provides clear, tangible evidence of your playbook's functionality. You can verify that your condition correctly identifies a "malicious" result and follows the branch to the next step, while a "clean" result correctly follows a different path. You can inspect the details of a simulated email notification to ensure the user's name and hostname were populated correctly by your placeholders. By the time you're done with the simulator, you can be confident that your playbook is not just built, but thoroughly tested and ready for deployment.
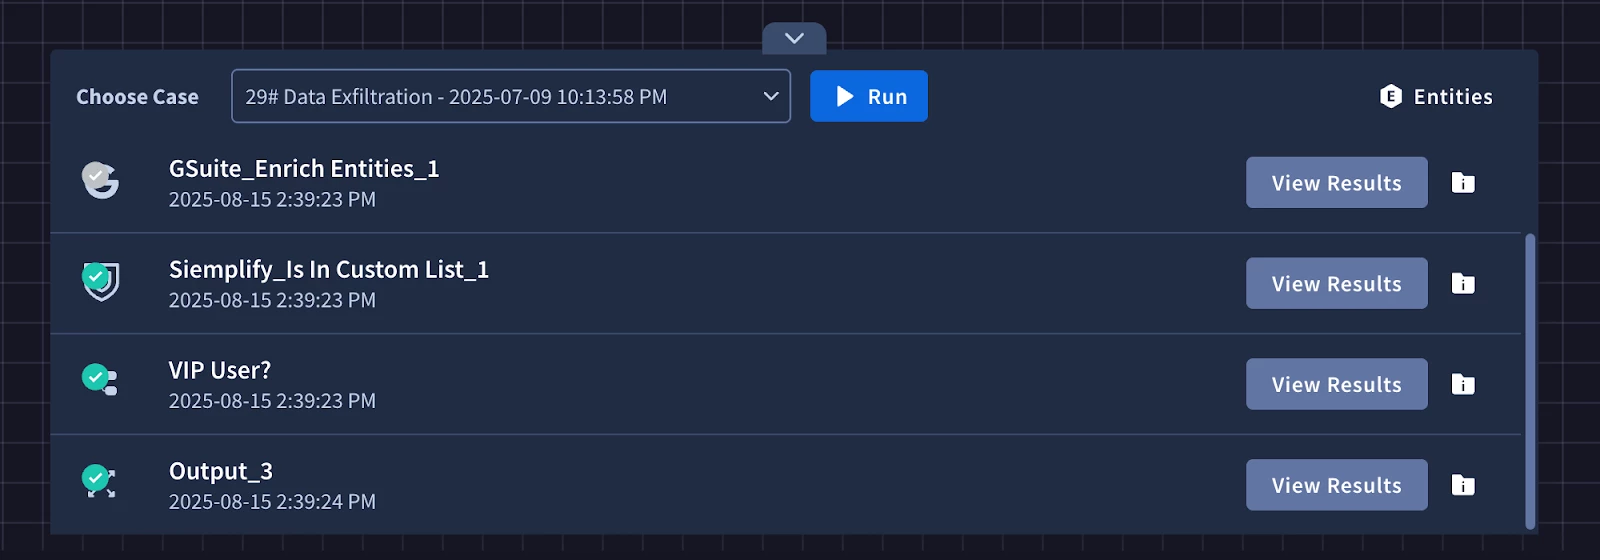
To use the simulator we can enable the Simulator toggle and select a test case to run it on. After running the simulator you can see the results of your actions and troubleshoot errors if any are found.
Creating IOC Enrichment Block
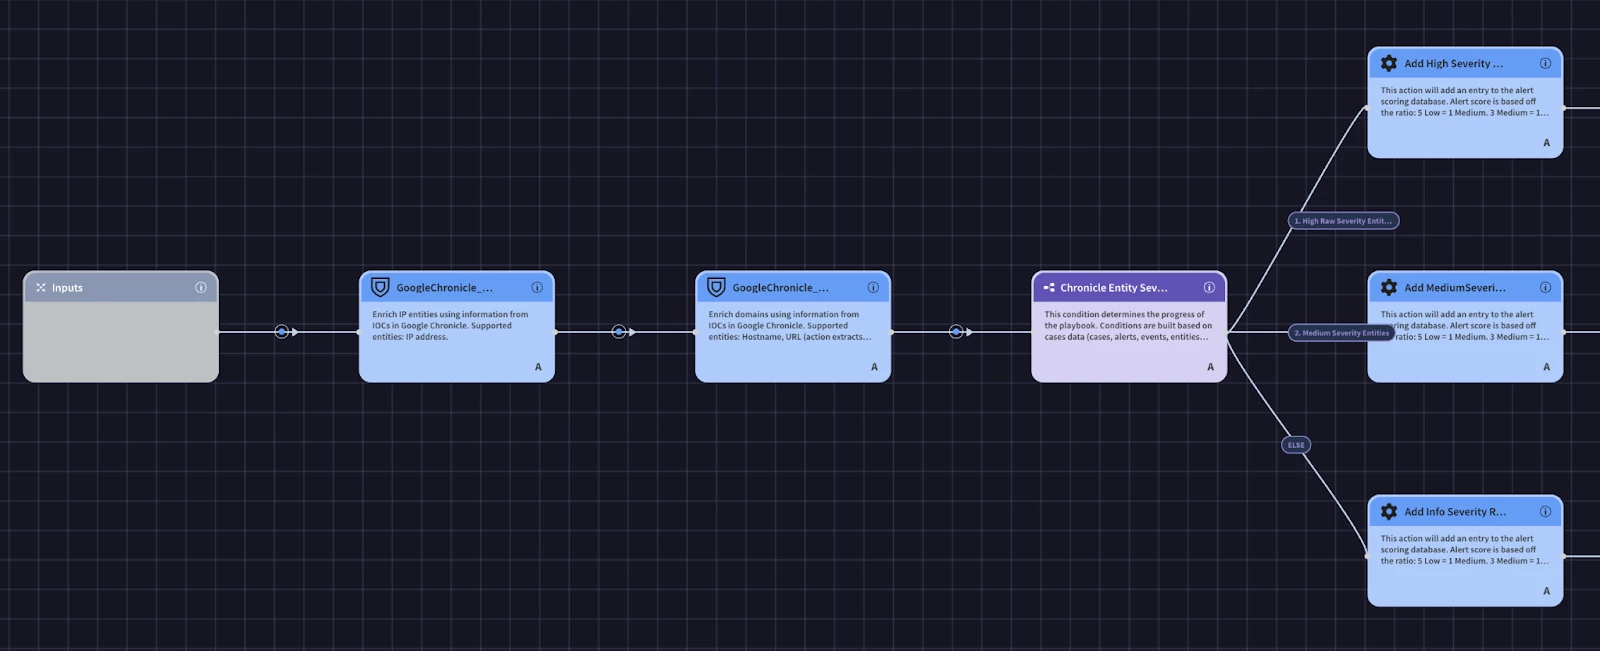
Next, we are going to create our IOC Enrichment block. This block will facilitate our enrichment process with the Google Chronicle and VirusTotal V3 integrations. The first part of the block is going to perform the Chronicle Enrichment actions. We will then add alert scoring information that aligns with the severity of the entity from the action. To do this we will use a condition. The primary benefit of using conditions in your Google SecOps playbook is that it introduces logic and decision-making, allowing you to create dynamic, automated workflows that adapt to the specific details of an incident. Instead of following a rigid, linear path, your playbook can branch into different sets of actions based on real-time data. This ensures that the response is always proportionate and relevant to the threat, focusing your analysts' attention where it's needed most and automating the handling of routine scenarios. For example, you would use a condition to check the results of a VirusTotal scan. If the file is confirmed to be malicious, the playbook could automatically proceed to quarantine the endpoint and open a high-priority ticket. However, if the result is inconclusive, the playbook could branch to a different path, perhaps gathering more enrichment data or assigning the case to an analyst for manual review. You could also use conditions to check the affected user's role; an alert involving an executive might trigger a more urgent and escalated response path than one involving a standard user. This conditional logic is key to building sophisticated, automated playbooks that truly enhance your security operations.
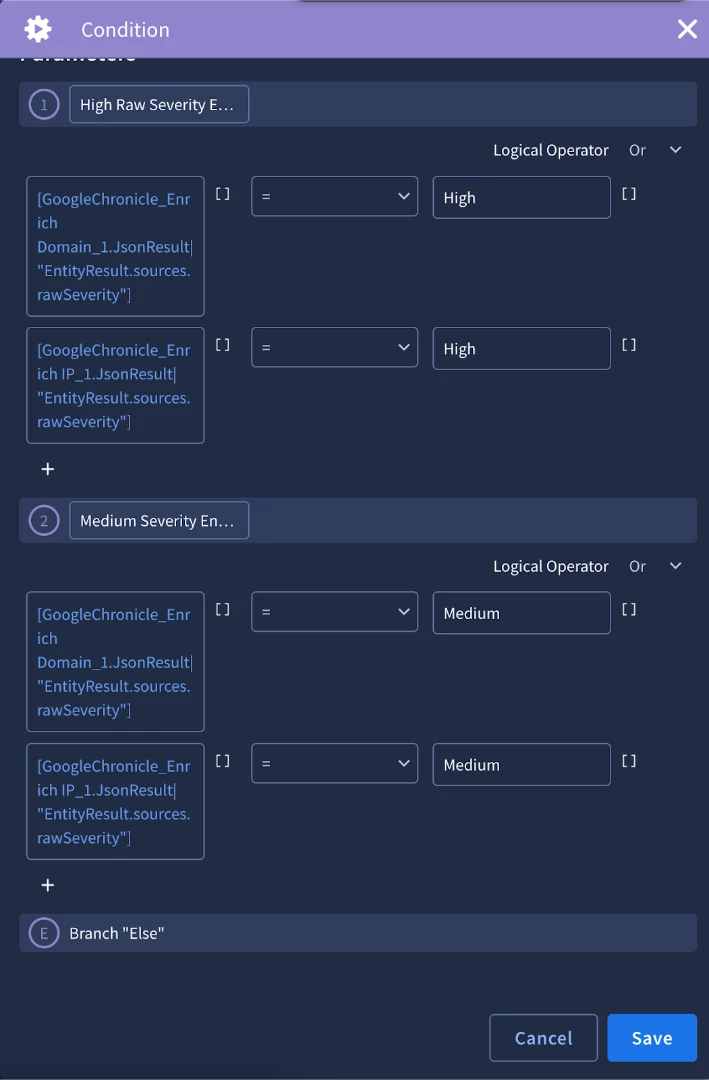
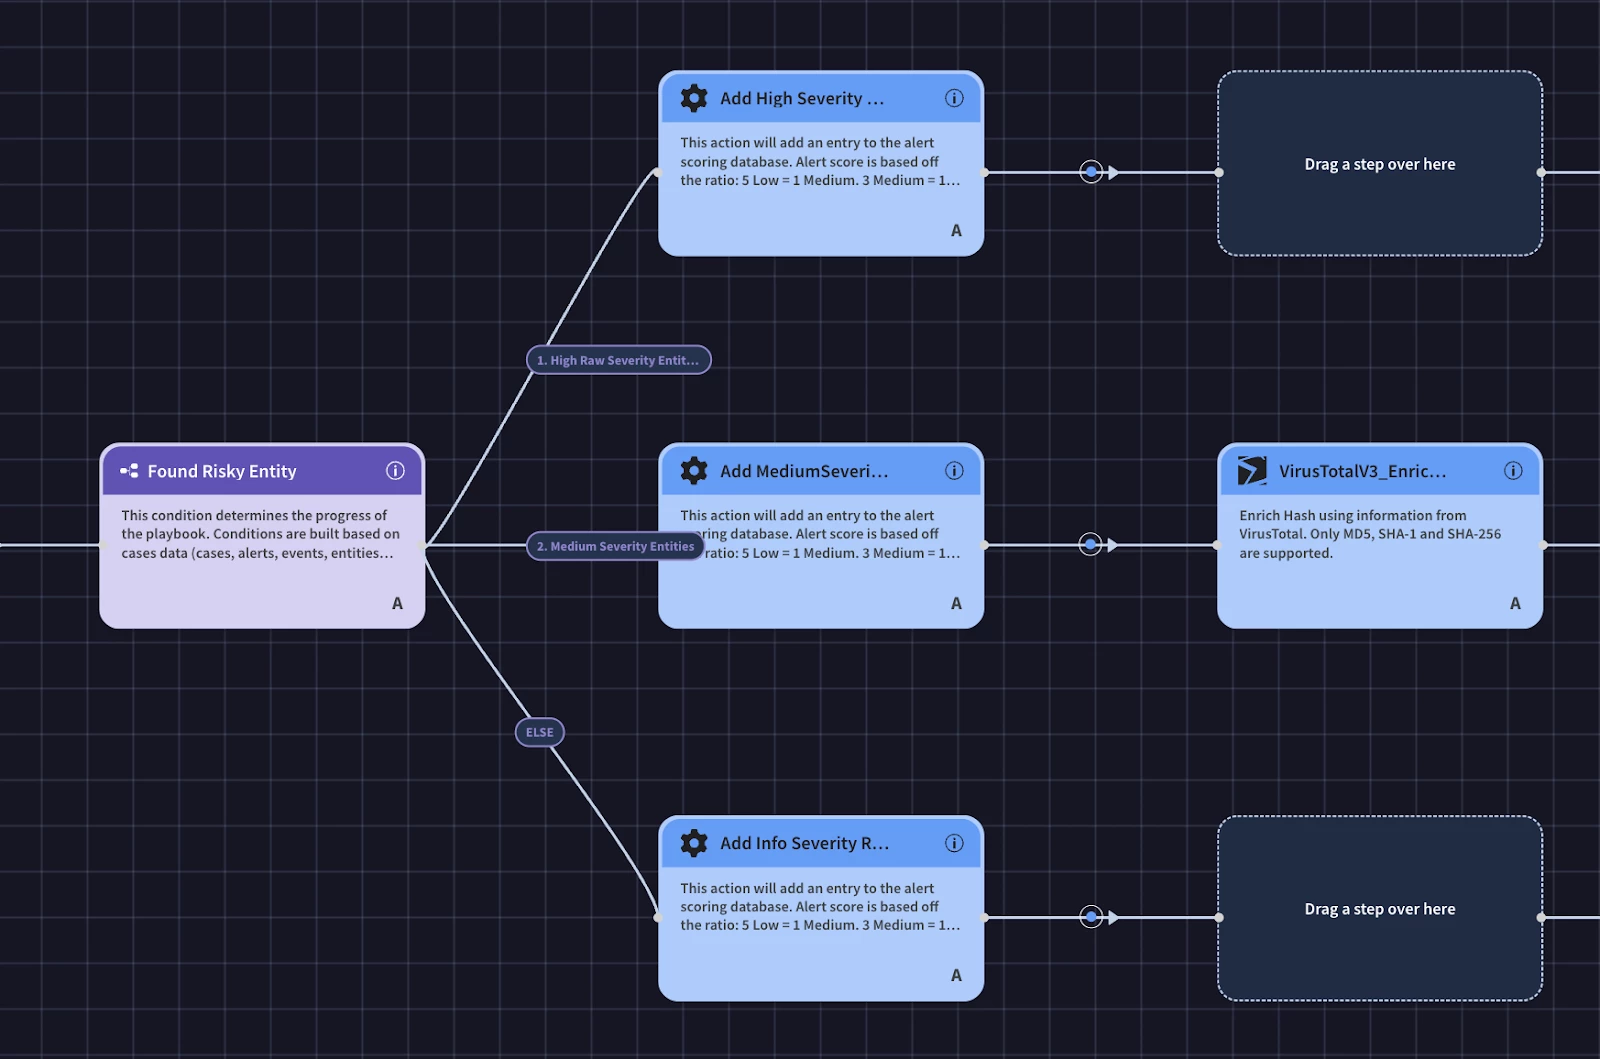
For our enrichment block, we’ll use the condition to check the results of both Chronicle enrichment actions and create a branch for high and medium severity entities and create an alert score. In order to do this, we’ll need to leverage the expression builder.
The primary benefit of the Expression Builder is that it gives your playbooks the power to perform complex data manipulation and transformation without writing any code. It acts as an interactive tool that allows you to parse, modify, and reformat the data returned by previous actions. When an action runs—like enriching a hash or getting details from an endpoint—it often returns a rich, and sometimes complex, JSON object. The Expression Builder is what allows you to surgically extract the exact piece of information you need from that JSON and prepare it for use in a subsequent action or condition.
This capability is what makes your playbooks truly flexible. With a library of built-in functions, you can handle a massive variety of data formats on the fly. You can use functions like split to break a single string of comma-separated IP addresses into individual entities for a loop, replace to clean up a messy file path, or getByIndex to grab the first or last element from a list. This means your playbook can adapt to inconsistent outputs from different tools and still feed the correct, clean data into the next step of your workflow.
For your malware playbook, the use cases are nearly endless. Imagine a threat intelligence feed returns a block of text containing multiple indicators. You could use the Expression Builder to parse that text, filter for only the CVEs, and then join them into a single string to add to a ticket description. You could also use it to take a standard timestamp from an alert and, using the DateFormat function, convert it into the specific format required by your ticketing system's API, ensuring successful integration between the two tools.
The user interface for the Expression Builder is designed for rapid, iterative development. As you construct an expression by chaining functions together with a pipe (|) character, the tool provides a live preview of the output based on sample data. This immediate feedback loop is invaluable for debugging; you can see exactly how your expression is transforming the data in real-time. This eliminates the guesswork and allows you to build and validate complex data transformations with confidence before the playbook ever runs against a live alert.
Ultimately, the Expression Builder bridges the critical gap between the raw, structured data that APIs and tools provide, and the specific, formatted data that your playbook's logic requires. It unlocks a much deeper level of automation, allowing you to build highly sophisticated workflows that can adapt to a wide array of data inputs. This reduces the need to write and maintain custom Python scripts for common data manipulation tasks, making your playbooks both more powerful and easier to manage.
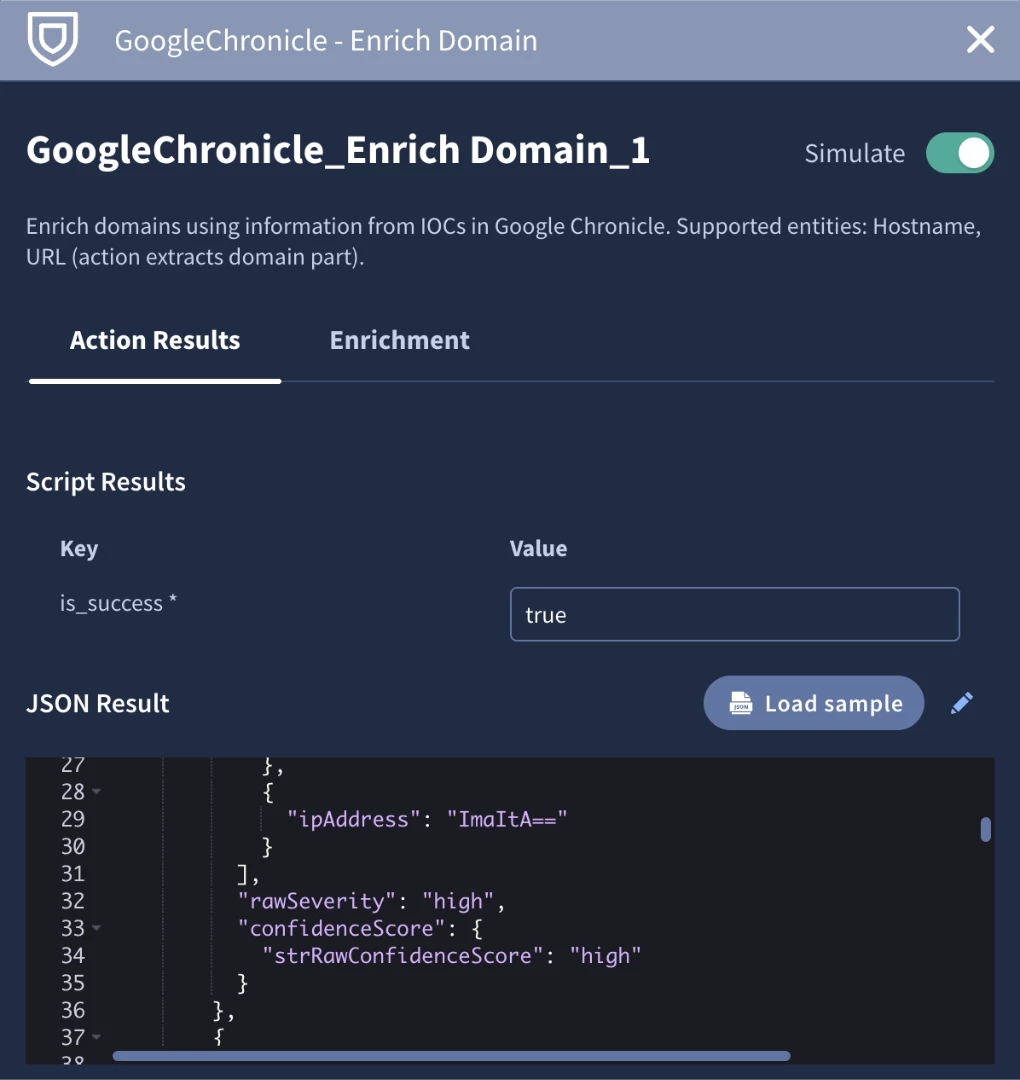
In our use case, we’ll use the expression builder to get the rawSeverity key from each enrichment result.
After we make some progress in a playbook, it’s important to stop and test it. We’ll use the simulator again to test the logic of our condition. A great feature of the simulator is that is allows your to pin data so that you don’t have to continuously call the same action as you test. We’ll pin the results of the Chronicle action after the first run.
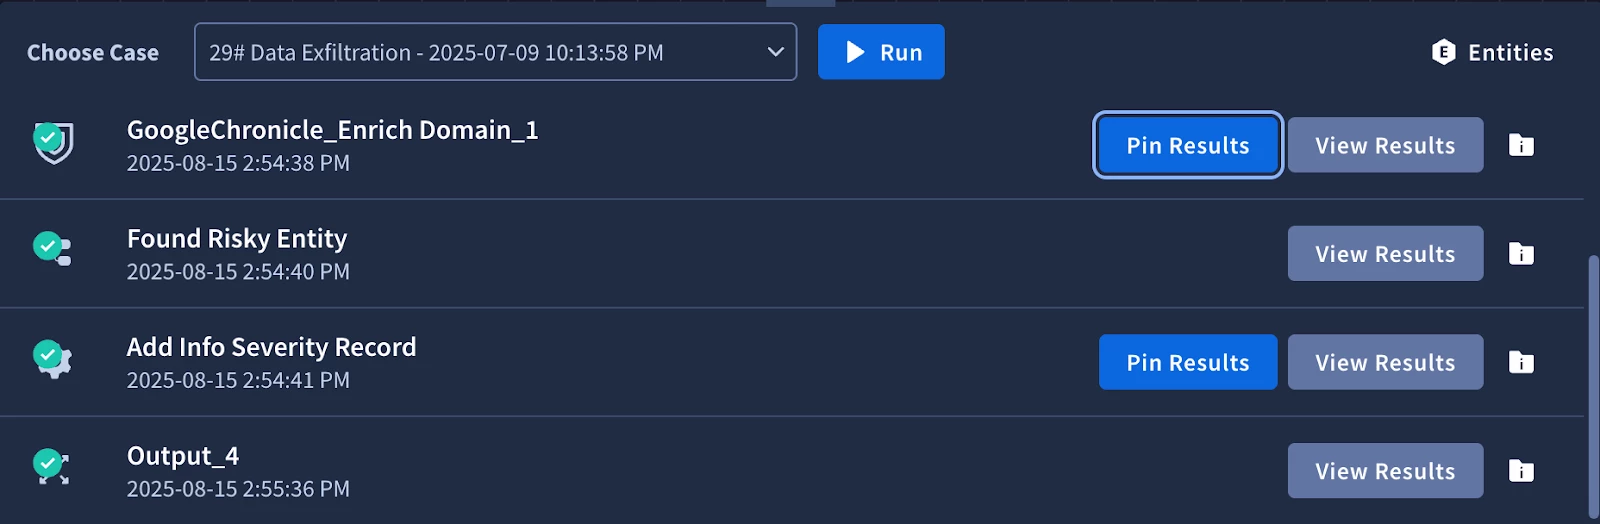
We see that the condition went down the else branch to the ‘Add Info Severity Record’. Let’s use the simulator to test out the other branches. It might be difficult to find an alert that would have the right data to match a condition to another branch, so let’s use the simulated data from our pinned Chronicle actions. We can click on the action, then the pencil icon to edit the JSON result. We’ll edit the rawSeverity field that matches our placeholder in the condition to ‘high’ so we can test the first logic branch.
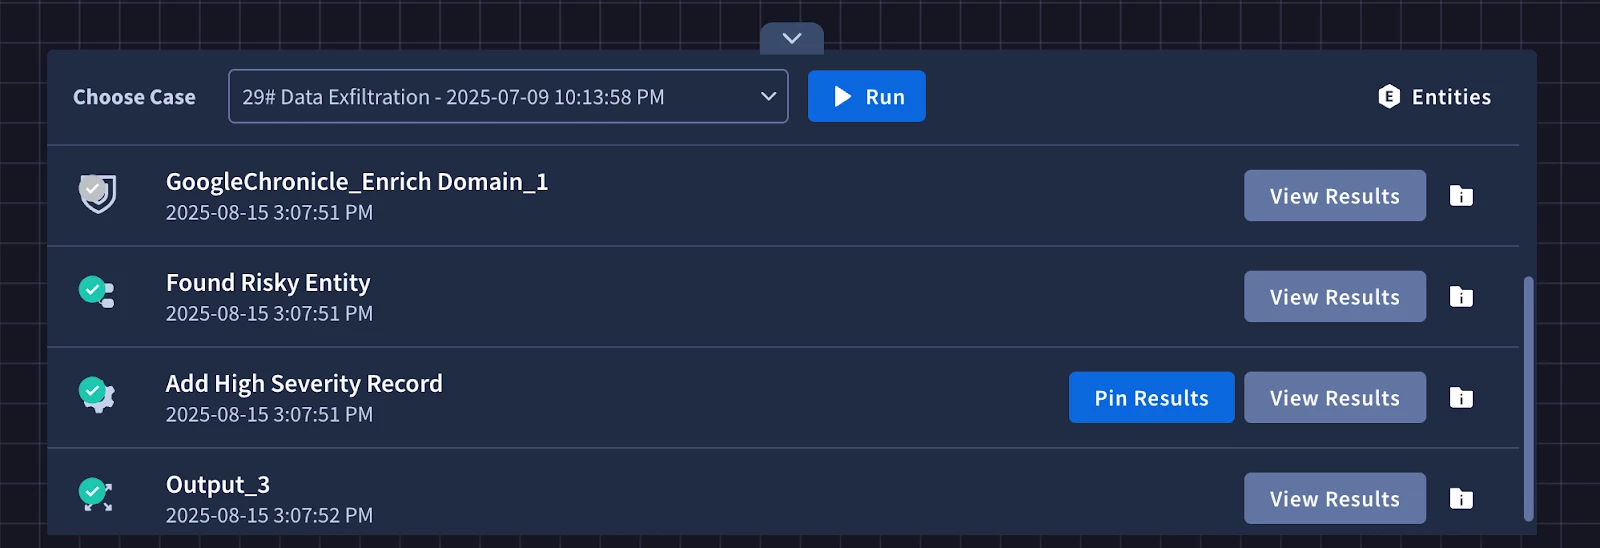
After running it again you will see that the simulator skipped running the Chronicle actions and simply passed through the modified simulated data allow us to successfully test the first branch in the condition. We’ll do the same thing for the second branch.
Next we will need to perform the VirusTotal enrichment actions. We will need to merge the logic paths from our condition to call the same enrichment actions to have our playbook continue down one path. We can do this by adding the next VirusTotal action to any of the branches.
Then drag the same VirusTotal action that was just added to one of the other ‘Drag a step over here’ nodes.
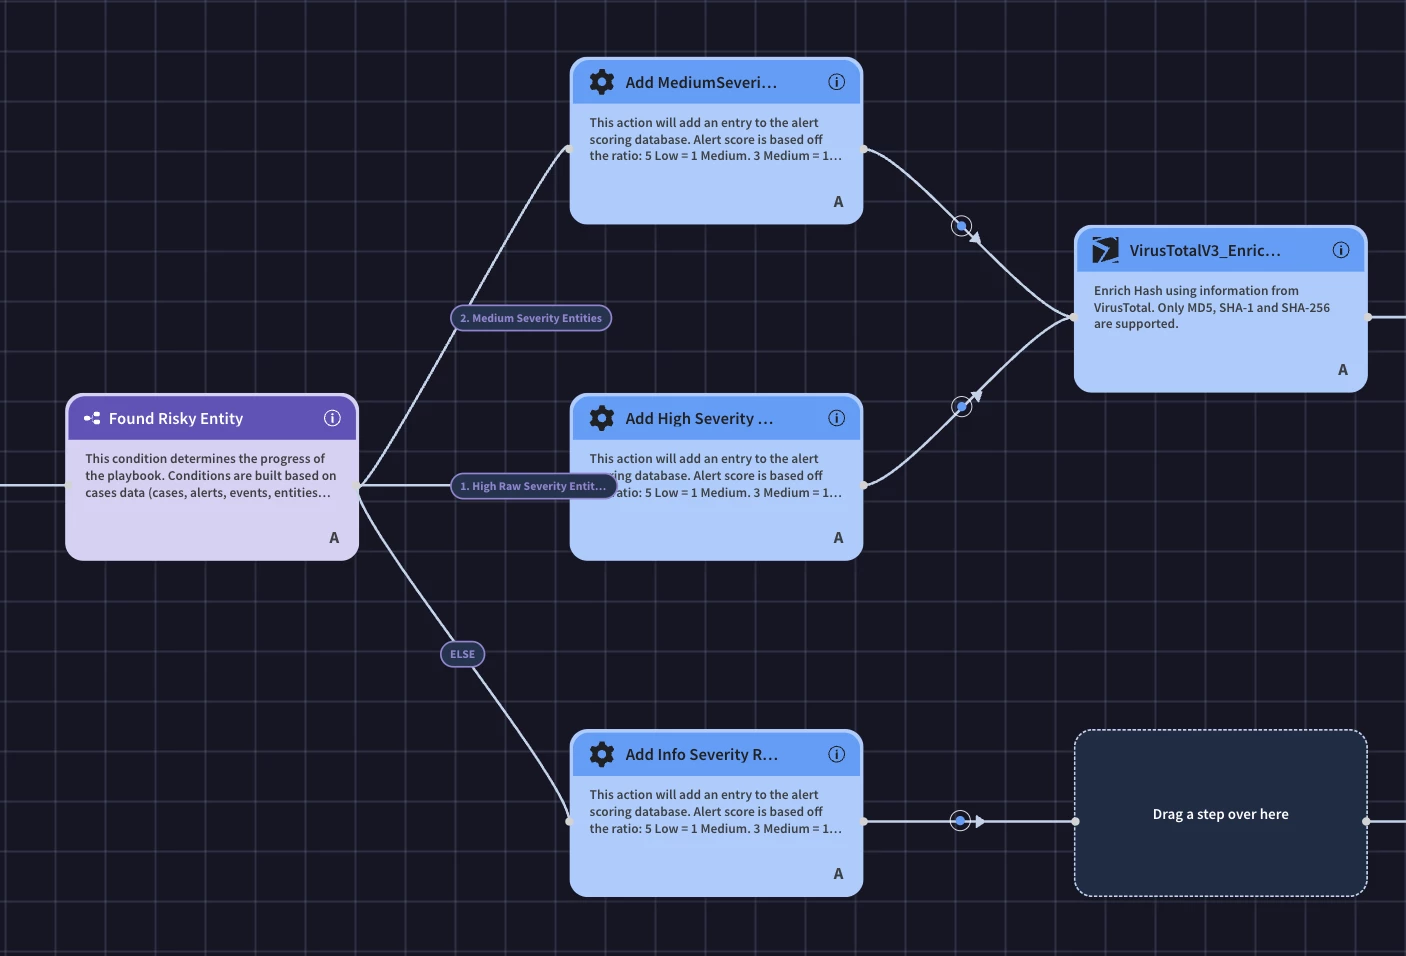
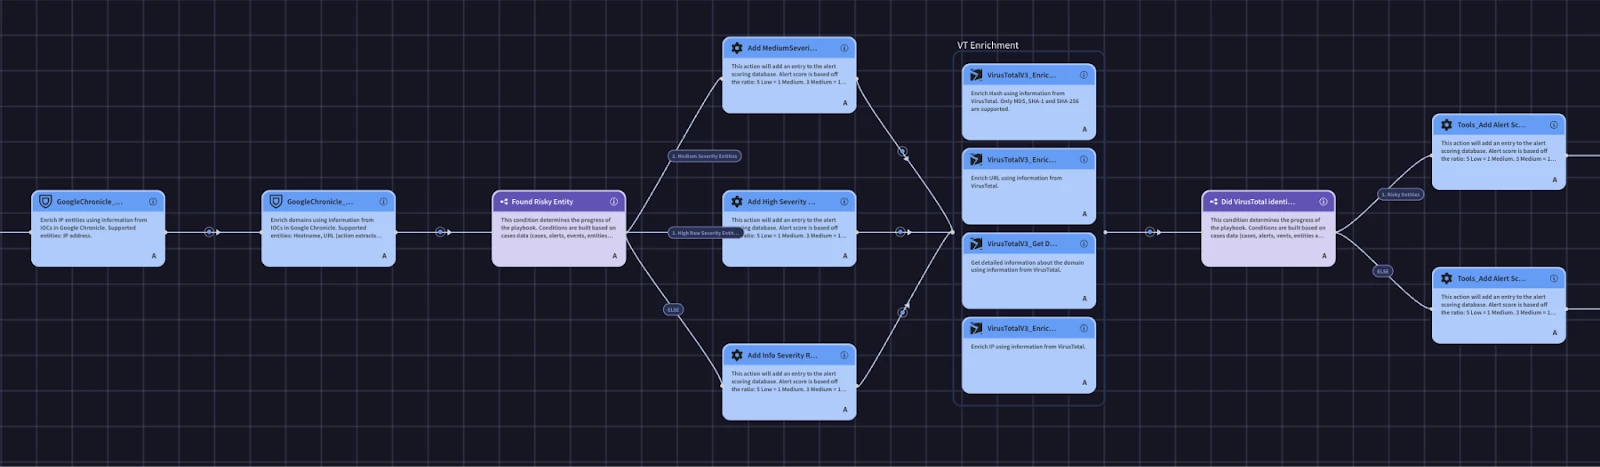
Finally, do the same for the final ‘Drag a step over here’ node and continue adding the enrichment actions.
We could simply just add all of the remaining enrichment actions one after the other, however, we can optimize this by using parallel actions. The primary benefit of using parallel actions in your Google SecOps playbooks is a significant reduction in response time. In a security incident, especially with malware, time is of the essence. Instead of waiting for each data enrichment and initial investigation step to complete sequentially, you can run up to five actions simultaneously. This concurrent execution means your team gets a comprehensive picture of the incident much faster. It’s important to note that in order to run actions in parallel the actions inside the group must not depend on the output of an action inside the same group.
Creating Containment Block
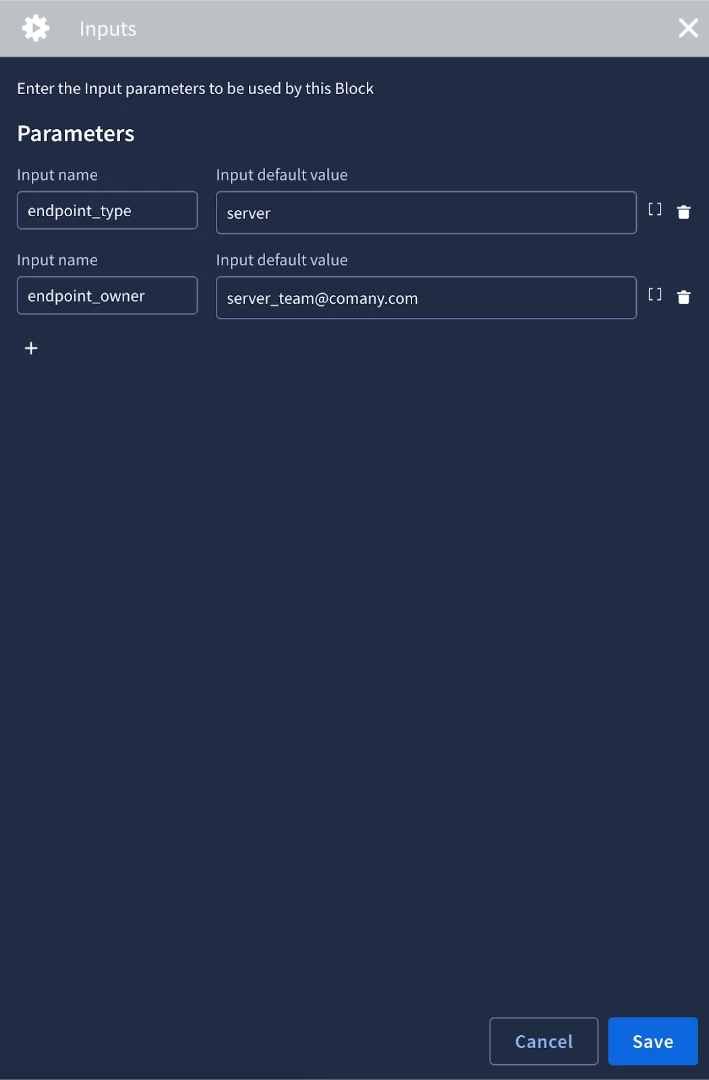
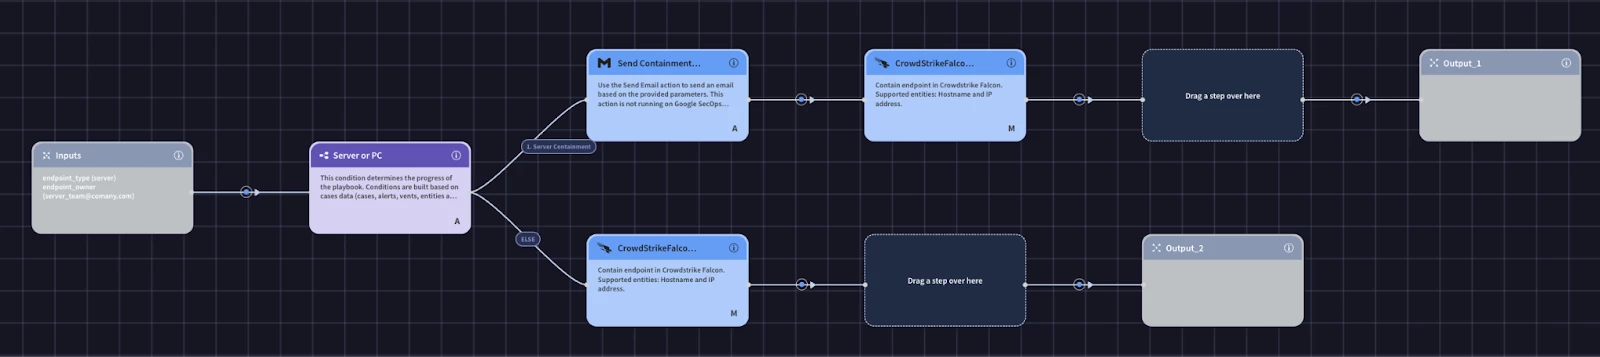
The last block we will build is the containment block. Our SOC process allows us to contain endpoints only if they are not servers. If it is a server, we need to contact the team responsible for the server to approve the containment. The first piece of information we need is whether or not the endpoint is a server or a pc. We could call an action to get the endpoint data, but we will have already enriched our assets before we would consider containing them. We can use the block’s Inputs to take in information from the playbook to be used in the block’s logic. For our use case we will need to get the endpoint type and the owner. We’ll create our input parameter names and supply a default value. The value can be configured in the playbook that calls the block.
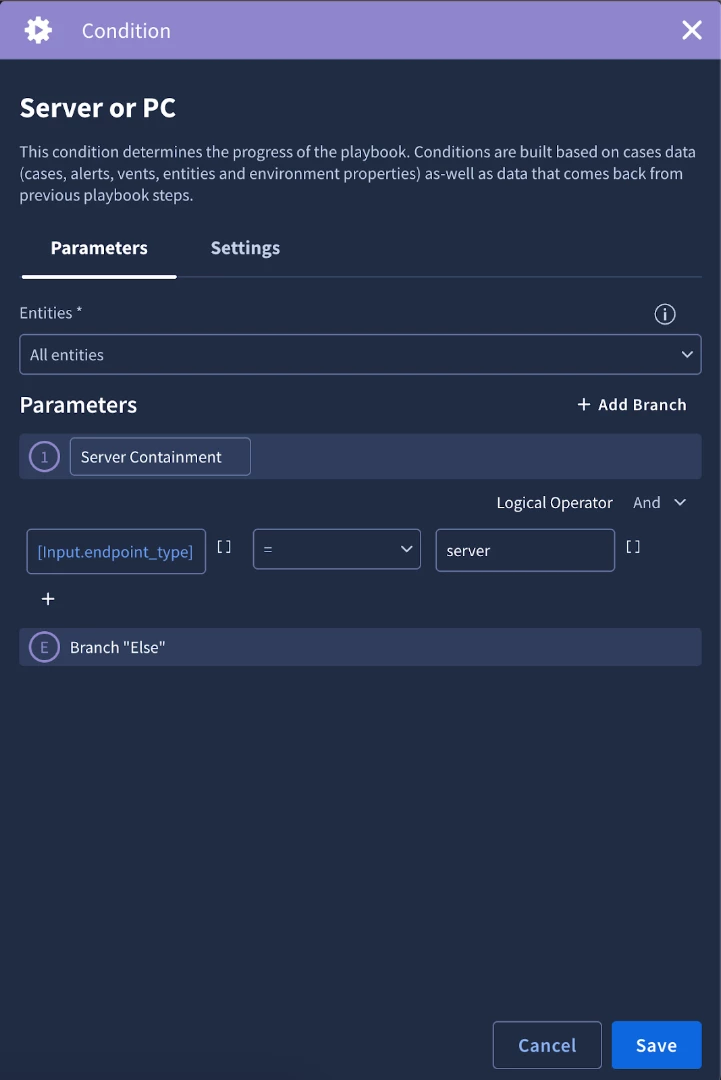
We will then add a condition to to check the endpoint_type input by using a placeholder
Let’s handle the server branch first. We need to contact the team responsible for the server and have them approve containing the server. We can leverage approval links. The primary benefit of using approval links is that they create a "human-in-the-loop" checkpoint, allowing you to safely integrate powerful or irreversible actions into your automated playbooks. Full automation is efficient, but certain actions—like isolating a critical server or deleting user data—carry significant operational risk. By embedding an approval link in the playbook, you can pause the workflow at a critical juncture and require explicit authorization from a human analyst or manager before proceeding. This gives you the best of both worlds: the speed of automation for investigation and the careful judgment of a human for high-impact decisions.
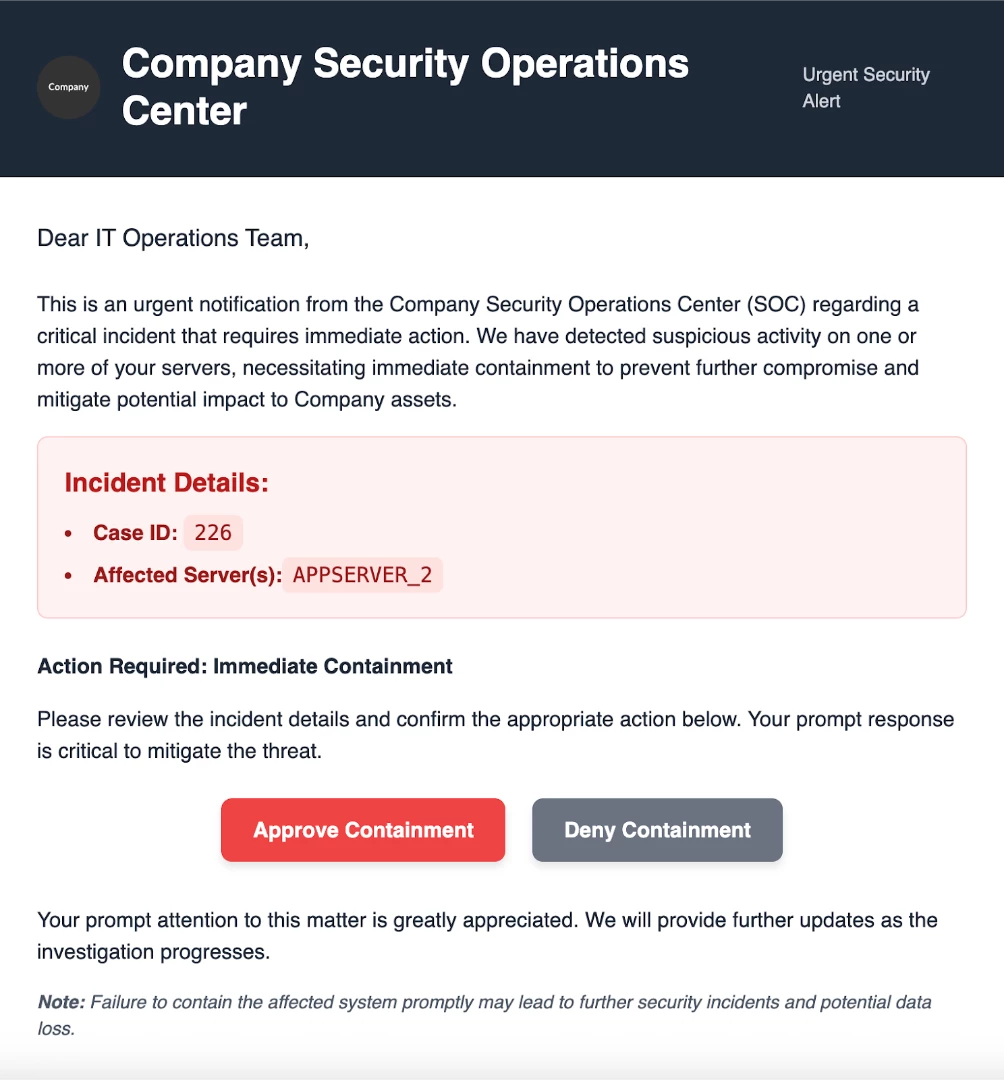
In a malware detection playbook, approval links are essential for managing containment and remediation actions. For example, your playbook might automatically enrich data, but before it isolates an endpoint that could be a crucial server, it would pause. Using an action like "Send Email," the playbook would send a message to a senior analyst or a distribution list containing two simple links: "Approve Quarantine" and "Deny Quarantine." Only after a trusted user clicks the "Approve" link will the playbook proceed with the isolation step. This prevents automated actions from causing unintentional downtime while still keeping the response process moving swiftly.
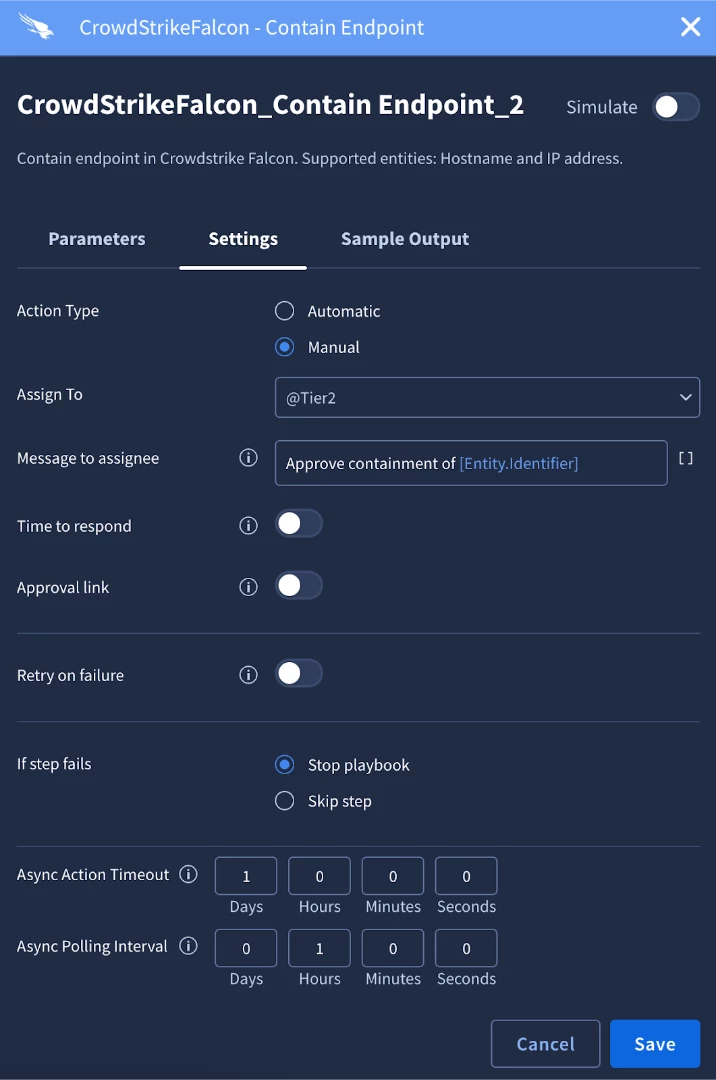
To implement the approval link, we will need two actions. The first action will be the one where the approver will receive the links. In our case, we will use the Send Email action from the Gmail integration. In other use cases this could be an instant message, ticket, etc. The second action will be the one the approver is approving. We will add the Contain Endpoint action and configure it to be manual in the settings tab. After setting it to manual, the approval link option is available to be turned on.
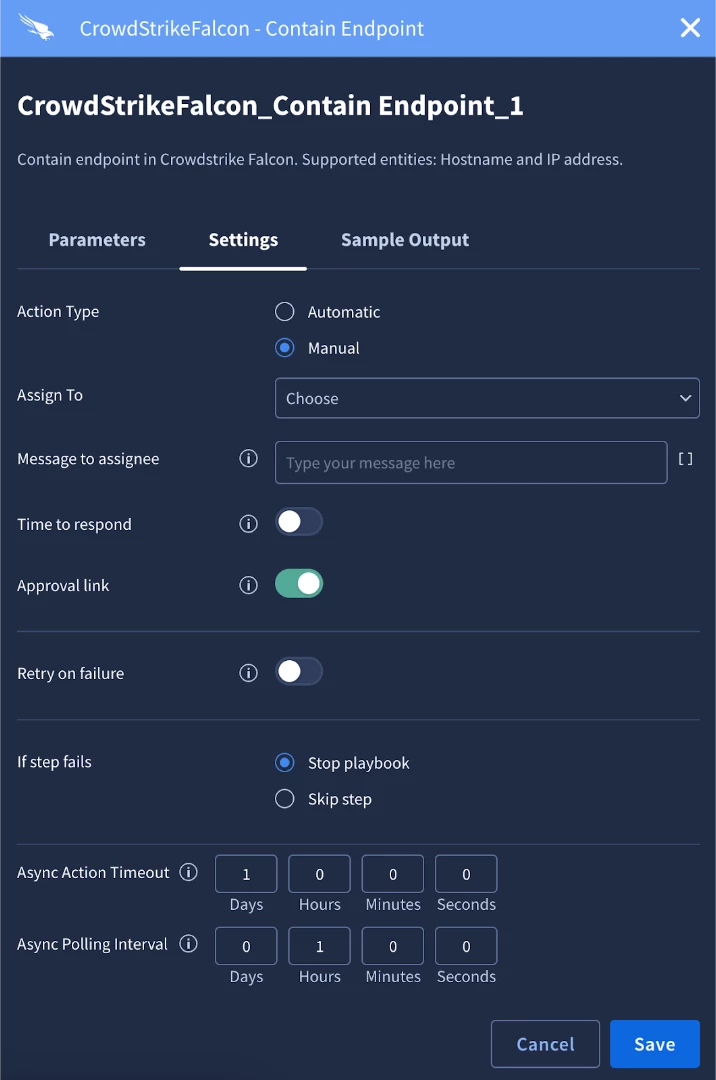
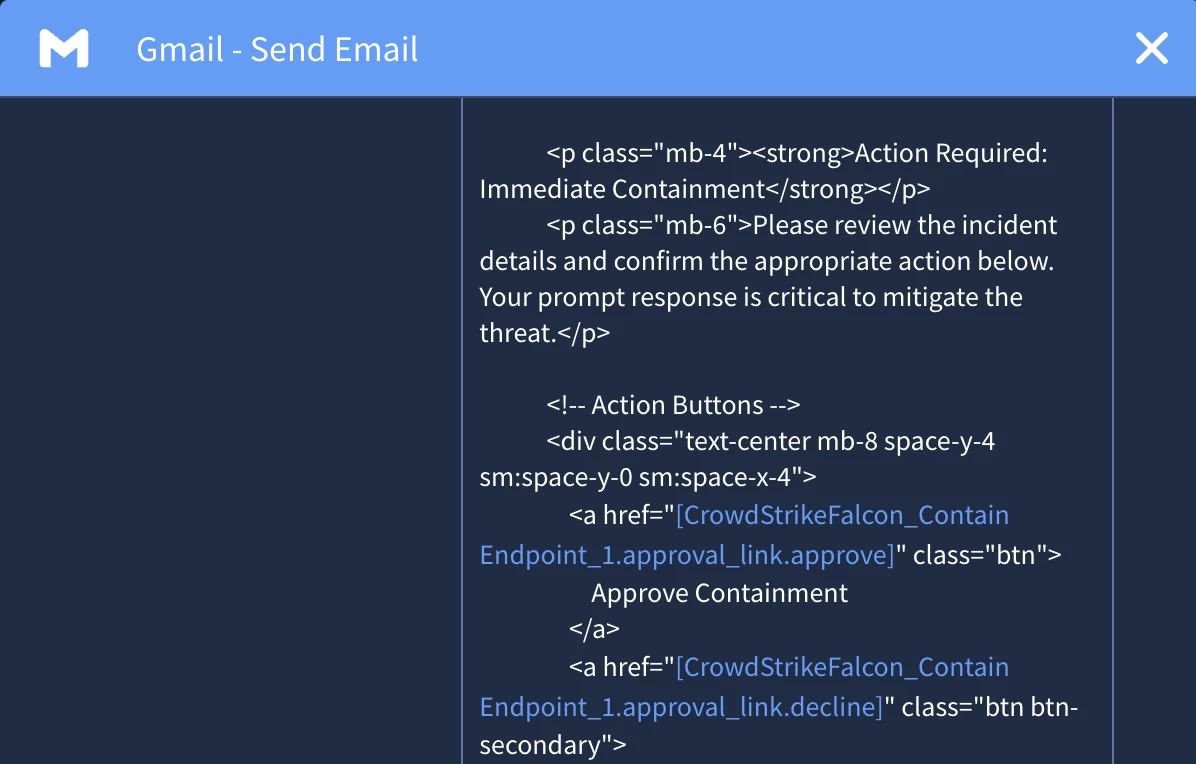
After we turn on the approval link we can save the action. Next, we will configure the email that we’re going to send. In the mail content parameter we can insert the new placeholder where applicable. In our example, we have an email with an approve or deny button so we will add the placeholder there.
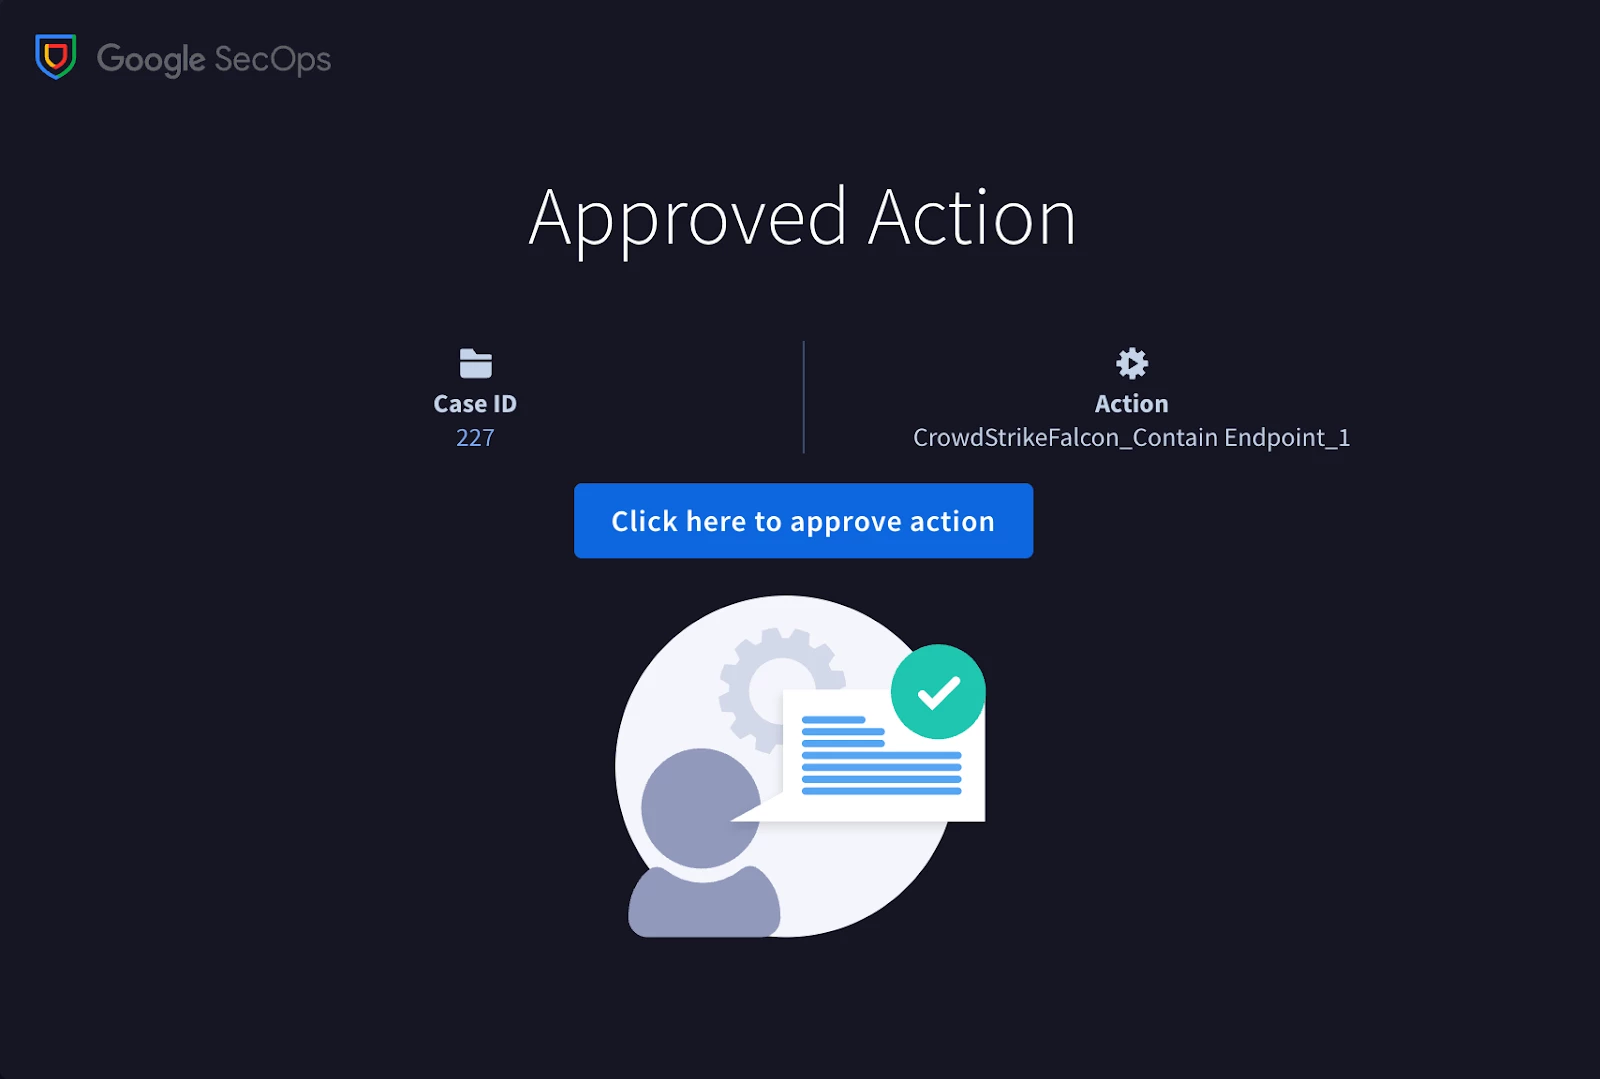
Clicking Approve Containment button will take them to a Google SecOps page where they will approve the containment. Once approved, the action will execute.
The subsequent step within this block involves the containment of a PC endpoint. An additional "Contain Endpoint" action will be incorporated. Given that any endpoint containment has the potential for disruption, it would be prudent to initially configure this as a manual action until sufficient confidence in the playbook's logic is established, prior to fully automating this component.
The fundamental advantage of a manual action lies in its deliberate integration of human expertise and decision-making into an otherwise automated workflow. While automation excels at rapid data collection and enrichment, certain scenarios necessitate a level of judgment, business context, or intuition that automated systems may lack. Manual actions establish a clear pause point within the playbook, where automation ceases, presenting all gathered information to a security analyst, and awaiting their strategic choice. This ensures that the laborious aspects of an investigation can be automated, without relinquishing expert oversight for critical decisions.
When we configure this action we’ll want to assign it and add a small message to the assignee that will be viewable in the pending actions widget.
Another critical part to talk about is entity scoping. The key benefit of entity scoping is its ability to provide surgical precision for a specific set of actions within your playbook. A case may contain numerous entities, but not all actions are relevant to every entity. Scoping allows you to command a specific action, or a group of subsequent actions, to execute only in the context of one chosen entity. This completely removes ambiguity, ensuring that critical or resource-intensive actions use the correct input. This makes your automation safer and more predictable by guaranteeing that an action like "Isolate Endpoint" is aimed squarely at a hostname, not at the user entity that happens to be in the same case.
In a malware playbook, this precision is vital. Imagine your case has a hostname and a file_hash. You might want to get reputation details for the hash and, separately, get OS details from the endpoint. To do this cleanly, you would first use a scoping action to focus on the file_hash entity right before your "Enrich Hash" action. Then, later in the playbook, you would add another scoping action to focus on the hostname entity just before the "Get Endpoint Details" action. By scoping the actions individually, you ensure each one gets the exact entity it needs to function correctly, preventing errors and creating a more logical, reliable workflow.
In our example, we will set the ‘Entities’ parameter to ‘Internal Hostnames’ to target the endpoints on this alert. It’s worth noting that the entity scoping also applies to the entity placeholder. If you recall when we configured the message to assignee we used the Entity.Identifier placeholder. When the message renders in the widget, we will just see the identifier of the hostname.

The final block will look like this.
Building the playbook
We have finished all of the blocks, now it’s time to create the playbook.
We have finished developing the individual blocks, which are the foundational sub-processes. Now, it's time to integrate these blocks into a comprehensive playbook. This playbook will act as the workflow that gets attached to an alert, bringing all the pieces together to effectively address a specific use case. Within this playbook, we will systematically implement our Security Operations Center (SOC) processes, capture important case metrics, and ultimately create a holistic and actionable view of each alert.
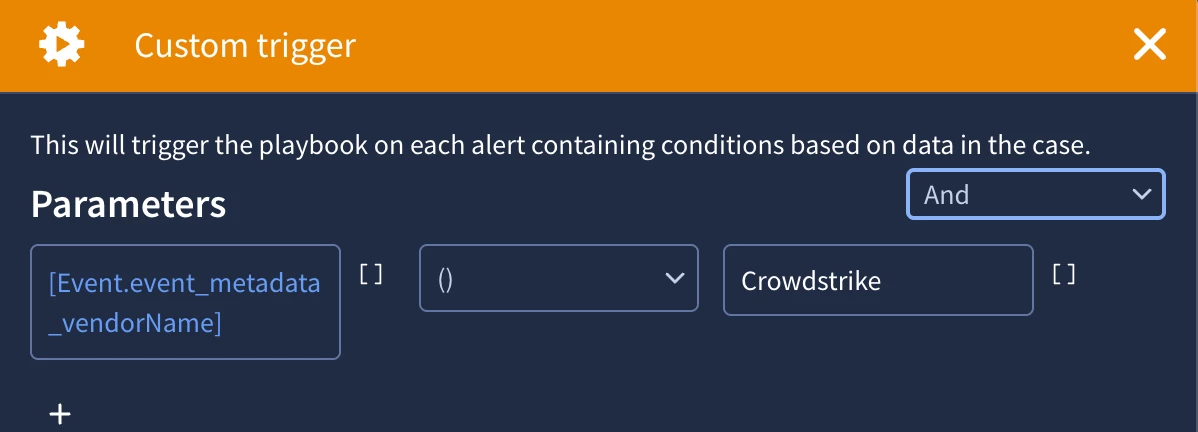
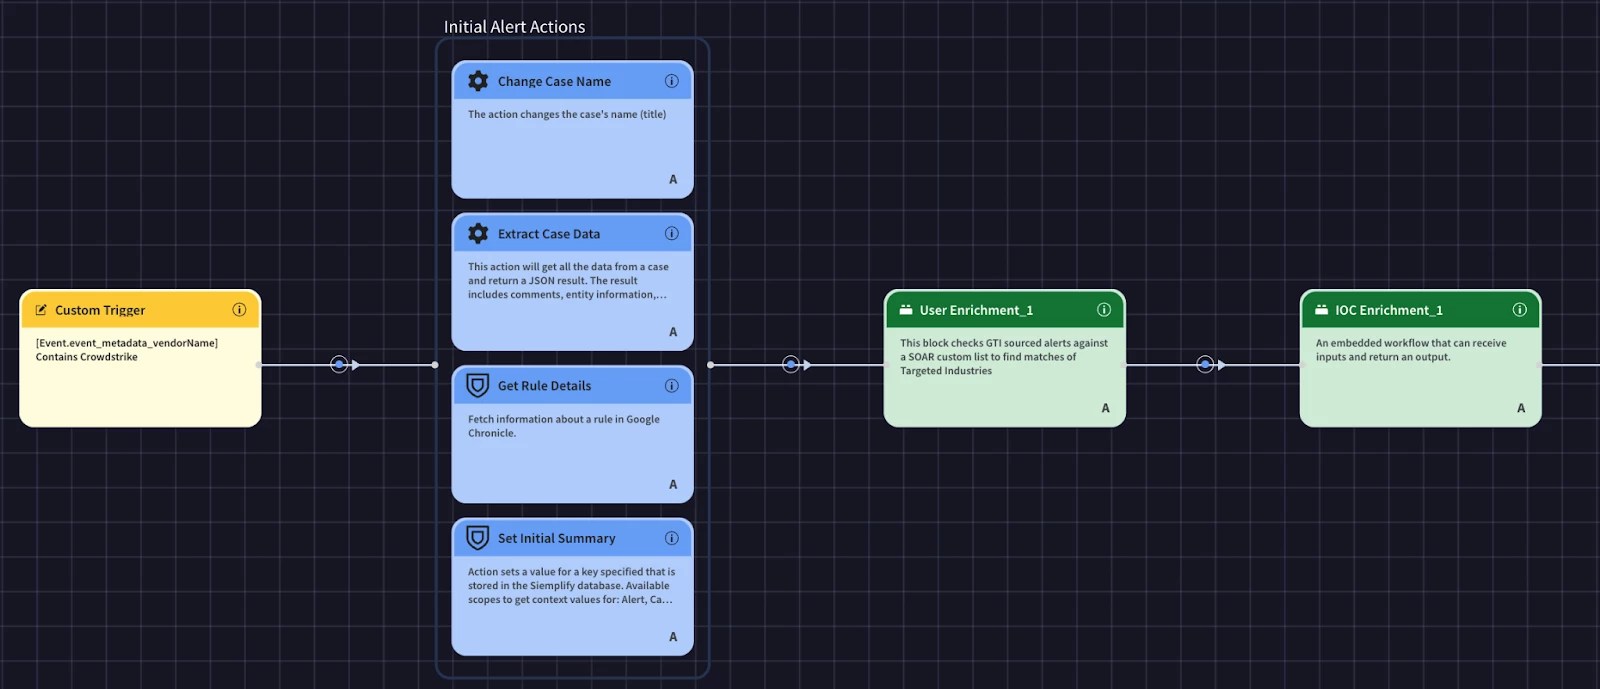
One thing to call out before we build our playbook is that our use case states that we need to set the stage to triage and assign it to tier1. We don’t need to add these steps in our playbook as they are the system defaults in our SecOps instance. Back to building the playbook. The first thing we will need to do is define a trigger. This is what is going to determine if the playbook can run on a given alert. We can use many different placeholders to create a trigger. We’ll keep ours simple and use some event metadata from one of the alerts that we are going to apply the playbook to.
After the trigger, we’re going to run a few actions to get and set some initial information.
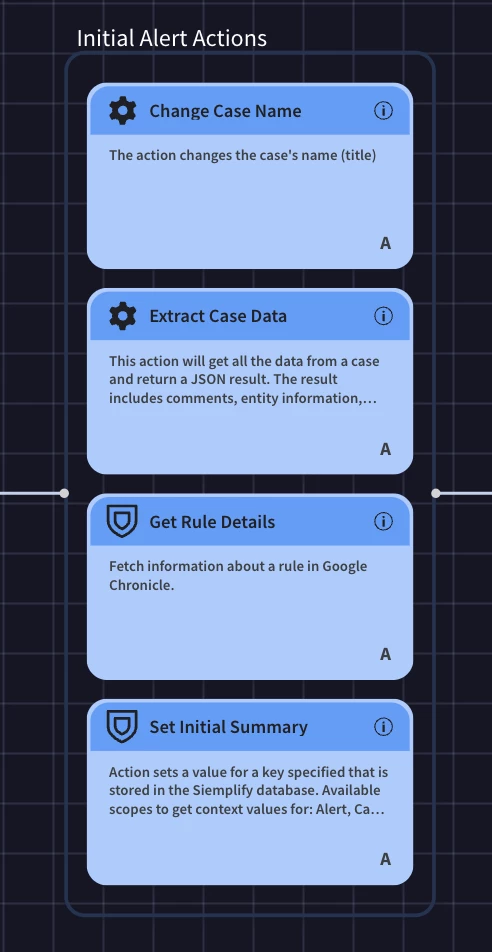
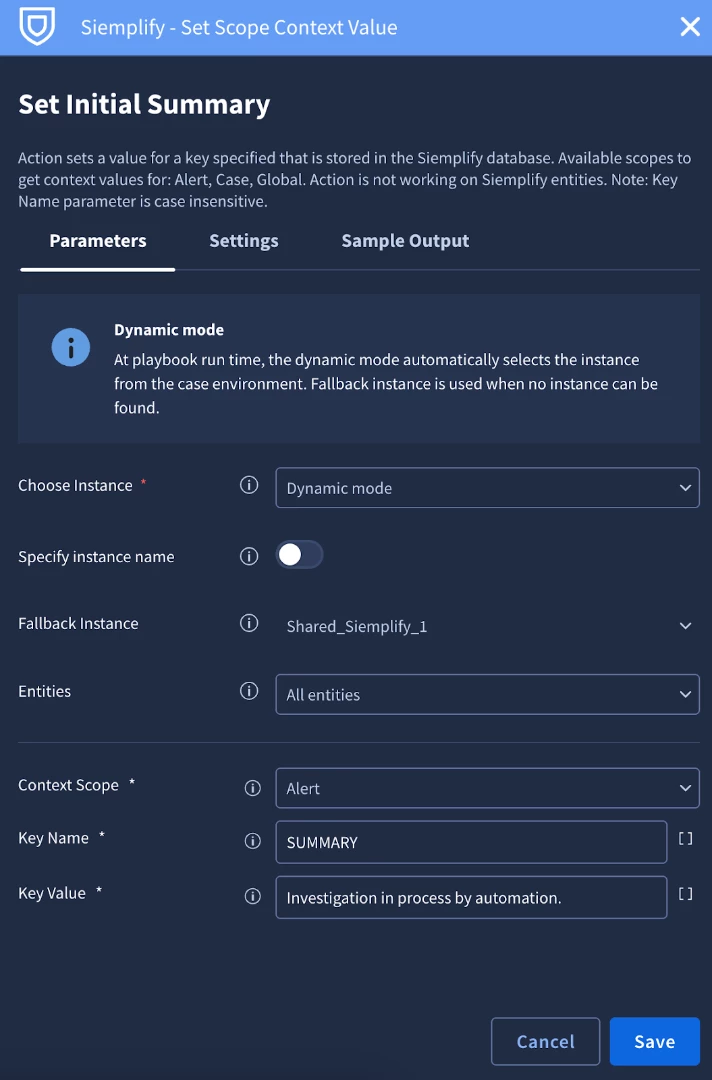
We’re getting information about the rule details and case data in order to present some information to the analyst in the alert view. We’re also setting some information such as a new case name and setting an initial summary. The action behind the initial summary is the Set Scope Context Value.
Think of context values as your playbook's memory for a specific security investigation. Instead of just reacting to each alert individually, context values let your automation remember what it has already done, so it can make smarter decisions. The cool thing is that you can save these values at different "scopes," which determines how widely that memory is shared. An alert-level scope is a memory specific to a single alert. This is useful when you need to remember something that only matters to that one alert, like the disposition of the alert or who the email sender was. The most common and powerful scope is at the case-level. This is a shared memory for all the alerts and actions related to a single investigation, which is crucial for preventing redundant efforts. For example, it ensures that your playbook opens a new ticket in your ticket system only once per case, even if multiple alerts are associated with that same incident. The main benefit here is building smarter, more efficient automation. This helps you prevent redundant work, build more robust investigations, and ultimately, close cases faster.
In this case we’re going to configure a context value for alerts called ‘SUMMARY’. We’ll use this later in our playbook view to display the summary of alert.
Next, our use case has use run through our user and IOC enrichment processes. This is where we will start to realize the value of blocks. Since we already created the blocks, we can simply add them to the playbook.
Next, we’ll add an action to get information about the host from CrowdStrike and set the case to assessment.

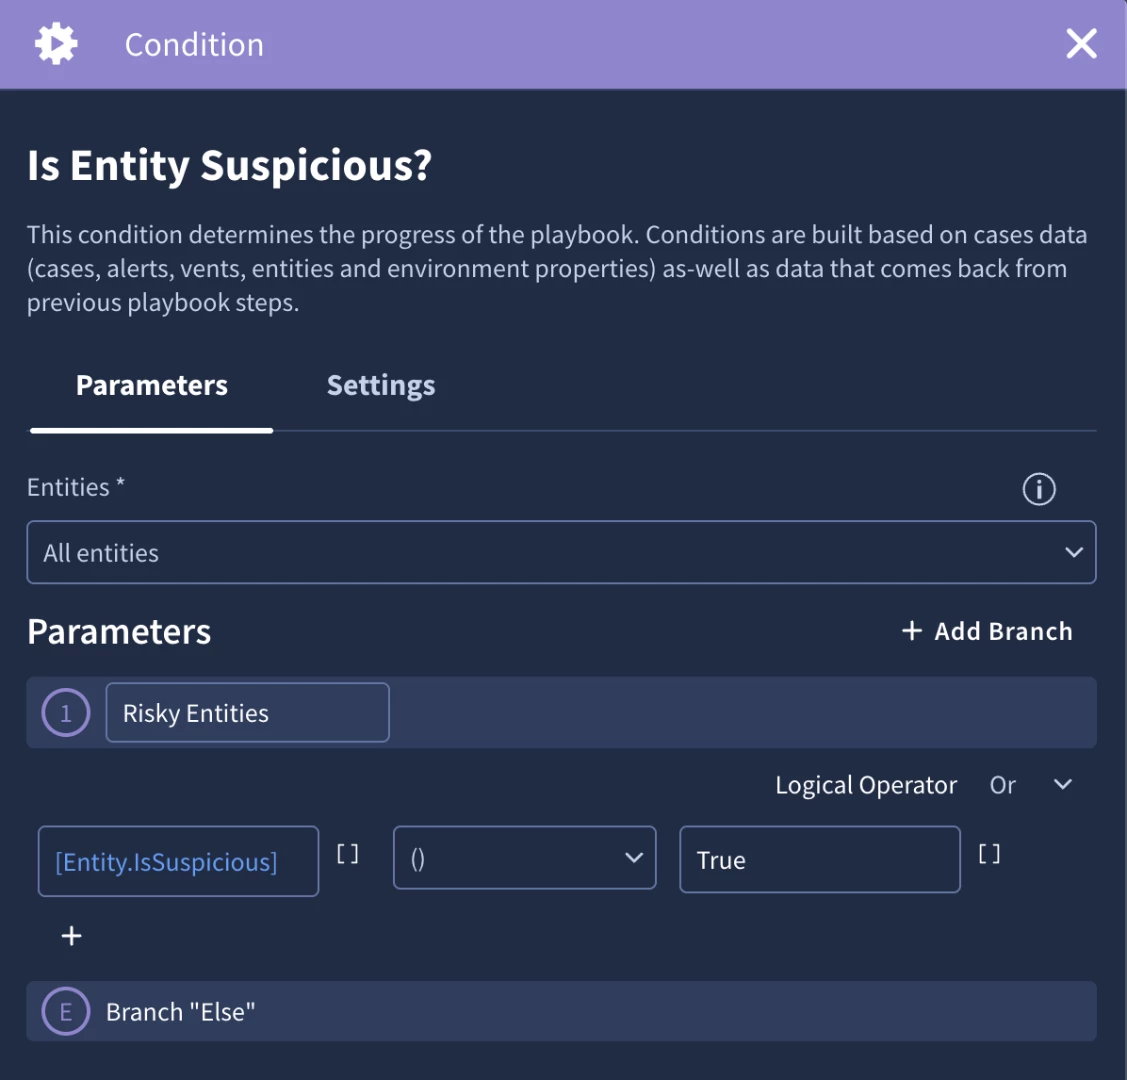
We’re at a point in our use case where we can leverage automated decision making to automatically close an alert or escalate it to an analyst. We’re going to add a condition to check if there are any suspicious entities. An entity’s isSuspicious attribute would be set to true from one of the actions in the IOC enrichment block which is defined in the action configuration. We’ll use that attribute in our condition.
You’ll notice that I use the ‘contains’ operator. This is because I’m using the Entity.isSuspicious placeholder. Since the condition has the entities scoped to All Entities, the placeholder will evaluate the IsSuspicious attribute for all entities on the case. This can of course be handled by scoping entities, or setting a context value in the IOC enrichment block, but it is important to highlight how entity scoping can impact conditions.
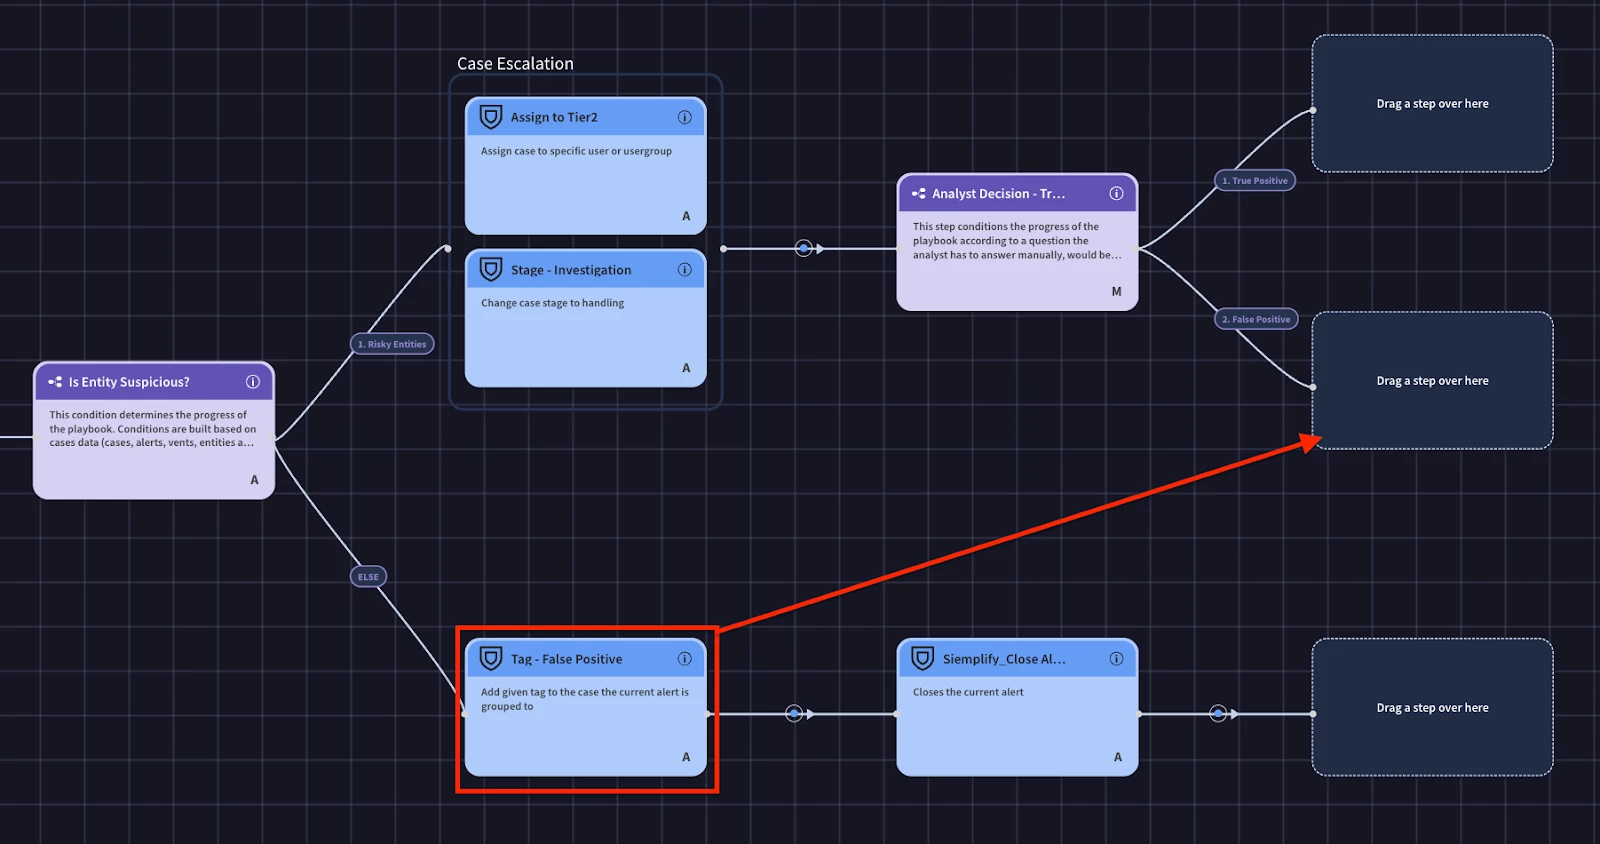
Let’s handle the else branch first. If we don’t find any suspicious entities, we can add a ‘False Positive’ tag and close the alert. Adding a simple tag such as false positive can help measure cases and provide insight into tuning opportunities.
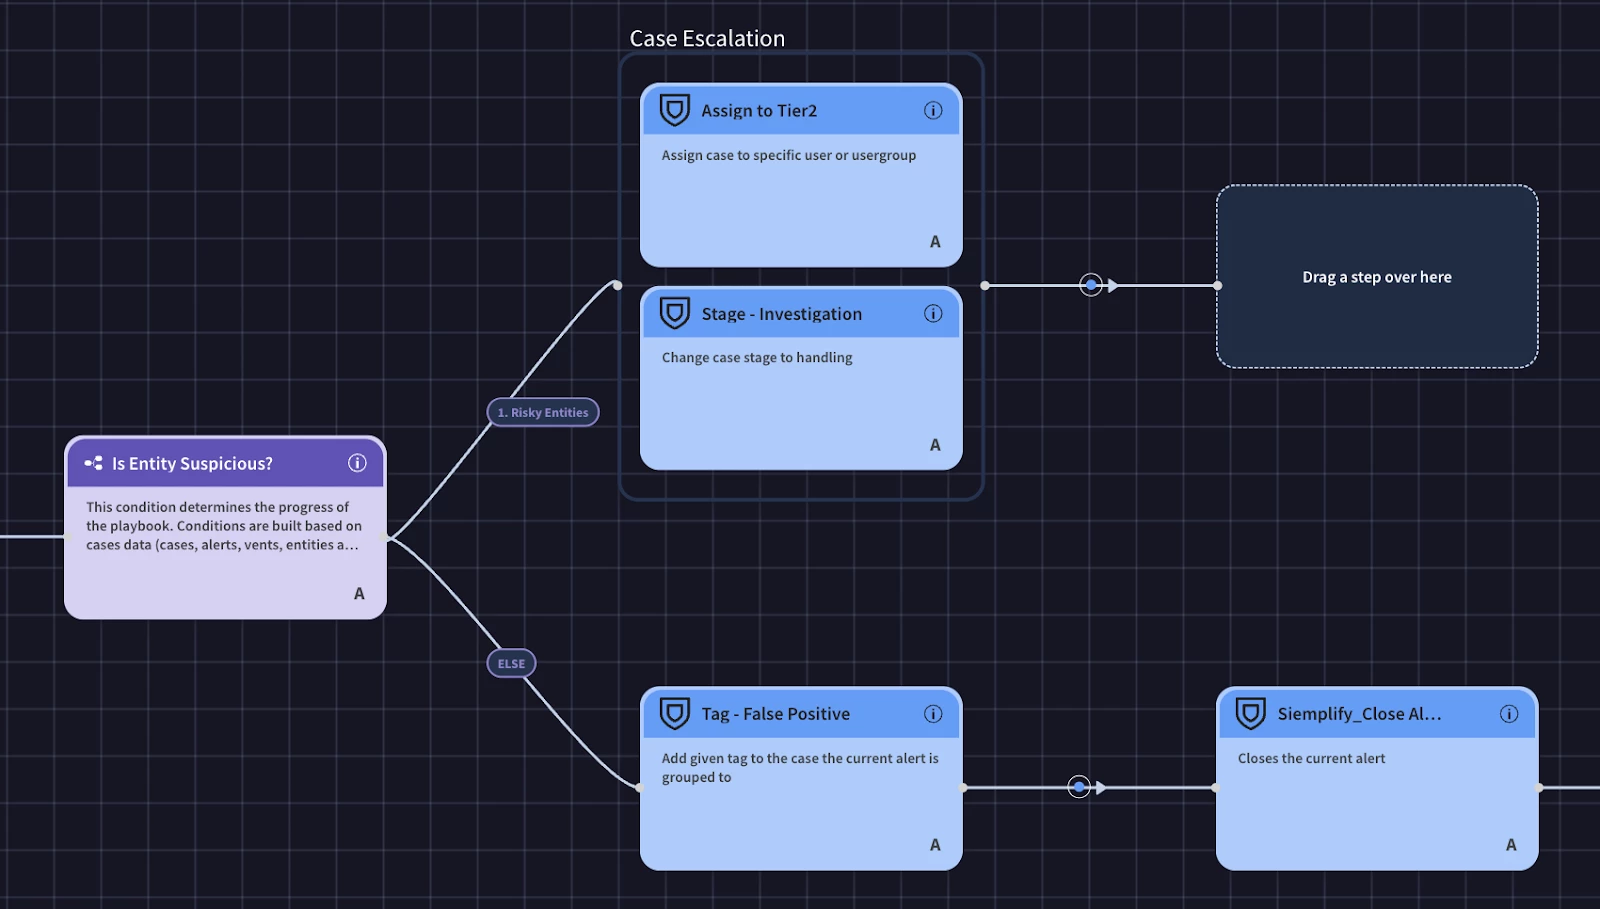
As seen in the above screenshot, we’ve started building out the branch to escalate the case with a suspicious entity to the analyst. We take advantage of parallel actions to assign the case and move the case to the next phase. Now we need to prompt the analyst to review the case and decide if this is an incident or if it is a false positive. We’ll use a multiple choice question here.
The primary benefit of using a Multiple Choice Question in a playbook is that it standardizes human decision-making at critical junctures. Unlike an open-ended manual task, this action presents an analyst with a predefined set of choices. This structures the response process, eliminates ambiguity, and ensures the playbook can reliably continue down a specific, pre-built logic branch based on the analyst's selection. It's the ideal way to guide an analyst through a complex decision, ensuring they only select from a list of valid, anticipated outcomes.
In your malware detection playbook, a Multiple Choice Question is perfect for the triage or initial assessment phase. After the playbook has enriched the alert with details about the file, user, and endpoint, it can pause and present a question to the analyst: "Based on the enrichment data, what is the initial assessment of this alert?" The predefined answers could be "Likely True Positive - High Risk," "Needs Deeper Investigation," or "Likely False Positive." Based on the analyst's choice, the playbook then branches to the appropriate workflow, whether that's initiating immediate containment for a high-risk alert, launching a sandbox for deeper investigation, or beginning the case closure process for a false positive.
Our multiple question will simply ask the analyst to review the case details and to select if it is a true or false positive.
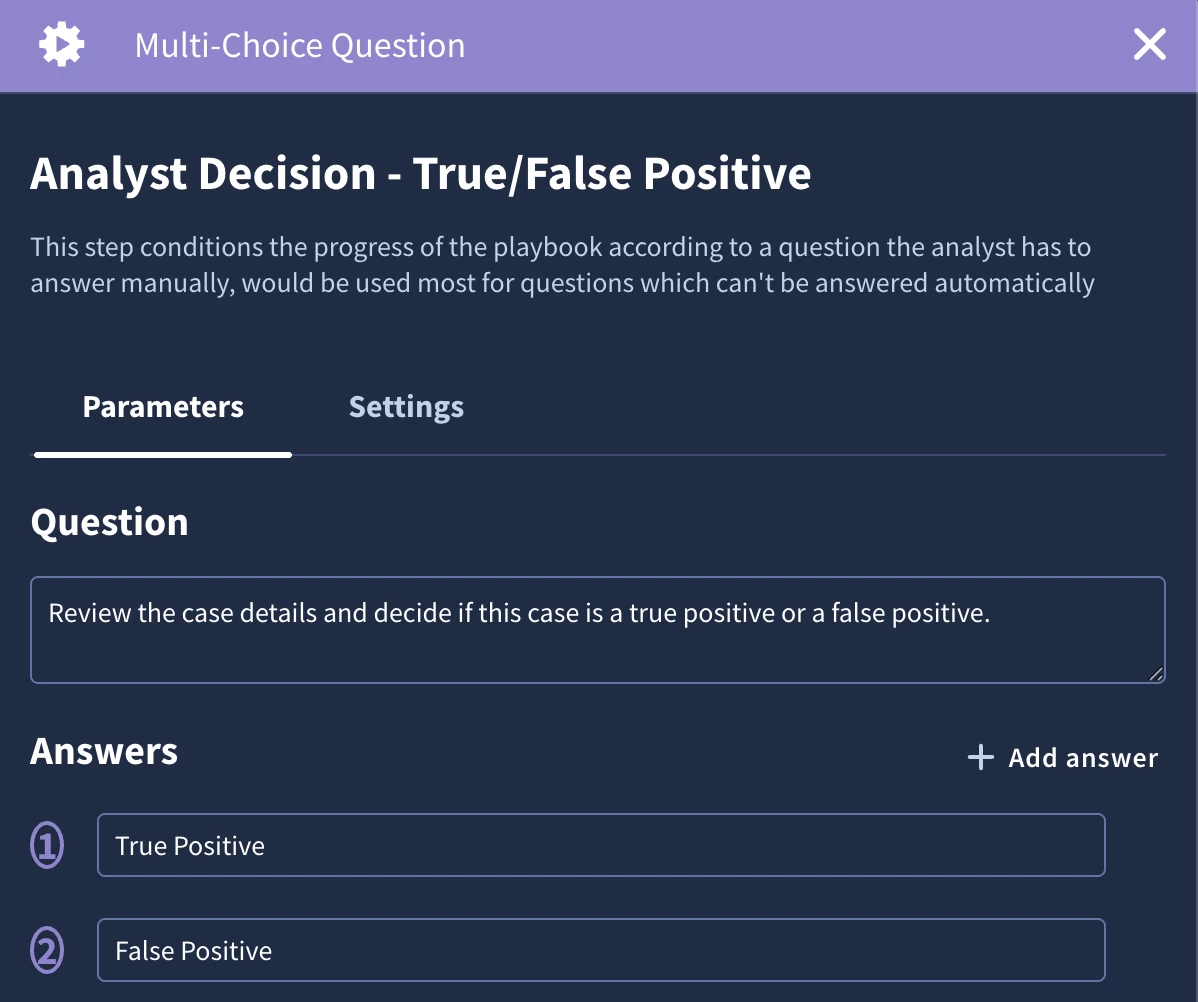
Since the False Positive selection will follow the same steps as we already defined, we can merge the logic paths and reuse the same logic
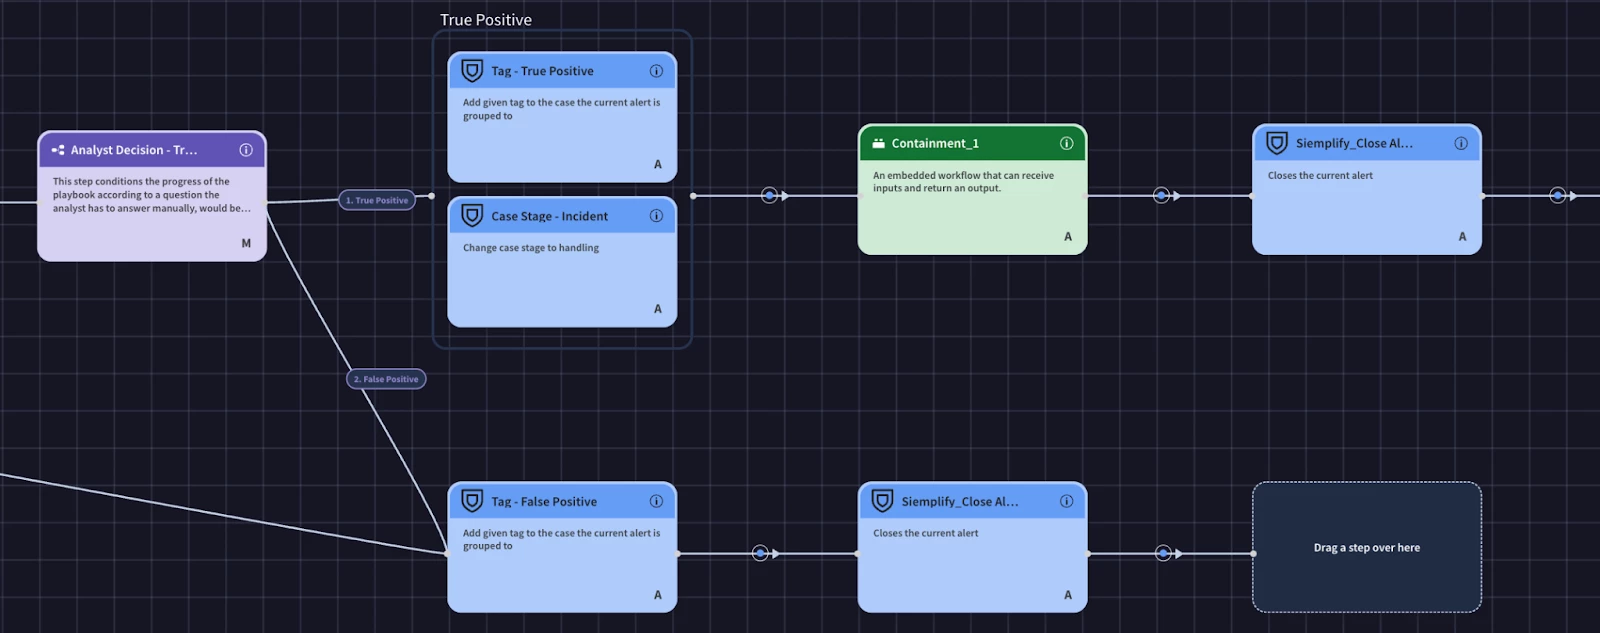
Now we can finish the true positive branch. We’ll add the true positive tag, change the case stage, add the containment block, and finally the close alert action.
Now that our playbook logic is implemented, we can work on our view. The fundamental benefit of a Playbook View is to transform the analyst experience by creating a purpose-built, custom user interface for specific security incidents. The goal is to move beyond a generic alert layout and present a highly relevant, consolidated screen that streamlines an analyst's workflow. By designing a view directly within the playbook, you ensure that as soon as an analyst opens an alert, they are immediately presented with the most critical data fields and actionable insights, drastically reducing the time they spend manually gathering context and navigating between different menus.
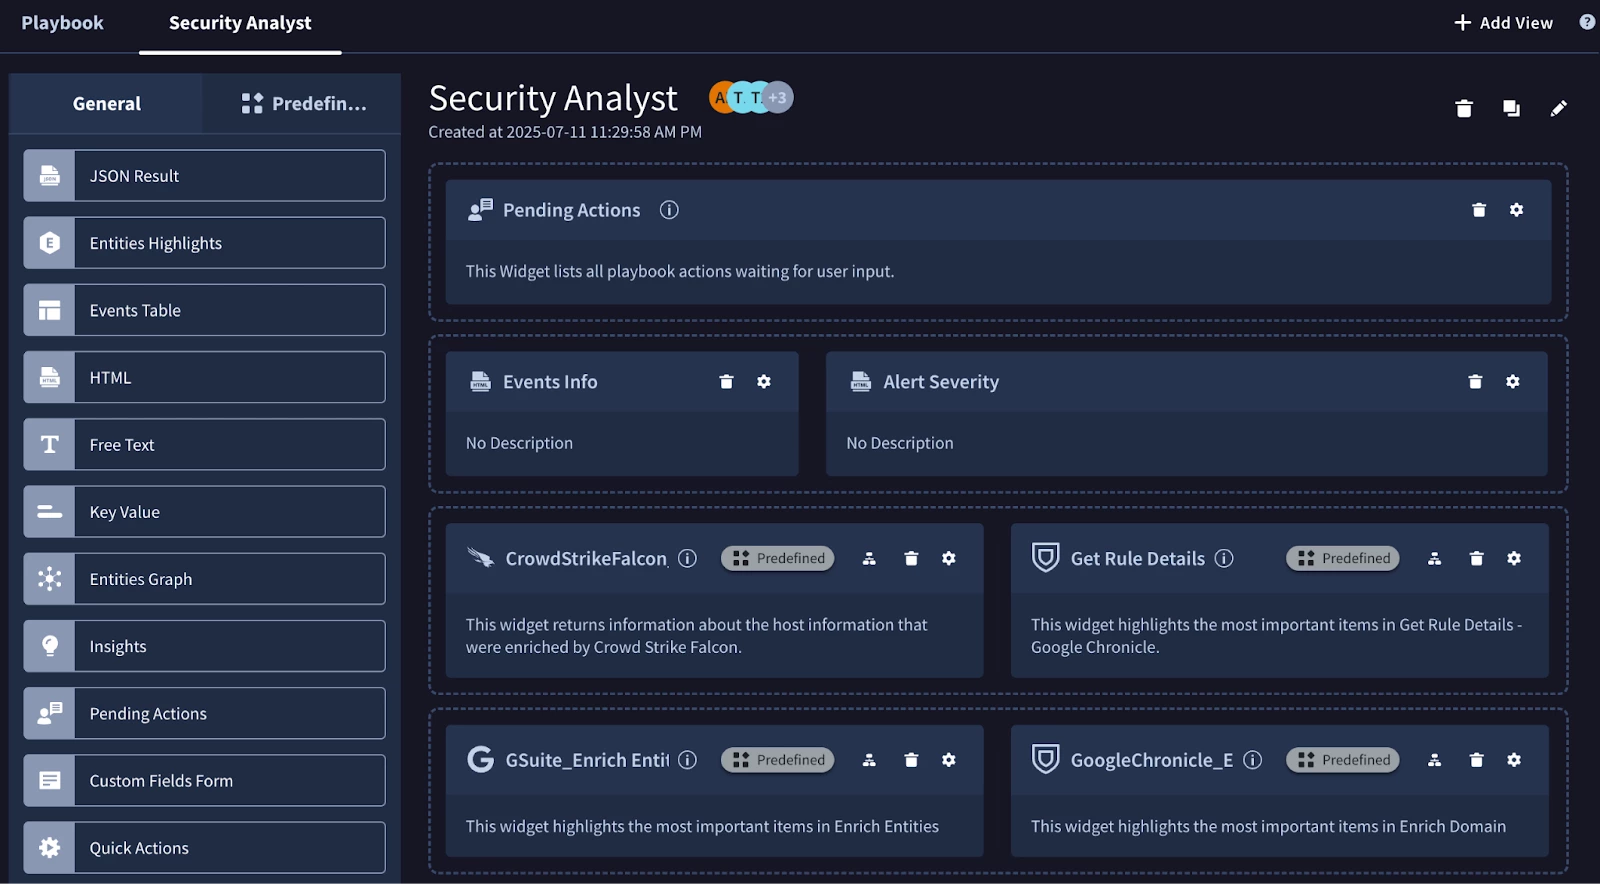
A key element of this feature is the use of prebuilt widgets. Google SecOps provides a variety of these widgets that you can drag and drop into your custom view. These range from simple widgets that display key-value pairs or entity details, to more advanced ones like an HTML widget for custom-formatted data or even widgets that are automatically included with certain integrations, like a VirusTotal analysis summary. This modular approach allows a playbook author without deep UI design skills to easily construct a clean, professional, and highly functional view that surfaces the right information at the right time.
Extending this capability further, Playbook Views are designed to be role-specific, which is a critical function in any mature Security Operations Center (SOC). You can create multiple views within the same playbook and assign each one to a different user role. This means a Tier 1 analyst, a Tier 3 threat hunter, and a SOC Manager can all look at the same alert but be presented with a completely different interface tailored to their specific responsibilities and technical depth.
Ultimately, by leveraging these features, you move from a one-size-fits-all alert screen to an intelligent, responsive interface that adapts to both the incident type and the analyst's role. This streamlines the entire investigative process, reduces cognitive load on your security team, enforces consistency, and ensures that every analyst, regardless of their tier, has immediate access to the exact information they need to perform their job effectively.
In our example we’re going to reduce our time to value by leveraging the predefined widgets. We’re also going to include the pending actions widget which is crucial for our use case because we are prompting analysts in our playbook.
Now that we’ve completed the playbook, it is ready to be turned on and run on alerts.