


I’ve saved this one for last even though I realize it might be the most frequently used entity graph to data table integration command. The previous two commands, graph_override and graph_exclude follow a similar process and use the same fields that were defined during the creation of the data table. Append is a bit of a different animal, and so it made sense to cover it after the other two.
graph_append
The graph_append command differs from the previous commands, both from a data preparation perspective within the data table and a syntax perspective. Before we get into the syntax differences, it is important to understand the data preparation component because this will impact both the speed and quality of your rules.
The most important part of data preparation as it pertains to graph_append is that the data table requires time ranges that map to the entity graph fields metadata.interval_start_time.seconds and metadata.interval_end_time.seconds. This provides a time boundary for the rows in the data table to be considered in the rule once appended to the entity graph.
Another aspect of data preparation is setting us up for the best possible outcome when it comes to integrating the data table with the entity graph and any existing rules that exist. A common theme in the rules that I write is that when I use the entity graph, I attempt to reduce the number of rows in the entity graph that are compared to my events.
Remember that the entity graph contains contextual data for assets, IPs, domains, users, file hashes and more as well as prevalence, first and last seen, local and global threat intelligence.
Did you know that just by adding these two lines to a search or rule that uses the entity graph, you will reduce the millions of rows in the entity graph to a much smaller subset of data?
graph.metadata.entity_type = "USER"
graph.metadata.source_type = "ENTITY_CONTEXT"
With some simple logic like this, why not improve performance?
That’s a long way of saying that metadata.entity_type and metadata.source_type are important fields and should be in rules with the entity graph to better focus the rule. So, if we want our data table that is being appended to work with existing rules that use this logic, it makes good sense to also make sure that these columns are in the data table and are mapped to the entity graph.
With that background, here is a visual representation of a small subset of the entity graph and the data table that we will be appending together.

The result of using the graph_append command is an ephemeral entity graph that can be used by a rule. We will use this hybrid entity graph and data table throughout this blog and the next one. Notice how we have columns that map to the entity graph as well as an additional column that is unique to the data table.
Creating a Data Table with Entity Field Mapping
With the basics in place, let’s talk about creating the data table that we will append to the entity graph. In a previous blog, we had used the API to create a data table and load the Cisco top 1 million domains list.
This time, I want to show you two methods to create the data table with the entity field mapping. The first is just creating the data table structure and the second will create the structure and populate its contents using a csv. This way you have examples of both and can use whichever you would prefer.
In this example, we are creating the data structure. Make sure you have your region, GCP project number and customer ID handy. The project number and customer ID can be found on the SIEM Settings - Profile page.
This data table will have eight columns. Notice that the numbering for the columns starts at 0. The name of the column in the data table aligns with original_column and the mapped_column_path aligns to the field in the entity graph. In our example, the userid is the only key_column. This means that if the write_row command is executed from a search or a rule, a userid that does not match the value in this data table column will be treated as a new row and appended to the data table. If the userid matches, the row will be updated. The one column that is different from all the others is column five which is not mapped to the entity graph and just has a column_type of 1 which maps to string.
curl -X POST \
'https://<region>-chronicle.googleapis.com/v1alpha/projects/<gcp_project_number>/locations/<region>/instances/<customer_id>/dataTables?dataTableId=<data_table_name>' \
  -H "Authorization: Bearer $(gcloud auth print-access-token)" \
  -H "Content-Type: application/json" \
  -d '{
    "name": "projects/<gcp_project_number>/locations/<region>/instances/<customer_id>/dataTables/<data_table_name>",
    "description": "Ad hoc list of users to run rules using entity graph against using graph_append",
    "column_info": [
        {
            "column_index": 0,
            "original_column": "userid",
            "key_column": true,
            "mapped_column_path": "entity.user.userid"
        },
        {
            "column_index": 1,
            "original_column": "entity_type",
            "mapped_column_path": "metadata.entity_type"
        },
        {
            "column_index": 2,
            "original_column": "source_type",
            "mapped_column_path": "metadata.source_type"
        },
        {
            "column_index": 3,
            "original_column": "organization",
            "mapped_column_path": "entity.user.company_name"
        },
        {
            "column_index": 4,
            "original_column": "state",
            "mapped_column_path": "entity.user.office_address.state"
        },
        {
            "column_index": 5,
            "original_column": "probationary",
            "column_type": 1
        },
        {
            "column_index": 6,
            "original_column": "validity_start_time",
            "mapped_column_path": "metadata.interval.start_time.seconds"
        },
        {
            "column_index": 7,
            "original_column": "validity_end_time",
            "mapped_column_path": "metadata.interval.end_time.seconds"
        }
    ]
}'

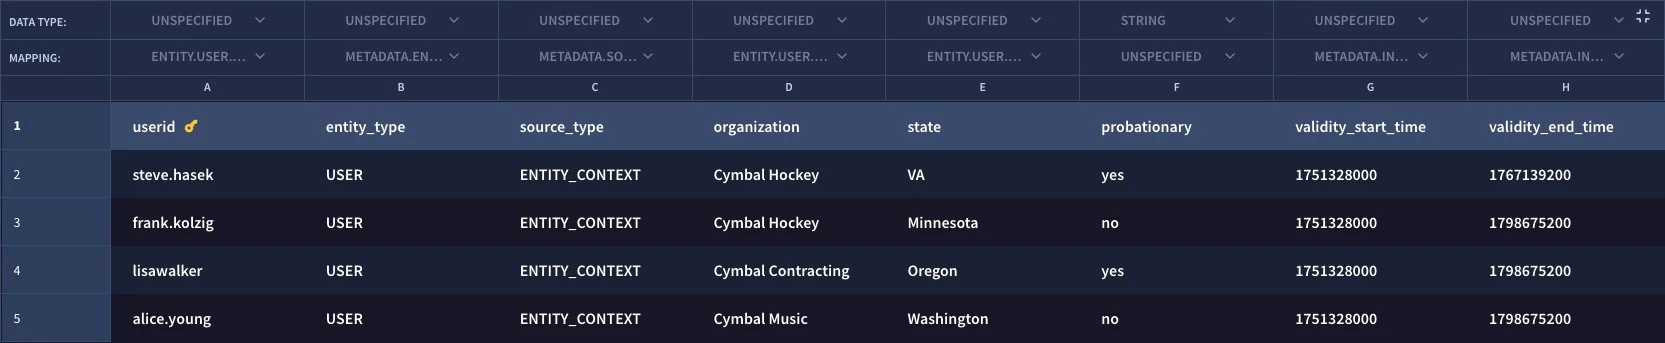
When we execute this curl statement, the result will be an empty data table with a header that looks like this. From here, you could copy and paste a csv into the UI to populate the data table.
Loading Data as a Data Table Is Created (with Entity Field Mapping)
Alternatively, if you wanted to load the csv file in a single shot as the data table is being created, you could do this as well.
For reference, here is the example csv named append-user-list.csv that I will be using.
userid,entity_type,source_type,organization,state,probationary,validity_start_time,validity_end_time
steve.hasek,USER,ENTITY_CONTEXT,Cymbal Hockey,VA,yes,1751328000,1767139200
frank.kolzig,USER,ENTITY_CONTEXT,Cymbal Hockey,Minnesota,no,1751328000,1798675200
lisawalker,USER,ENTITY_CONTEXT,Cymbal Contracting,Oregon,yes,1751328000,1798675200
alice.young,USER,ENTITY_CONTEXT,Cymbal Music,Washington,no,1751328000,1798675200
curl -X POST \ 'https://<region>-chronicle.googleapis.com/upload/v1alpha/projects/<gcp_project_number>/locations/<region>/instances/<customer_id>/dataTables:bulkCreateDataTableAsync' \
-H "Authorization: Bearer $(gcloud auth print-access-token)" \
-H "X-Return-Encrypted-Headers: all_response" \
-H "Content-Type: multipart/form-data" \
-H "X-Goog-Upload-Protocol: multipart" \
-F 'data_table={
"data_table_id": "<data_table_name>",
"data_table": {
"name": "projects/<gcp_project_number>/locations/<region>/instances/<customer_id>/dataTables/<data_table_name>",
"description": "Ad hoc list of users to run rules using entity graph against using graph_append",
"column_info": [
{
"column_index": 0,
"original_column": "userid",
"key_column": true,
"mapped_column_path": "entity.user.userid"
},
{
"column_index": 1,
"original_column": "entity_type",
"mapped_column_path": "metadata.entity_type"
},
{
"column_index": 2,
"original_column": "source_type",
"mapped_column_path": "metadata.source_type"
},
{
"column_index": 3,
"original_column": "organization",
"mapped_column_path": "entity.user.company_name"
},
{
"column_index": 4,
"original_column": "state",
"mapped_column_path": "entity.user.office_address.state"
},
{
"column_index": 5,
"original_column": "probationary",
"column_type": 1
},
{
"column_index": 6,
"original_column": "validity_start_time",
"mapped_column_path": "metadata.interval.start_time.seconds"
},
{
"column_index": 7,
"original_column": "validity_end_time",
"mapped_column_path": "metadata.interval.end_time.seconds"
}
]
}
};type=application/json' \
-F 'file=@append-user-list.csv;type=application/octet-stream' \
--verbose -i
This curl command will create the table with the structure and mapping to the entity graph like the previous command, but this time, it will upload the file append-user-list.csv and load it so we are left with a data table that looks like the one above.
With the data table loaded with user data and additional metadata like the entity type, source type and most importantly the interval start and end times, this data table is ready to be used to extend the entity graph and provide detection engineers with a way to broaden their reach with detection rules beyond the data that exists in the entity graph.
If you are planning to use graph_append, remember that:
- Data preparation is important so plan ahead and make sure the data table has fields that map to metadata.interval.start_time.seconds and metadata.interval.end_time.seconds
- Add in fields like metadata.entity_type and metadata.source_type and others that you commonly use in rules that use the entity graph to ensure rule execution is efficient
- Use the example curl commands as a starting point to customize your own data table creation and loading of data
One more thing. The interval time in the data table (and the entity graph) is crucial to determine if the entity will be considered in the rule or not. In the examples above, my time intervals are pretty wide, six to eighteen months actually. I don’t expect yours will be that wide but make sure that when you are populating the data in your data table that the interval times cover the time ranges that the rules are running in. And if you make a mistake and put the wrong time interval values in, don’t worry, you can modify the values in the data table!
We are going to stop here for today, but next week we will be back and apply this data table to rules using the graph_append command in our rules.